Wiring 2 Subs to Mono Amp: Step-by
Wiring two subwoofers to a mono amplifier is a smart way to get deeper bass, more power, and a better music experience in your car or home audio system. Many beginners feel unsure about the right way to connect two subs to one amp.
The process may seem confusing, but with the right steps, it’s simple and safe. This article will guide you through everything you need to know— from basic concepts and wiring options, to step-by-step instructions and common mistakes to avoid. You’ll also see practical examples, clear diagrams, and comparison tables to make the process easy to understand.
Understanding Mono Amplifiers And Subwoofers
Mono amplifiers, sometimes called monoblock amps, are designed to power subwoofers. They provide one channel of output, which is perfect for bass frequencies. Subwoofers are speakers made to handle low-frequency sounds, giving you the deep, powerful bass that standard speakers can’t deliver.
Why use a mono amp for subs?
- Mono amps deliver more power per channel compared to multi-channel amps.
- They are stable at low impedance (ohm) loads, which is important for driving subwoofers.
- They produce clean, distortion-free bass.
Key terms:
- Impedance (Ohms): Resistance to electrical current. Subs and amps are rated in ohms.
- Wattage: Power handling or output, measured in watts (W).
- Series wiring: Connecting subs end-to-end.
- Parallel wiring: Connecting subs side-by-side.
Understanding these basics helps you choose the right wiring method for your setup.
Why Wiring Matters: Series Vs. Parallel
The way you wire two subs to a mono amp changes the total impedance (ohms) that the amp “sees. ” This affects both the amp’s power output and the safety of your equipment.
Series Wiring
How it works:
- The positive terminal of the amp connects to the positive of the first sub.
- The negative of the first sub connects to the positive of the second sub.
- The negative of the second sub connects to the amp’s negative.
Result:
- Impedance adds together.
- Example: Two 4-ohm subs wired in series = 8 ohms total.
Parallel Wiring
How it works:
- Both sub positives connect to the amp’s positive.
- Both sub negatives connect to the amp’s negative.
Result:
- Impedance splits.
- Example: Two 4-ohm subs wired in parallel = 2 ohms total.
Series Vs. Parallel: Quick Comparison
| Wiring Type | Total Impedance (2 x 4Ω subs) | Power Output | Use Case |
|---|---|---|---|
| Series | 8Ω | Lower | Safer for older amps |
| Parallel | 2Ω | Higher | Modern mono amps |
Key Insight: Always check your amp’s minimum impedance rating. Never wire subs below what the amp supports, or you risk overheating or damaging the amp.
Credit: www.diymobileaudio.com
Choosing The Right Wiring Method
Before connecting your subs, you need to know:
- The impedance of each subwoofer (written on the back or in the manual)
- The minimum impedance your mono amp can handle (found in the amp’s manual or on its label)
Common Setups
- Two 4-ohm single voice coil (SVC) subs:
- Series wiring = 8 ohms
- Parallel wiring = 2 ohms
- Two 2-ohm SVC subs:
- Series wiring = 4 ohms
- Parallel wiring = 1 ohm
Example: Wiring Two 4-ohm Subs
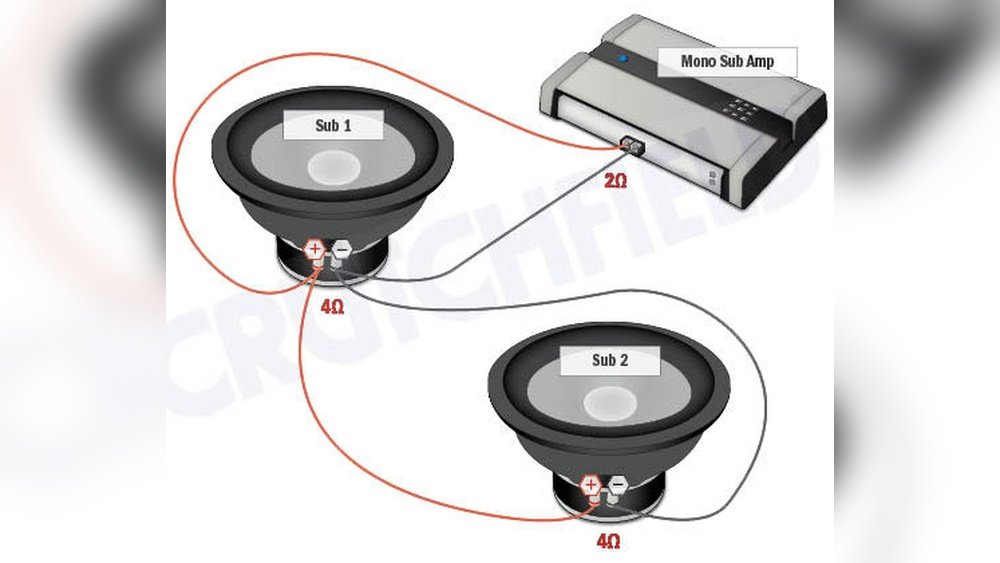
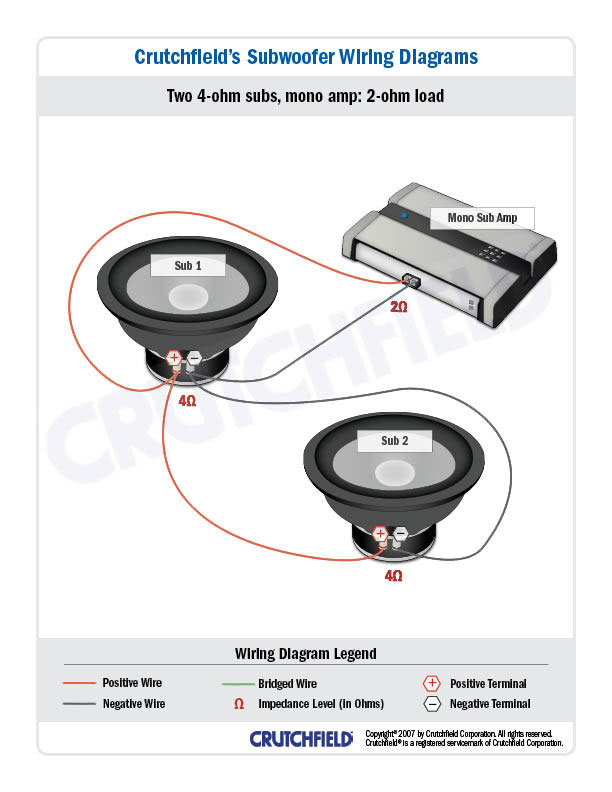
Suppose you have a mono amp rated for 2-ohm loads and two 4-ohm SVC subs. Parallel wiring is best. This gives a 2-ohm load, letting your amp deliver the most power safely.
Practical Data:
- Amp RMS power at 2 ohms: 500W
- Each sub’s RMS: 250W
Wiring in parallel lets each sub get its rated power without stressing the amp.
Step-by-step Guide: Wiring 2 Subs To A Mono Amp
Let’s walk through the process using two 4-ohm SVC subwoofers as an example. Always disconnect your battery or power source before starting.
Tools And Materials Needed
- Speaker wire (12- or 14-gauge recommended)
- Wire cutters/strippers
- Screwdriver (for terminals)
- Electrical tape or wire connectors
Step 1: Plan Your Wiring
Decide if you’re wiring in series or parallel. Most modern mono amps work best with parallel wiring for two 4-ohm subs.
Step 2: Prepare Your Wires
Cut enough wire to reach from the amp to each sub. Strip about half an inch of insulation from the ends.
Step 3: Connect The Subwoofers
For Parallel Wiring:
- Twist together both sub positives, and connect to the amp’s positive.
- Twist both sub negatives, and connect to the amp’s negative.
Diagram:
- Amp + → Sub1 + and Sub2 +
- Amp – → Sub1 – and Sub2 –
For Series Wiring:
- Amp + → Sub1 +
- Sub1 – → Sub2 +
- Sub2 – → Amp –
Diagram:
- Amp + → Sub1 +
- Sub1 – → Sub2 +
- Sub2 – → Amp –
Step 4: Secure Connections
Use wire connectors or tape to keep connections tight and safe. Loose wires can cause distortion or damage.
Step 5: Double-check Everything
Make sure polarity (+ and -) is correct. Wrong polarity causes weak bass or phase issues.
Step 6: Reconnect Power And Test
Turn on your amp and play some music with deep bass. Listen for clear, strong bass with no rattles or distortion.

Credit: www.youtube.com
Wiring Dual Voice Coil (dvc) Subs
Some subwoofers have two voice coils (DVC) instead of one (SVC). This gives more wiring options and flexibility.
Example: Two 4-ohm Dvc Subs
Each sub has two 4-ohm coils. You can wire the coils and subs together in different ways.
Parallel Wiring Both Coils and Both Subs:
- Each sub’s coils wired in parallel (each sub = 2 ohms)
- Both subs wired in parallel (total = 1 ohm)
Series-Parallel Combination:
- Each sub’s coils wired in series (each sub = 8 ohms)
- Both subs in parallel (total = 4 ohms)
Why Dvc Matters
DVC subs give you more choices for matching your amp’s best power output. For example, if your amp is only stable at 4 ohms, you can wire two 4-ohm DVC subs in series-parallel for a perfect match.
Insight: Beginners often buy DVC subs but wire only one coil, losing half the sub’s capability. Always use both coils.
Common Wiring Mistakes (and How To Avoid Them)
Even small errors can cause poor sound or damage your gear. Watch out for these mistakes:
- Ignoring amp’s minimum impedance: Never wire subs below what your amp allows.
- Mixing different sub types: Always use identical subs for balanced sound.
- Wrong polarity: Double-check that positives and negatives match.
- Using thin wire: Use thick (12- or 14-gauge) wire for strong bass and safety.
- Loose connections: Make sure wires are tight and secure.
Example: Wiring two 4-ohm subs in parallel to a 1-ohm-only amp can cause overheating, distortion, or amp shutdown.
Credit: www.crutchfield.com
Power Handling And Matching
Getting the best bass means matching your amp’s power to your subs.
Key Points:
- Amp RMS power should match or be slightly below the combined RMS rating of your subs.
- Never overpower subs; it can cause damage.
- Underpowering is safer, but may cause weak bass.
Example Data
| Subwoofer RMS | Number of Subs | Total RMS | Recommended Amp RMS |
|---|---|---|---|
| 250W | 2 | 500W | 400-500W |
| 400W | 2 | 800W | 700-800W |
Pro tip: Go for an amp with a bit less power than your subs’ combined RMS if you’re not experienced with gain settings.
Tips For Best Performance
To get deep, clean bass and keep your system healthy:
- Tune your amp: Adjust gain, low-pass filter, and bass boost settings for your music style.
- Enclose subs properly: Use a sealed or ported box designed for your sub size.
- Avoid clipping: If you hear distortion, lower the gain.
- Ventilation: Mount the amp where it can stay cool.
Beginner insight: Many people skip tuning. Even a perfect wiring job sounds bad without good amp settings.
Safety Precautions
Working with car or home audio systems means handling electrical current. Stay safe:
- Disconnect the battery before working in a car.
- Don’t touch bare wires with the system powered on.
- Keep wires away from moving parts or sharp edges.
- Use fuses close to the amp for protection.
Real-world Example: Step-by-step
Let’s walk through a real setup:
- Two 4-ohm SVC subs, each rated at 300W RMS
- Mono amp rated at 600W RMS at 2 ohms
Steps:
- Disconnect car battery.
- Cut and strip two equal lengths of 12-gauge wire.
- Connect both sub positives to amp positive, both sub negatives to amp negative (parallel wiring).
- Double-check connections.
- Reconnect battery and test.
Result: Each sub gets 300W, amp runs safely at 2 ohms, and bass is loud and clean.
Practical Table: Wiring Methods And Final Impedance
Here’s a quick reference for wiring two subs of different types:
| Sub Type | Wiring | Final Impedance | Amp Setting |
|---|---|---|---|
| Two 4Ω SVC | Parallel | 2Ω | 2Ω output |
| Two 4Ω DVC | Series-Parallel | 4Ω | 4Ω output |
| Two 2Ω SVC | Parallel | 1Ω | 1Ω output (if supported) |
Frequently Asked Questions
Can I Wire Two Different Subs To One Mono Amp?
It’s not recommended. Using different subs (size, brand, or impedance) can cause unbalanced sound and may damage your amp or speakers. Always use matching subs for best results.
Is Parallel Or Series Wiring Better For Two Subs?
Parallel wiring is usually better for modern mono amps. It allows you to get a lower impedance load, which means more power and louder bass. But always check your amp’s minimum impedance rating first.
Can I Use Any Speaker Wire For Subwoofers?
No. Use thick wire (12- or 14-gauge) for subwoofers. Thin wire can overheat, cause voltage loss, and reduce bass quality. Always use quality wire made for audio systems.
What Happens If I Wire My Subs Wrong?
Wiring mistakes can cause distortion, weak bass, or even damage your amp and subs. Double-check all connections and make sure impedance matches your amp’s rating.
Where Can I Find Safe Wiring Diagrams?
For clear diagrams and advanced guides, see the Crutchfield Subwoofer Wiring Guide. This is a trusted source in car audio.
Setting up two subwoofers with a mono amp can transform your audio system, giving you deep, powerful bass. With the right wiring, safe connections, and a little patience, even a beginner can get pro-level results. Take your time, double-check everything, and enjoy the music!