How to Build a Box for a Subwoofer: Step-by-Step Guide
Building a box for a subwoofer can transform your music experience. A well-designed box improves bass, protects your subwoofer, and lets you enjoy deeper sound. If you’re new to woodworking or car audio, this project might look difficult. But with clear steps, some tools, and attention to detail, you can make a professional-quality subwoofer box yourself.
This guide breaks down the process into simple steps. You’ll learn how to choose the right box type, gather materials, measure, cut, assemble, and finish your box. Along the way, you’ll also discover common mistakes to avoid and tips that even experienced DIYers sometimes miss.
Understanding Subwoofer Boxes
Before you start, it’s important to know why the subwoofer box matters. The box controls how the subwoofer moves air. The shape, size, and material all affect how your bass sounds.
Main types of subwoofer boxes:
- Sealed box – Simple design, tight and accurate bass, smaller size
- Ported (vented) box – Louder, deeper bass, larger size, includes a port (hole or tube)
- Bandpass box – Complex design, very loud within a narrow frequency, difficult for beginners
Most beginners start with a sealed box. It’s easier to build, needs fewer calculations, and fits in most cars or rooms.
Why The Right Box Size Matters
Each subwoofer has an ideal box volume, usually listed as internal volume in cubic feet (ft³) or liters (L). Using the wrong size can make your bass sound weak or distorted.
For example, a typical 12-inch subwoofer might need a sealed box with an internal volume of 1.25 ft³. If the box is too small, bass sounds “tight” but weak. Too large, and the sound becomes “boomy.”
Manufacturers always provide recommended box sizes. Check your subwoofer’s manual or the brand’s website for this information.
Planning Your Subwoofer Box
Good planning saves you time and materials. Here’s how to get started:
- Choose Your Subwoofer: Know the size (e.g., 10”, 12”) and model.
- Find the Recommended Box Volume: Check the manual or brand website.
- Decide Box Type: Beginners should start with a sealed box.
- Measure Your Space: Make sure the box will fit where you want to place it.
Example: Planning For A 12-inch Subwoofer
- Subwoofer: 12-inch, 500W RMS
- Recommended sealed box volume: 1.25 ft³ (35.4 liters)
- Area available in car trunk: 18” (H) x 20” (W) x 15” (D)
Materials And Tools You Need
Building a strong box means choosing the right materials. For the best sound, use medium-density fiberboard (MDF). It’s dense, easy to cut, and doesn’t vibrate like plywood.
Materials
- MDF board (3/4” or 19mm thick) – one sheet (4’ x 8’) is usually enough
- Wood glue – strong and dries clear
- Wood screws – 1.5” to 2” long
- Silicone caulk – for sealing edges
- Speaker wire – 12- or 14-gauge
- Speaker terminal cup – for connecting wires outside the box
- Carpet or vinyl wrap (optional) – for a finished look
Tools
- Circular saw or table saw
- Jigsaw (for cutting the speaker hole)
- Drill and drill bits
- Screwdriver
- Tape measure
- Carpenter’s square
- Pencil
- Clamps (optional but helpful)
- Sandpaper
Calculating Box Dimensions
This is a critical step. You want the internal volume of your box to match the subwoofer’s requirements.
Formula for box volume (rectangular box):
Length × Width × Height (in inches) ÷ 1728 = Volume in ft³
Example:
You need a box with 1. 25 ft³ internal volume.
Let’s try these dimensions:
- Height: 14”
- Width: 18”
- Depth: 17”
14 × 18 × 17 = 4284 In³
4284 ÷ 1728 = 2.48 Ft³ (too Big)
Try:
- Height: 13”
- Width: 16”
- Depth: 13”
13 × 16 × 13 = 2704 In³
2704 ÷ 1728 = 1.56 Ft³ (still A Bit Big)
Try:
- Height: 12”
- Width: 15”
- Depth: 12”
12 × 15 × 12 = 2160 In³
2160 ÷ 1728 = 1.25 Ft³ (perfect)
Tip:
Subtract the thickness of the MDF from all sides to get the internal measurements. For 3/4” MDF, reduce each dimension by 1.5”.
Credit: condicor.co.uk
Cutting The Panels
With your measurements ready, mark your cuts on the MDF.
Typical cuts for a sealed box:
- Front and back panels: 2 pieces (12” × 15”)
- Side panels: 2 pieces (12” × 12”)
- Top and bottom panels: 2 pieces (15” × 12”)
Steps:
- Measure twice, cut once. Use a square for straight lines.
- Cut all pieces with a circular or table saw.
- Use a jigsaw to cut the subwoofer hole. Mark the center, drill a starter hole, and cut slowly.
- Lightly sand the edges for a smooth fit.
Cutting Data Comparison
Here’s a quick look at MDF thickness options:
| MDF Thickness | Sound Quality | Weight | Durability |
|---|---|---|---|
| 1/2” (12mm) | Fair | Light | Low |
| 3/4” (19mm) | Excellent | Medium | High |
| 1” (25mm) | Overkill for most | Heavy | Very high |
For most uses, 3/4” MDF is ideal. It balances strength, sound quality, and weight.
Assembling The Subwoofer Box
Proper assembly ensures the box is airtight and durable.
Steps:
- Dry-fit all panels before gluing or screwing.
- Apply wood glue to the edges. Join panels together.
- Use clamps to hold panels. If you don’t have clamps, add screws every 4 inches.
- Screw panels together. Drill pilot holes first to prevent splitting.
- Wipe off any excess glue.
- Let the box dry for at least 1 hour before moving it.
Important:
The box must be airtight. Air leaks reduce bass and cause noise.
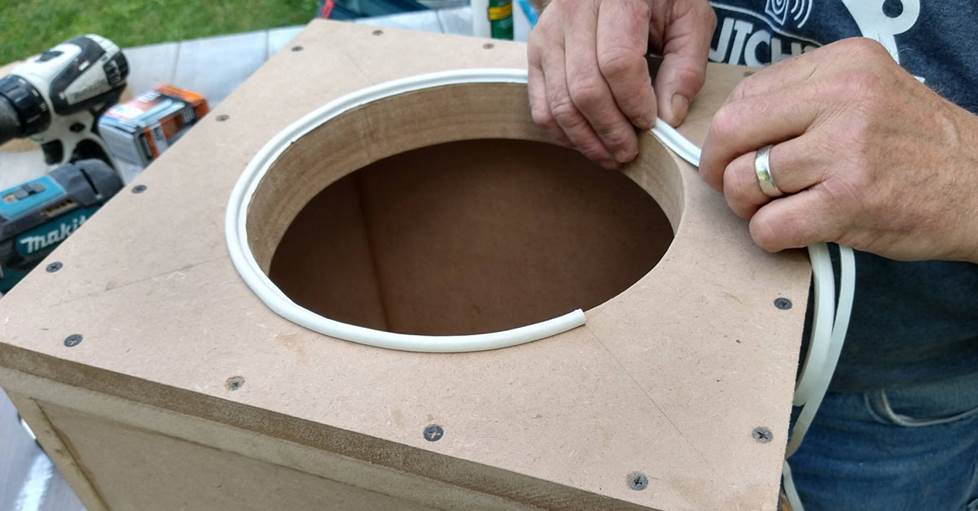
Sealing And Finishing
- Run a bead of silicone caulk along all inside seams. Smooth it with your finger.
- Install the speaker terminal cup on the back panel. Seal around it with caulk.
- After caulk dries, sand any rough spots outside the box.
Optional:
Wrap the box in carpet or vinyl for a professional look.
Credit: www.crutchfield.com
Cutting The Speaker Hole
The subwoofer hole must fit tightly. Most 12-inch subwoofers need an 11-1/8” hole, but check your model’s specs.
How to cut the hole:
- Mark the center of the front panel.
- Use a compass or trace the subwoofer’s gasket.
- Drill a small hole near the edge as a starter.
- Insert the jigsaw and cut slowly along the line.
- Test-fit the subwoofer. The fit should be snug.
Pro tip:
Mark the mounting holes for screws and pre-drill them. This prevents splitting the MDF.
Wiring The Box
Good wiring prevents noise and power loss.
Steps:
- Install the speaker terminal cup. Run short wire leads from the cup to the subwoofer hole.
- Solder or crimp the wire ends for a solid connection.
- Use 12- or 14-gauge wire for best power transfer.
Example wiring options:
| Wire Gauge | Max Length (ft) | Best For |
|---|---|---|
| 12 AWG | Up to 30 | High-power subs |
| 14 AWG | Up to 20 | Medium-power subs |
| 16 AWG | Up to 10 | Low-power, short runs |
Tip:
Label your wires for easy troubleshooting later.
Mounting The Subwoofer
Once the box is finished and wired, install the subwoofer.
How to do it:
- Place the subwoofer in the hole. Align mounting holes.
- Connect the wires from the terminal cup to the subwoofer.
- Use the provided screws to secure the subwoofer.
- Do not overtighten—MDF can strip easily.
Finishing Touches:
- Add grill covers if your subwoofer might get bumped.
- Put rubber feet or foam tape on the bottom to reduce vibration.
Testing Your Subwoofer Box
Before final installation, test for air leaks and sound quality.
Steps:
- Connect your subwoofer to an amplifier.
- Play music with deep bass.
- Feel for air escaping at seams or the terminal cup.
- Listen for rattles. If you hear any, re-seal the box.
Non-obvious insight:
A small leak can ruin bass quality. Use a lighter or incense stick to see if air is blowing out (be careful with fire).
Common Mistakes To Avoid
- Ignoring box volume: Always match the box size to your subwoofer.
- Skipping caulk: Even small leaks hurt sound.
- Using thin wood: Vibrations will ruin your bass.
- Cutting sloppy holes: Gaps let air escape and reduce performance.
- Not pre-drilling screw holes: MDF splits easily.
Pro tip:
Build the box slightly larger and add wood blocks inside if you need to reduce volume. It’s easier than rebuilding a box that’s too small.
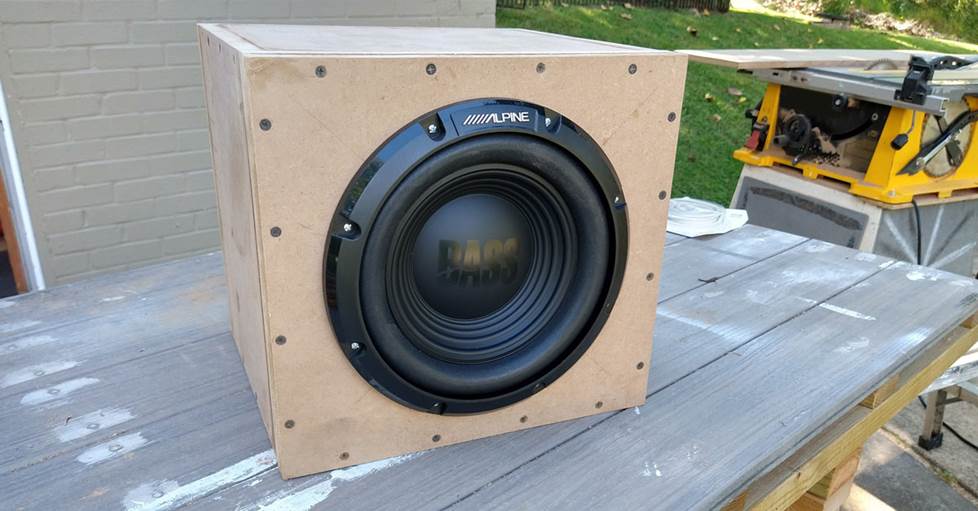
Example Build: 12-inch Subwoofer Sealed Box
Let’s summarize an example build for a standard 12” subwoofer:
- Internal volume needed: 1.25 ft³
- MDF thickness: 3/4”
- Internal box size: 12” (H) x 15” (W) x 12” (D)
- External box size: 13.5” x 16.5” x 13.5”
- Subwoofer hole: 11-1/8” diameter
- Terminal cup hole: 2-1/2” diameter
Follow the steps above for cutting, assembling, sealing, wiring, and mounting. Total build time is about 3–4 hours for most beginners.
Credit: www.crutchfield.com
Frequently Asked Questions
What Is The Best Material For A Subwoofer Box?
The best material is 3/4” MDF. It’s dense, reduces vibration, and creates the best sound for most car and home subwoofer boxes.
How Can I Make My Subwoofer Box Louder?
A ported (vented) box increases loudness compared to a sealed box. But it’s harder to build and tune. For beginners, start with a sealed box. Upgrade to ported later if you want more volume.
Can I Use Plywood Instead Of Mdf?
Plywood can work, but it’s not as dense. Use high-quality, void-free plywood (like Baltic birch) if you must. Avoid particleboard—it’s weak and crumbles easily.
How Do I Calculate The Correct Box Volume?
Measure the internal dimensions (height, width, depth), multiply them, and divide by 1728 for cubic feet. Always subtract the thickness of your panels from the measurements before calculating.
Where Can I Find Box Plans For My Subwoofer?
Many manufacturers share free box designs. You can also use online box calculators or check resources like Crutchfield for trusted guides.
Building your own subwoofer box is a rewarding project. With careful planning and attention to detail, you’ll enjoy powerful bass and a custom look. Take your time, measure carefully, and enjoy the deep sound from your new DIY subwoofer box.