How to Bridge a 4 Channel Amplifier: Unlock Maximum Power
Bridging a 4 channel amplifier can boost your car audio system to a new level. Many car owners want more power for their speakers or subwoofers, but are unsure how to get it. Bridging an amp is one of the simplest and most effective ways to do this.
But what does bridging mean, and how do you do it safely? This article explains everything you need to know, step by step. You’ll learn the basics, see real examples, and discover common mistakes. This guide is designed for beginners, so you don’t need advanced technical knowledge.
What Does Bridging An Amplifier Mean?
Bridging means combining two amplifier channels into one more powerful channel. For example, you can turn a 4 channel amp into two stronger channels. This is useful if you want more power for one or two speakers, like subwoofers.
Key points to know:
- Bridged mode sends the combined power of two channels into a single speaker.
- It’s popular for subwoofers, which need more power than regular speakers.
- Not all amplifiers can be bridged. Always check your amp manual first.
Why Bridge A 4 Channel Amplifier?
Many people ask, “Why not just use a more powerful amp? ” Sometimes, you already have a 4 channel amp and want to make the most of it. Bridging gives you flexibility without buying new equipment.
Top reasons to bridge a 4 channel amp:
- More power for high-demand speakers (like subwoofers).
- Fewer speakers used, so you can focus on sound quality.
- Better bass response for music lovers.
Bridging is especially useful in cars with small space or budgets.
Understanding 4 Channel Amplifier Basics
Before bridging, you must know how a 4 channel amp works. It has four separate outputs, usually labeled as Channel 1, 2, 3, and 4. Each channel powers one speaker.
Typical configurations:
- 4 speakers: Each channel powers one.
- 2 speakers (bridged): Pair channels to double power for each speaker.
Here’s a simple comparison:
| Configuration | Channels Used | Speakers Powered | Power per Speaker |
|---|---|---|---|
| Normal | 4 | 4 | ~50W |
| Bridged | 2 | 2 | ~100W |
Note: Power numbers are examples; always check your amp’s ratings.
Tools And Materials Needed
Before starting, gather everything you need. This makes the process smoother and safer.
- Screwdriver
- Speaker wire (correct gauge, usually 14-16 AWG)
- Wire cutters/strippers
- Multimeter (optional but useful)
- Amplifier manual
- Good lighting
The Four Main Bridging Methods
There are four common ways to bridge a 4 channel amplifier. Each method suits a different goal. Below, you’ll find step-by-step instructions for each method.
1. Bridging Two Channels For One Speaker
This is the most basic method, often used for a single subwoofer. It combines two channels into one strong channel.
How to do it:
- Identify the channels you want to bridge (e.g., Channel 1 and 2).
- Locate the speaker terminals. Most amps label them as “+” and “-” for each channel.
- Connect the speaker wire to the positive terminal of Channel 1 and the negative terminal of Channel 2.
- Leave the other two channels unused or use them for other speakers.
Example:
- If your amp provides 50W per channel, bridging two channels will deliver about 100W to your subwoofer.
Practical insight: Beginners often connect to the wrong terminals. Always use the positive from one channel and the negative from the next.
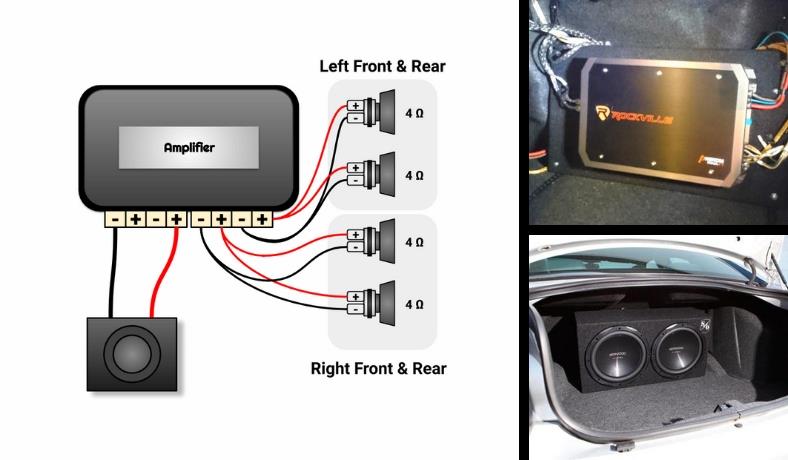
2. Bridging Four Channels For Two Speakers
This method gives more power to two speakers, perfect for a pair of subwoofers or high-power door speakers.
Step-by-step:
- Pair channels: 1+2 for the first speaker, 3+4 for the second.
- Wiring: Connect each speaker to the positive terminal of the first channel and the negative of the second in each pair.
- Double-check connections. The amp manual usually shows a diagram for this.
Example:
- Each speaker gets about double the power. If each channel is 60W, bridging gives each speaker around 120W.
Non-obvious tip: Make sure your speakers can handle the extra power. Using low-rated speakers can cause damage.
3. Bridging Four Channels For One Speaker
Some advanced setups use all four channels to drive a single speaker, usually a very powerful subwoofer. This is called “double bridging.”
How it works:
- Not all amplifiers support this. Check the manual or manufacturer website.
- You combine two bridged pairs and connect them in parallel to a dual voice coil subwoofer.
Wiring steps:
- Bridge channels 1+2 and 3+4 as you would for two separate speakers.
- Connect each bridged pair to each coil of a dual voice coil subwoofer.
Practical insight: This method is rare. It’s only for subwoofers with two coils and amps that can support the wiring.
Warning: Incorrect wiring can damage both your amp and your speaker.
4. Bridging Two Channels And Leaving Two Channels Unbridged
Sometimes, you want one powerful channel and two regular channels. For example, you may want a subwoofer and two smaller speakers.
How to set up:
- Bridge channels 1+2 for the subwoofer.
- Connect regular speakers to channels 3 and 4.
- Double-check speaker impedance to make sure the amp is not overloaded.
Example:
- Subwoofer gets about 100W (bridged).
- Two door speakers get 50W each (unbridged).
Non-obvious insight: This setup is flexible. You can have big bass and clear vocals without extra equipment.
How To Bridge A 4 Channel Amplifier: Step-by-step Guide
Let’s go through a simple, beginner-friendly process for bridging your amp. These steps work for most common situations.
Preparation
- Turn off your car and disconnect the battery. This keeps you safe from shocks.
- Read your amplifier’s manual to confirm bridging is supported.
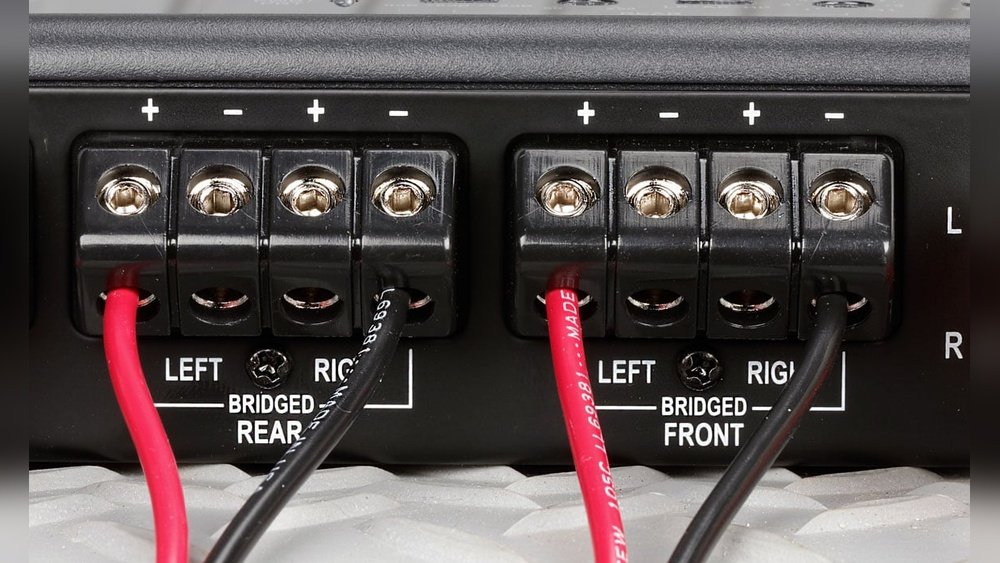
Making The Connections
- Find the bridging terminals on your amplifier. These are usually marked, like “Bridged” or “Mono.”
- Cut and strip your speaker wire to the right length.
- Connect the wires following one of the methods above, depending on your goal.
- Use a screwdriver to tighten connections. Loose wires can cause problems.
- Reconnect the battery and turn on your system.
Testing The System
- Play music at low volume first.
- Check for distortion or overheating.
- Use a multimeter to confirm voltage if you have one.
Example Wiring Diagram
Here’s a simple example for bridging channels 1+2 for a subwoofer:
- Speaker positive wire: Amp Channel 1 “+”
- Speaker negative wire: Amp Channel 2 “-”
- Channels 3 and 4: Left unused or connected to other speakers
Common Mistakes And How To Avoid Them
Many beginners make the same errors. Here’s how to avoid them:
- Wrong terminals: Always check the manual for the correct “+” and “-” terminals.
- Speaker impedance too low: Most amps need at least 4 ohms in bridged mode. Using 2 ohms can overheat your amp.
- Overpowering speakers: Bridging gives more power. If your speaker can’t handle it, it may blow.
- Ignoring amp limits: Not all amps can be bridged. Forcing it can ruin your equipment.
Real-world Example: Power Output Comparison
To understand the benefit, compare the normal vs. bridged output of a typical 4 channel amplifier.
| Mode | Number of Channels | Total RMS Power | Speaker Load (Ohms) |
|---|---|---|---|
| Normal | 4 x 50W | 200W | 4 ohms |
| Bridged | 2 x 100W | 200W | 4 ohms |
Key takeaway: Bridging does not increase total amp power, but it does concentrate it into fewer, more powerful outputs.
Important Safety Tips
- Always disconnect power before working with wiring.
- Check speaker ratings. Using low-impedance speakers in bridged mode is risky.
- Use the correct wire gauge. Too thin wires can overheat.
- Test at low volume first. This protects your gear.
When Not To Bridge
Bridging is not always the answer. There are times when it’s better to use all four channels normally:
- If you want four separate speakers (like front and rear).
- If your speakers are low impedance (2 ohms or less).
- If your amp manual says “Do not bridge.”
Always follow the manufacturer’s advice.
Credit: soundcertified.com
Practical Data: Real Amplifier Example
Let’s look at a popular 4 channel amp: the Alpine S-A32F.
- Normal mode: 4 x 55W RMS @ 4 ohms
- Bridged mode: 2 x 110W RMS @ 4 ohms
Result: Bridging doubles the wattage per channel, great for subwoofers or large speakers.
Quick Troubleshooting Table
If you have problems after bridging, use this quick guide.
| Problem | Possible Cause | Solution |
|---|---|---|
| No sound | Wrong terminals or loose wire | Check wiring and tighten |
| Distortion | Speaker impedance too low | Use 4 ohm or higher speakers |
| Amp shuts off | Overheating | Let cool, check load |
| Speaker rattles | Overpowered speaker | Lower gain, check speaker rating |

Credit: www.reddit.com
Final Thoughts
Bridging a 4 channel amplifier is a smart way to get more power for your car speakers or subwoofers. With clear goals and the right steps, most beginners can do it safely. Always check your amp and speaker ratings, and follow the wiring instructions exactly.
The most common problems come from wrong connections or using the wrong speakers. Take your time, double-check your work, and you’ll enjoy better sound quality and more powerful bass.
If you want to see official amp wiring diagrams and learn more, visit the Wikipedia page on audio power amplifiers.
Frequently Asked Questions
How Do I Know If My Amplifier Can Be Bridged?
Check your amp’s manual. Most manuals have a section about bridging. If you don’t have the manual, look up the amp model online. Some amps have labels on the terminals for bridging.
What Is The Best Speaker Impedance For Bridging?
Most 4 channel amplifiers require a 4 ohm speaker in bridged mode. Using lower impedance (like 2 ohms) can overheat the amp or cause shutdowns.
Can I Bridge All Four Channels To One Speaker?
Only if your amp supports it and your speaker has dual voice coils. This is called “double bridging. ” Check both your amp and speaker manuals for support.
What Happens If I Use The Wrong Terminals When Bridging?
Using the wrong terminals may cause no sound, distortion, or even damage the amp. Always check the manual and double-check your wiring before turning the system on.
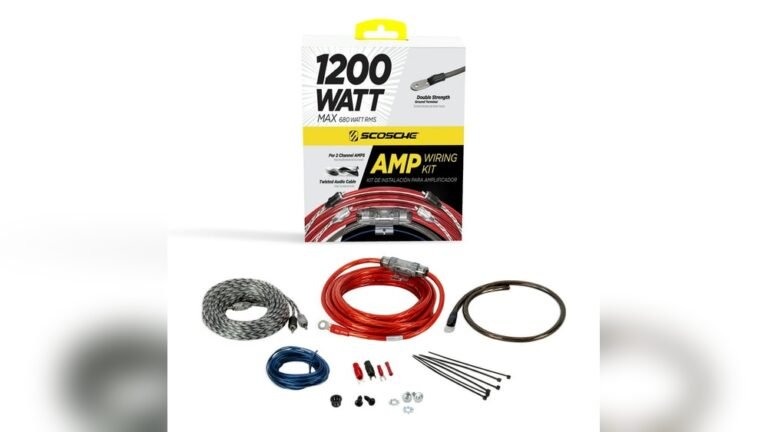
Do I Need Special Wires For Bridging My Amp?
No special wires are needed, but use the correct wire gauge for your amp’s power. Usually, 14 or 16 AWG speaker wire is enough for most car audio systems. For higher power, consider 12 AWG.
Bridging your amplifier is a practical way to upgrade your car audio, but always follow safety steps and manufacturer advice to protect your equipment and enjoy strong, clear sound.

Credit: audiocontrol.com