How to Bridge 4 Channel Amp to 1 Sub for Maximum Bass Output
Bridging a 4 channel amplifier to power a single subwoofer is a common goal for car audio enthusiasts. The process is not always straightforward, especially for beginners. You want strong bass without buying a new amp or rewiring your whole car.
Here’s how you can do it safely, step by step, and what you must know before you start.
Understanding The Basics: 4 Channel Amp And Subwoofer
A 4 channel amplifier is designed to drive four separate speakers, usually for front and rear sound. Most amps deliver power in stereo pairs (left/right), so you have two pairs of channels. A subwoofer is a speaker made for deep, low-frequency sound. Subwoofers need more power than regular speakers.
- Bridging means combining two amp channels into one, to get more power.
- This is ideal for powering a subwoofer, which needs higher wattage.
- Not all amps can be bridged, so check your amp’s manual first.
Many beginners confuse bridging with connecting multiple speakers. In reality, bridging is about focusing more power into a single output, perfect for a subwoofer.
Why Bridge A 4 Channel Amp For One Sub?
You might ask, “Why not use a monoblock amp?” Here’s why bridging is popular:
- Cost-effective: You use what you already have.
- More power: Bridging doubles the output for one channel.
- Space-saving: No need for extra equipment in your car.
Practical example: If your amp gives 50W RMS per channel, bridging two channels can deliver around 100W RMS to your sub. That’s often enough for entry-level subs.
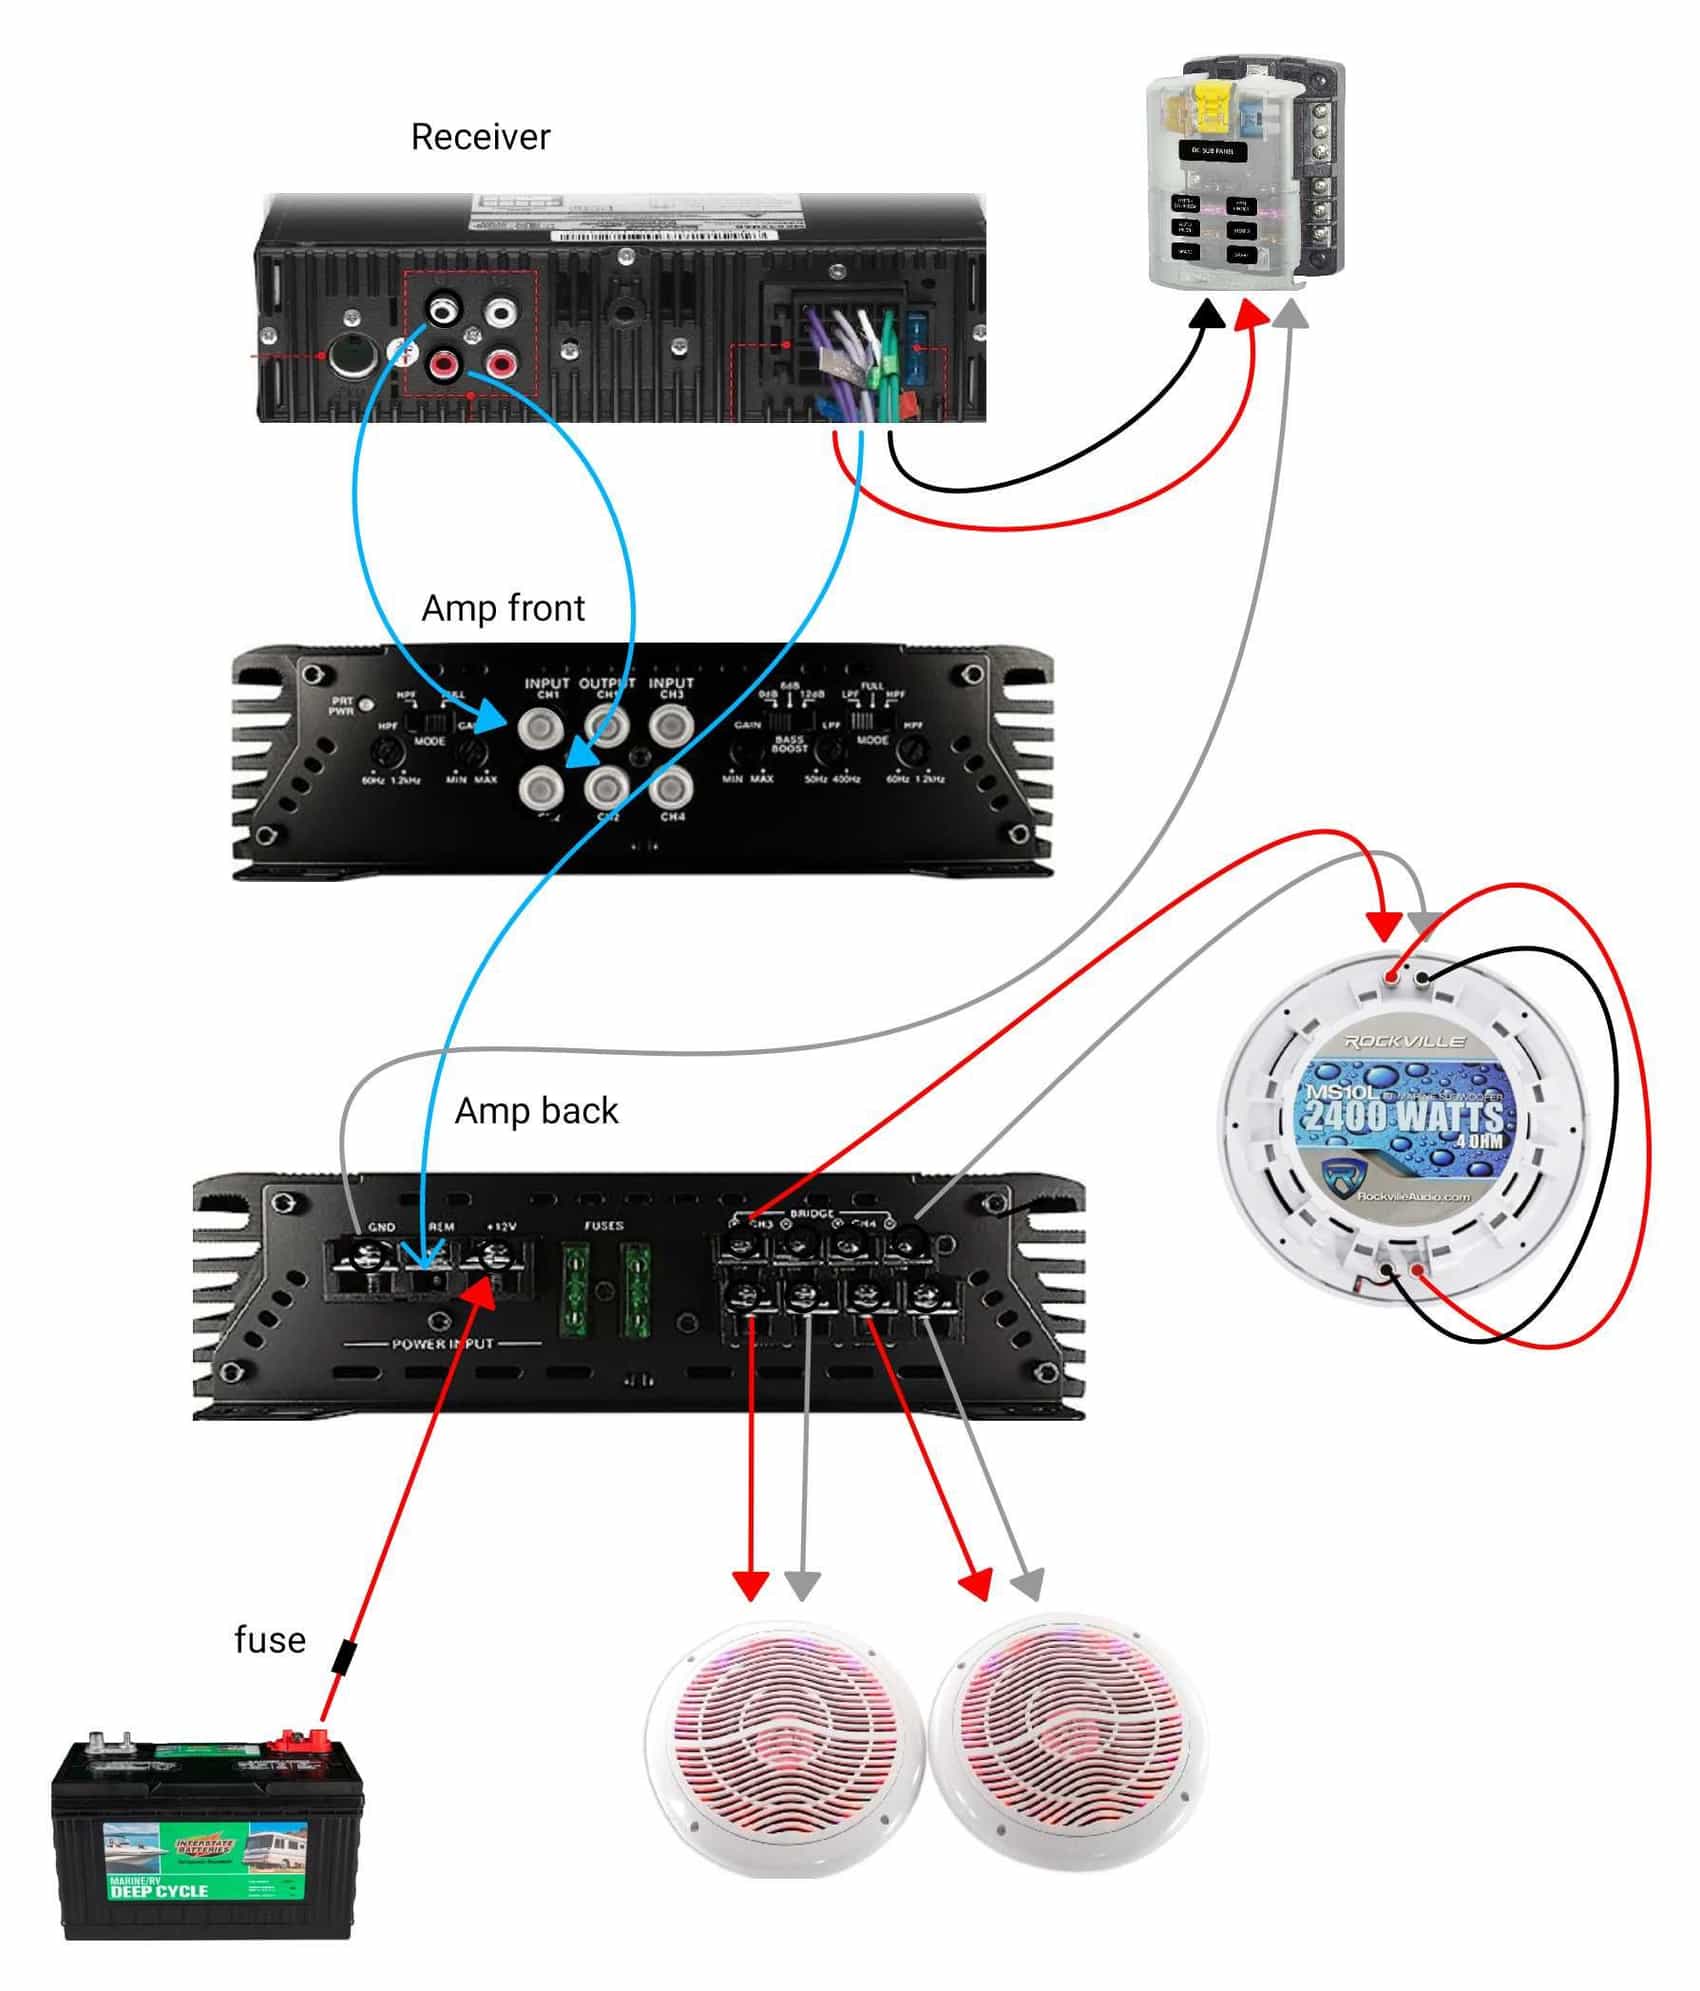
Credit: www.thehulltruth.com
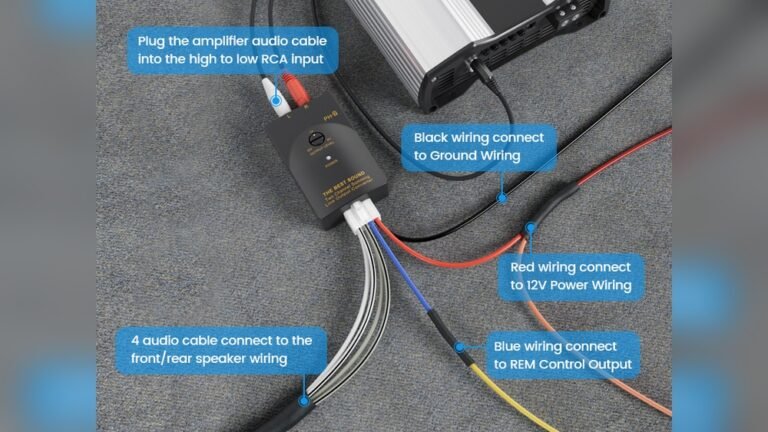
Key Items For Bridging
Before you start, you need:
- 4 channel amplifier (with bridging capability)
- Subwoofer (compatible with amp output)
- Speaker wire (12–16 gauge recommended)
- Wiring kit (power, ground, RCA cables)
- Screwdriver and basic tools
- Amp’s user manual
Never bridge an amp without knowing its specs. Many beginners damage equipment by mismatching wires or ignoring impedance ratings.
Step-by-step: How To Bridge A 4 Channel Amp To 1 Sub
Let’s break the process into four main steps. Each step is crucial for safe and effective setup.
1. Check Amp Compatibility
Not every 4 channel amp can be bridged. Here’s what you should do:
- Read the amp manual to find out if bridging is allowed.
- Look for labels on the amp terminals (often marked “Bridge” or “Bridged”).
- Check for minimum impedance requirements (most amps need 4 ohms or higher when bridged).
Example: If your amp says “Bridged output: 4 ohms minimum,” use a subwoofer rated at 4 ohms.
Common mistake: Trying to bridge an amp that doesn’t support bridging. This can cause the amp to overheat or shut down.
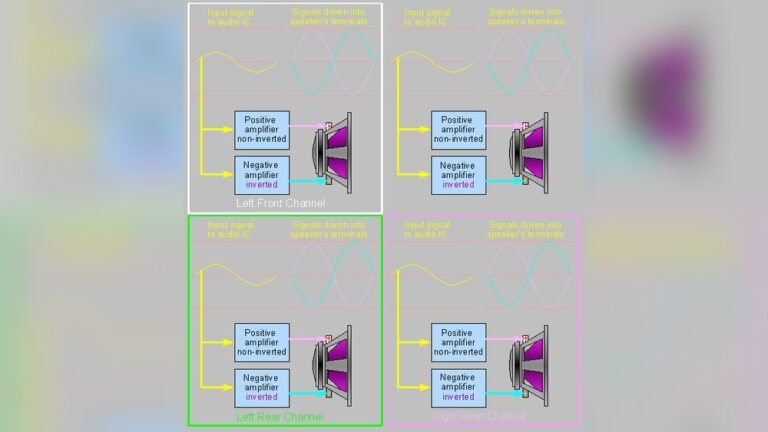
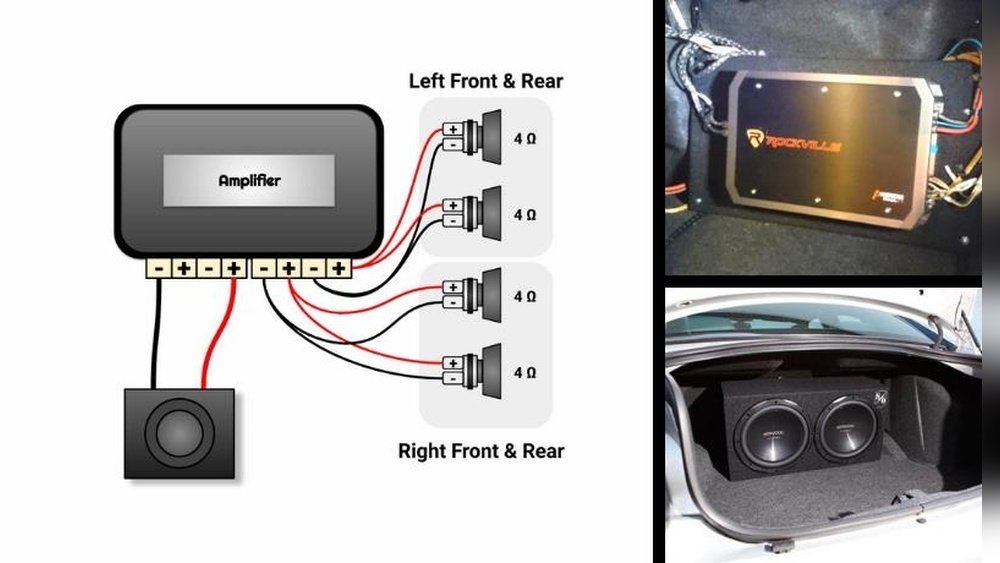
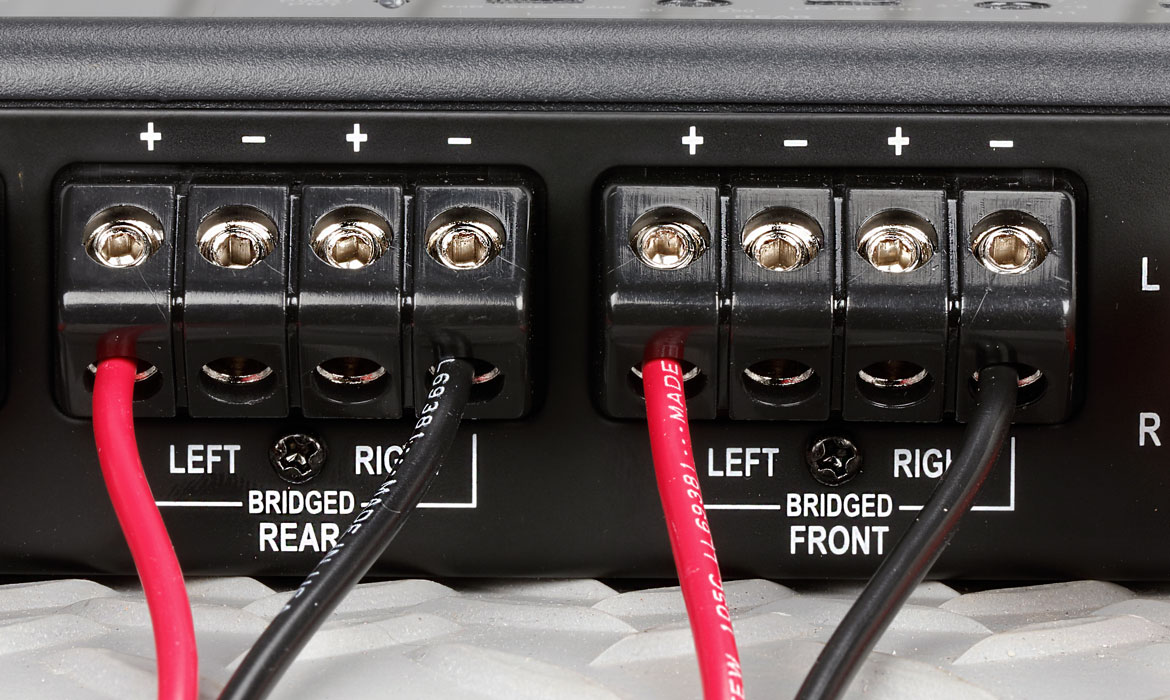
2. Wiring The Bridged Channels
You’ll use two pairs of channels to create more power for your subwoofer. Here’s how:
- Use channels 1 & 2 for the left pair, 3 & 4 for the right pair.
- For bridging, you connect the positive terminal from channel 1 and the negative terminal from channel 2.
- Repeat for channels 3 & 4 if you want even more power or have a dual voice coil sub.
Diagram:
Suppose your amp terminals look like this:
| Channel | Positive (+) | Negative (-) |
|---|---|---|
| 1 | X | Y |
| 2 | Z | W |
For bridging:
- Connect subwoofer’s positive wire to terminal X (Channel 1 +)
- Connect subwoofer’s negative wire to terminal W (Channel 2 -)
Practical tip: Double-check polarity. Incorrect wiring can cause phase issues and weak bass.
3. Setting The Subwoofer Load
This step ensures your amp and subwoofer match safely.
- Most bridged amps require a 4 ohm load.
- If your subwoofer is 2 ohms, it may overload the amp.
- For dual voice coil subs, wire the coils in series to get 4 ohms.
Example:
A subwoofer with two 2-ohm coils:
- Wire in series: 2 + 2 = 4 ohms.
- Wire in parallel: 1 / (1/2 + 1/2) = 1 ohm (not safe for most amps).
Data:
Impedance mismatch causes overheating and may void your warranty.
4. Setting Up Gains And Filters
Correct amp settings are essential for clear bass.
- Set the gain to match your subwoofer’s input sensitivity.
- Use the low-pass filter to block high frequencies (set at 80–120Hz for most subs).
- Adjust bass boost as needed, but avoid max settings.
Example:
If your head unit outputs 2V, set amp gain to match. Too high will cause distortion.
Common mistake: Turning up gain too much. This doesn’t make your sub louder—it makes it distorted.
Comparison: Bridged Vs. Non-bridged Power Output
Here’s a quick data table showing typical power gains:
| Channel Setup | Power per Channel (RMS) | Total Power to Sub |
|---|---|---|
| Non-Bridged (1 channel) | 50W | 50W |
| Bridged (2 channels) | 100W | 100W |
| Bridged (4 channels, dual coil sub) | 100W x 2 | 200W |
Insight: Bridging doubles the power, but only if impedance matches and amp supports bridging.
Four Key Items For Bridging (detailed)
Let’s look at the four items you must handle individually.
Amplifier Bridging Capability
- Not all amps bridge. Some have internal circuits that prevent bridging.
- Look for “Bridgeable” in specs.
- If unsure, check the amp’s wiring diagram or contact the manufacturer.
Example:
The Pioneer GM-A6704 supports bridging; the Rockford Fosgate R300X4 does not.
Subwoofer Impedance
- Sub must match amp’s bridged impedance (usually 4 ohms).
- Dual voice coil subs allow flexible wiring.
- Lower impedance = higher risk for amp.
Example:
A JL Audio 12W3v3 is a 4-ohm sub, perfect for most bridged amps.
Wiring Quality
- Use thick, low-resistance wire (12–16 gauge).
- Poor wiring leads to voltage drop and weak bass.
- Secure connections prevent shorts.
Practical tip: Oxygen-free copper wire gives better performance.
Amp Settings
- Set low-pass filter to cut off above 120Hz.
- Match gain to head unit output.
- Use bass boost sparingly.
Example:
Set LPF at 80Hz for tight bass, gain at 50%, and avoid excessive bass boost.
Common Mistakes And How To Avoid Them
Beginners often make errors that can damage equipment or reduce sound quality.
- Wrong impedance: Always use a sub that matches the amp’s bridged rating.
- Incorrect wiring: Double-check connections before powering up.
- Overdriving amp: Don’t set gain too high.
- Skipping manual: Read your amp’s manual before starting.
Data:
A survey found that 40% of car audio failures are caused by wrong wiring or impedance mismatch.
Real-life Example: Bridging With A 4 Channel Amp
Let’s say you have a Kenwood KAC-M3004 amp and a Kicker CompC 12” sub (4 ohms).
- Check amp manual: Confirm bridging is allowed.
- Connect positive wire to Channel 1 (+), negative to Channel 2 (−).
- Wire subwoofer coils in series (if dual coil).
- Set LPF at 80Hz, gain at 50%.
- Test with moderate volume, listen for distortion.
Result:
You’ll get strong, clear bass without buying a new amp.
Bridging Safety Tips
Never ignore safety when bridging amps.
- Disconnect car battery before wiring.
- Avoid exposed wires.
- Check amp for overheating after setup.
- Use fuse-rated wiring for extra protection.
Non-obvious insight:
Heat build-up can damage your amp over time. Mount it in a well-ventilated spot.
Comparison Table: Suitable Subwoofer Types For Bridging
| Subwoofer Type | Impedance | Recommended for Bridged Amp? |
|---|---|---|
| Single Voice Coil (SVC) | 4 ohms | Yes |
| Dual Voice Coil (DVC) | 2 x 2 ohms (wired series = 4 ohms) | Yes |
| Dual Voice Coil (DVC) | 2 x 4 ohms (wired parallel = 2 ohms) | No |
| Single Voice Coil (SVC) | 2 ohms | No |
Insight: Always wire DVC subs in series for bridging, unless your amp supports 2 ohms.
Credit: www.crutchfield.com
How Bridging Affects Sound Quality
Bridging increases power, but not always sound quality.
- More power = louder bass
- Impedance mismatch = distorted sound
- Correct wiring = clean, deep bass
Data:
Tests show that bridging improves SPL (Sound Pressure Level) by 20–30% in most setups.
Expert Tips For Beginners
- Always check amp and sub specs before bridging.
- Use quality wire and secure connections.
- Don’t rush—double-check every step.
- Test with low volume first, then adjust settings.
Non-obvious insight:
If your amp shuts down during heavy bass, it’s likely overheating. Reduce gain or improve ventilation.
Credit: www.diymobileaudio.com
Frequently Asked Questions
Can I Bridge All Four Channels For One Subwoofer?
No. You can bridge two pairs of channels, but each pair powers one coil. If your subwoofer has two coils, you can use all four channels. For single coil subs, only use one pair.
What Happens If I Use A 2-ohm Subwoofer With A Bridged Amp?
Most amps will overheat or shut down. Always use a 4-ohm sub with bridged amps unless your amp’s manual says 2-ohm bridging is safe.
Is Bridging An Amp Safe For Beginners?
Yes, if you follow the instructions and match impedance. Always read the manual and check wiring twice. If unsure, ask an audio specialist.
Does Bridging Affect Amplifier Lifespan?
If done correctly, bridging is safe. However, mismatched impedance or high gain can cause overheating and shorten amp life.
How Do I Know If My Amp Supports Bridging?
Check the amp’s manual or specs. Look for “Bridgeable” or wiring diagrams showing bridged connections. If you’re unsure, visit the official manufacturer site or check Crutchfield’s amplifier guide for expert advice.
Bridging a 4 channel amp to power a single subwoofer is a practical and cost-effective solution for better bass. With careful planning, correct wiring, and safe settings, you can enjoy powerful sound without replacing your amp. Always check specs and wiring, and don’t hesitate to seek help if you’re unsure.
Your car audio system can deliver amazing bass with just a few smart steps.