What are the Pioneer Wiring Harness Colors: Complete Guide
When installing or upgrading a car stereo, understanding the Pioneer wiring harness colors is essential. Many car owners and audio enthusiasts face confusion when connecting their new Pioneer head units. The colored wires may look simple, but each color has a specific role. Connecting them incorrectly can lead to poor sound, system errors, or even damage to your stereo or car electronics.
In this guide, you’ll learn exactly what each Pioneer wiring harness color means, how to connect them safely, and how they compare to other brands. Whether you’re a complete beginner or you just want a quick reference, this article provides practical advice, real examples, and clear explanations to make your car audio installation successful.
Why Wiring Harness Colors Matter
Wiring harness colors act like a universal language for car audio. They help you match the stereo wires to your car’s original wiring. Each color represents a specific function, such as power, ground, or speakers. If you mix them up, your stereo might not turn on, or your speakers could sound distorted.
Using the correct color codes makes installation:
- Faster (no guesswork)
- Safer (less risk of short circuits)
- Easier to troubleshoot if problems appear
Beginners often overlook the ground wire or confuse speaker pairs, which can cause buzzing sounds or no audio at all. Always double-check each connection before powering on your stereo.
Pioneer Wiring Harness Color Codes Explained
Pioneer uses a set of standardized wire colors for their car stereo harnesses. While they match most industry standards, it’s wise to confirm with your user manual, especially for older units. Here are the common Pioneer wiring harness colors and their functions:
| Wire Color | Function | Where It Connects |
|---|---|---|
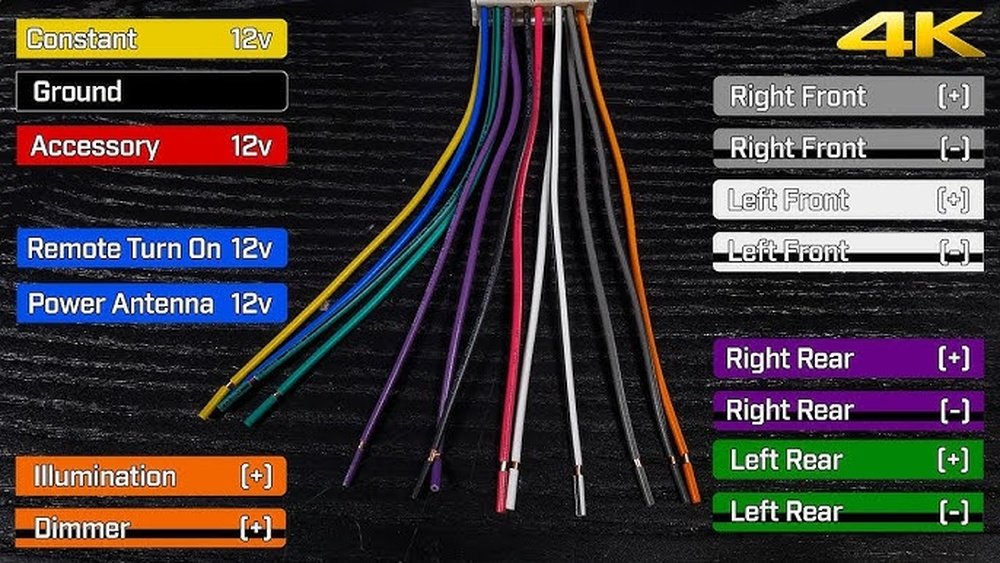
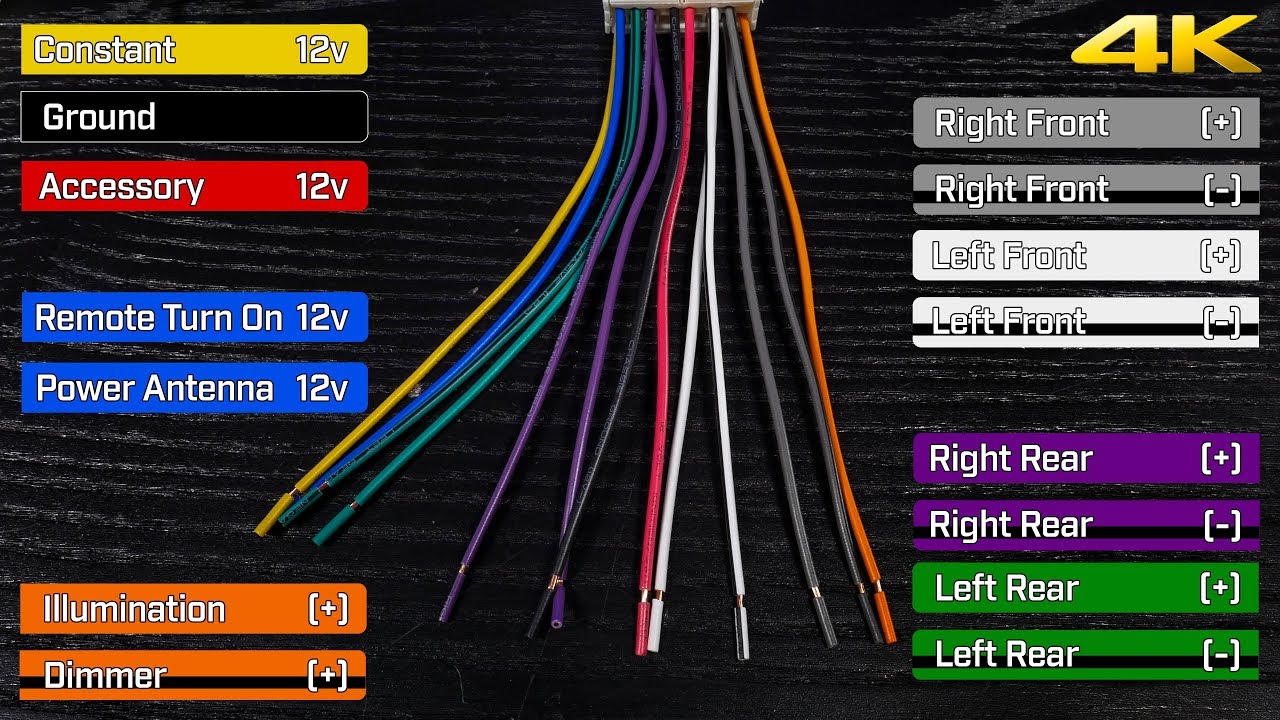
| Yellow | Constant 12V (+) | Battery |
| Red | Switched 12V (+) | Ignition/ACC |
| Black | Ground | Vehicle Chassis |
| Blue/White | Amplifier Remote Turn-On | External Amp/Power Antenna |
| Orange/White | Illumination/Dimmer | Dashboard Light Circuit |
| White & White/Black | Front Left Speaker (+/-) | Front Left Speaker |
| Gray & Gray/Black | Front Right Speaker (+/-) | Front Right Speaker |
| Green & Green/Black | Rear Left Speaker (+/-) | Rear Left Speaker |
| Purple & Purple/Black | Rear Right Speaker (+/-) | Rear Right Speaker |
Most Pioneer harnesses use these colors. But always check your stereo’s specific manual, especially for extra features like steering wheel control or backup camera.
Power, Ground, And Accessory Wires
The three most important wires for any Pioneer wiring harness are power, ground, and accessory. Without these, your stereo won’t even turn on.
- Yellow (Constant 12V): This wire connects directly to the battery. It provides memory power, so your radio stations and settings are saved.
- Red (Switched 12V): This wire connects to a source that only gets power when the ignition is on. It tells your stereo when to turn on or off.
- Black (Ground): This wire must be connected to the car’s metal chassis. A poor ground connection is a common beginner mistake and can cause your stereo to not power up or create noise.
If your stereo doesn’t turn on, first check these three wires. Use a simple test light or multimeter to confirm voltage.
Speaker Wires Breakdown
Connecting speakers is where most people get confused. Pioneer (and most car stereo brands) use paired solid and striped wires:
- White = Front Left (+)
- White/Black = Front Left (-)
- Gray = Front Right (+)
- Gray/Black = Front Right (-)
- Green = Rear Left (+)
- Green/Black = Rear Left (-)
- Purple = Rear Right (+)
- Purple/Black = Rear Right (-)
The solid color is always positive (+), and the color with a black stripe is negative (-). For example, match the white wire on the harness to the positive terminal of your front left speaker.
Key Tips For Speaker Connections
- Always connect (+) to (+) and (-) to (-) to avoid out-of-phase sound (where speakers cancel each other out).
- If a speaker sounds weak or “hollow,” reverse the wires and test again.
- Secure connections with crimp connectors or soldering for reliability.

Credit: www.reddit.com
Special Function Wires
Some Pioneer harnesses include extra wires for advanced features:
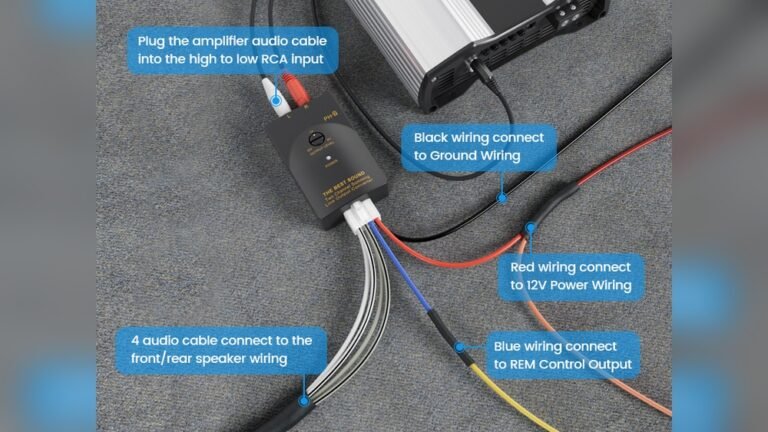
- Blue/White (Remote Turn-On): Sends a signal to turn on an external amp or power antenna.
- Orange/White (Illumination): Dims the stereo display when you turn on your headlights.
- Blue (Antenna Power): Powers electric antennas, not always present on all harnesses.
Not all vehicles need these connections. For example, if you don’t have an amp or electric antenna, you can safely leave the blue/white wire disconnected.
Comparing Pioneer Wiring To Other Brands
Pioneer wiring harness colors are similar to many other brands, but small differences exist. Here’s a quick comparison with Kenwood and Sony:
| Function | Pioneer Color | Kenwood Color | Sony Color |
|---|---|---|---|
| Constant 12V | Yellow | Yellow | Yellow |
| Switched 12V | Red | Red | Red |
| Ground | Black | Black | Black |
| Speaker (+) | White, Gray, Green, Purple | White, Gray, Green, Purple | White, Gray, Green, Purple |
| Speaker (-) | White/Black, Gray/Black, Green/Black, Purple/Black | White/Black, Gray/Black, Green/Black, Purple/Black | White/Black, Gray/Black, Green/Black, Purple/Black |
| Remote/Amp Turn-On | Blue/White | Blue/White | Blue/White |
As you can see, most brands use similar colors. However, always check the user manual for your specific model, especially for premium features or older units.
Credit: www.youtube.com
Step-by-step Guide: Connecting A Pioneer Wiring Harness
If you’re ready to install your Pioneer stereo, follow these steps for a safe and clean connection:
- Disconnect your car battery to avoid short circuits.
- Match each wire on the Pioneer harness to the corresponding wire on your car’s harness. Use the color codes above.
- Strip a small section of each wire (about 1/4 inch) for a good connection.
- Twist and secure the wires together. Use crimp connectors, solder, or wire nuts. Electrical tape is a last resort and not recommended for long-term reliability.
- Double-check connections. Compare each wire’s function, not just color, especially if your car’s harness uses different colors.
- Reconnect the car battery and test the stereo before putting everything back in the dash.
Common Beginner Mistakes
- Mixing up left/right or positive/negative speaker wires.
- Forgetting to connect ground (black) wire.
- Ignoring unused wires: Cap them off to avoid shorts.
- Not securing connections, leading to loose wires and sound dropouts.
Real-world Example: Installing A Pioneer Stereo In A Honda Civic
Suppose you’re installing a Pioneer DEH-S1100UB in a 2008 Honda Civic. The Pioneer harness uses standard colors, but the Honda harness may be different. Use a wiring diagram or adapter that matches the car’s wires to the Pioneer harness.
Example connection:
- Pioneer yellow to Civic constant 12V (often white/red)
- Pioneer red to Civic ignition (often yellow/black)
- Pioneer black to chassis ground
- Match speaker wires by position, not just color
Using a wiring adapter simplifies this process. It prevents mistakes and keeps your factory wiring safe.
Data Table: Quick Reference For Pioneer Wiring Harness Colors
Here’s a quick look-up for the most-used Pioneer wiring harness colors:
| Color | Function | Typical Car Wire Color |
|---|---|---|
| Yellow | Constant Power | White/Red, Yellow, or Pink |
| Red | Accessory Power | Yellow/Black or Red |
| Black | Ground | Black or Brown |
| White/White-Black | Front Left Speaker (+/-) | Varies |
| Gray/Gray-Black | Front Right Speaker (+/-) | Varies |
| Green/Green-Black | Rear Left Speaker (+/-) | Varies |
| Purple/Purple-Black | Rear Right Speaker (+/-) | Varies |
Always cross-check with your vehicle’s wiring diagram or use a professional harness adapter for the best results.
Non-obvious Insights Most Beginners Miss
- Factory amplifiers need special attention: If your car has a built-in amp, you must use the blue/white remote wire. If not, your speakers may not get power, or sound may be missing.
- Illumination wire can improve nighttime driving: Connecting the orange/white wire allows your stereo display to dim when headlights turn on, reducing glare and eye strain.
- Testing before final assembly saves hours: Always power up your stereo and test all functions before reinstalling the dashboard. Fixing mistakes is much easier with everything accessible.
Troubleshooting Wiring Issues
If your Pioneer stereo doesn’t work after installation, check these steps:
- Confirm all main wires (yellow, red, black) are securely connected.
- Test each speaker wire pair for sound.
- Ensure no wires are touching metal (which can cause shorts).
- If your stereo resets every time you turn off the car, swap the red and yellow wires (this is a common issue in some vehicles).
If problems continue, consult your car’s wiring diagram or seek help from a professional installer.
Where To Find Official Pioneer Wiring Diagrams
For the most accurate and up-to-date information, always refer to the official Pioneer user manual for your model. You can find many PDF manuals and diagrams on the official Pioneer website or on trusted resources like Wikipedia. This helps avoid errors and gives you access to special features unique to your head unit.
Credit: www.therangerstation.com
Frequently Asked Questions
What Do I Do If My Car’s Wire Colors Don’t Match Pioneer’s Harness?
Use the function of the wires, not just the colors. Check your car’s service manual or use a vehicle-specific wiring adapter. Never connect wires by color alone unless you are sure they match.
Can I Leave Some Pioneer Harness Wires Unconnected?
Yes, not all wires are always needed. For example, if your car doesn’t have an amp or power antenna, you can leave the blue/white and blue wires unconnected. Just make sure you cap off unused wires to prevent short circuits.
Why Does My Pioneer Stereo Lose Its Settings Every Time I Turn Off The Car?
This usually means the yellow (constant 12V) and red (switched 12V) wires are reversed or not connected correctly. Double-check your connections and swap if necessary.
Is It Safe To Use Electrical Tape For Wire Connections?
Electrical tape is not the best long-term solution. It can loosen over time, especially with heat and vibration. Use crimp connectors or soldered joints covered with heat shrink tubing for reliable results.
How Do I Know If My Pioneer Harness Has Extra Features Like Steering Wheel Control?
Check your stereo’s manual or the wiring diagram included with your harness. Special feature wires are often labeled and may be different colors. If unsure, look up your model’s wiring guide on the Pioneer website.
Understanding Pioneer wiring harness colors will make your car stereo installation easier, safer, and more enjoyable. Take your time, follow the color codes, and always test your work. With these tips, even beginners can achieve a professional result.