How to Bridge a 2 Channel Amp With 2 Subs: Ultimate Guide
Many people want louder and deeper bass in their cars. Two subwoofers can help, but you might only have a 2 channel amplifier. Is it possible to use this amp with both subs and still get strong bass? The answer is yes, but you need to bridge the amp and wire the subs correctly. Bridging means combining both amp channels to get more power for your subwoofers. This guide shows you how to bridge a 2 channel amp with 2 subs, step by step, using clear instructions. You’ll also learn common mistakes, practical tips, and how to get the best results.
What Does Bridging A 2 Channel Amp Mean?
Bridging is a way to combine the power output from both channels of your amp into one. Instead of left and right channels powering separate speakers, you join them to deliver more watts to a single load. This is great for subwoofers because they need more power for deep bass.
- Bridging increases the amp’s output, often doubling the power.
- It’s usually done by connecting one speaker (or both subs wired together) across the positive terminal of one channel and the negative of the other.
- Not all amps can be bridged. Always check your amp’s manual or label.
Why Use Two Subs With A 2 Channel Amp?
Two subwoofers can give you:
- More bass: The sound is fuller and more powerful.
- Better sound coverage: Bass spreads evenly in the car.
- Higher volume: You can play music louder without distortion.
But wiring two subs to a 2 channel amp isn’t straightforward. You must match the amp’s power and the subs’ wiring for safe, clean sound.
Can You Bridge A 2 Channel Amp With 2 Subs?
Yes, you can. But there are a few important things to know:
- Wiring options: You can wire both subs together to act as one load, or wire each sub to each channel.
- Impedance matters: The total impedance (measured in ohms) must match what the amp can handle. Too low can damage the amp.
- Power sharing: Both subs must share the bridged power output equally.
Let’s look at the details and steps.
Understanding Key Terms And Data
Before you start, understand these terms:
- Impedance (Ohms): Resistance in the circuit. Most car subs are 2 ohms or 4 ohms.
- RMS Power: Real power the amp delivers. Ignore “peak” ratings.
- Parallel wiring: Connect both subs’ positives together, both negatives together. Lowers total impedance.
- Series wiring: Connect positive of one sub to negative of the other. Raises total impedance.
Here’s a quick comparison:
| Wiring Type | Resulting Impedance | Use Case |
|---|---|---|
| Parallel | 1/2 total (e.g. two 4-ohm subs = 2 ohms) | When amp supports low impedance |
| Series | Sum total (e.g. two 4-ohm subs = 8 ohms) | When amp can’t handle low impedance |
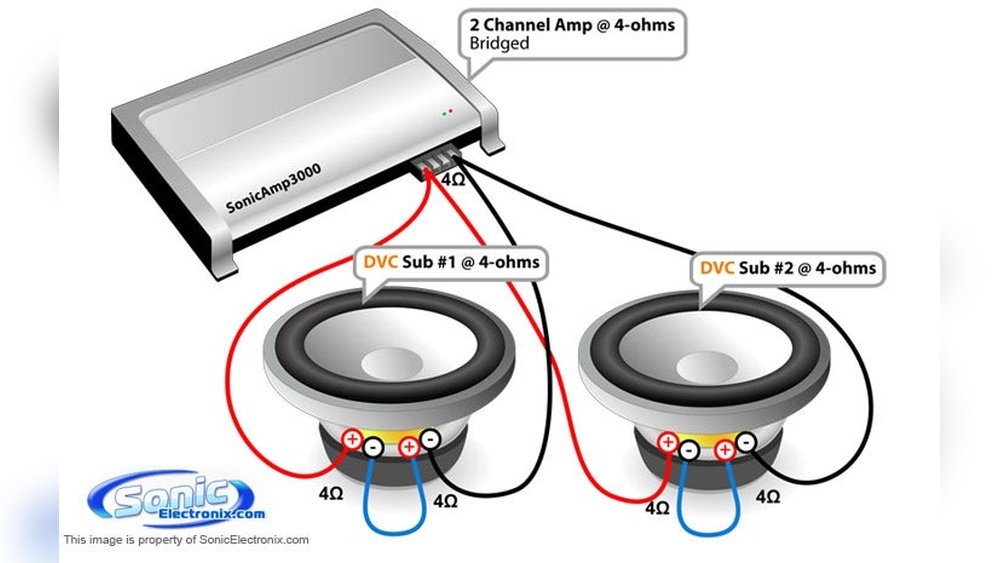
Step-by-step: Bridging A 2 Channel Amp With 2 Subs
Follow these steps for a safe and effective setup. The example uses two 4-ohm subwoofers and a 2 channel amp that can be bridged down to 2 ohms.
1. Check Your Amp’s Bridging Capability
- Look for “bridgeable” marking on the amp.
- Read the manual. It will show the minimum supported impedance.
- Example: “Bridged output: 300W RMS @ 4 ohms.”
2. Know Your Subwoofers’ Specs
- Find out each sub’s impedance (ohms) and power rating (RMS).
- Example: “Subwoofer: 4 ohms, 200W RMS.”
3. Choose Wiring Method
- To use both subs with the amp bridged, wire them in parallel or series.
- Parallel is common for two 4-ohm subs, making a 2-ohm load.
4. Wire The Subwoofers
Parallel wiring for two 4-ohm subs:
- Connect both subs’ positive terminals together.
- Connect both subs’ negative terminals together.
- You now have a single pair of wires (one positive, one negative).
Series wiring for two 4-ohm subs:
- Connect the positive terminal of sub 1 to the amp.
- Connect the negative terminal of sub 1 to the positive of sub 2.
- Connect the negative terminal of sub 2 to the amp.
- You now have an 8-ohm load.
5. Bridge The Amplifier
- Find the amp’s bridging terminals. Usually, it’s the left channel positive and right channel negative.
- Connect your subwoofer wire’s positive to the amp’s left channel positive.
- Connect your subwoofer wire’s negative to the amp’s right channel negative.
Here’s a simple table for bridging terminals:
| Channel | Terminal for Bridging |
|---|---|
| Left | Positive (+) |
| Right | Negative (-) |
6. Test The System
- Turn on the amp and play music at low volume.
- Check that both subs work.
- Listen for distortion or strange noises.
Practical Example: Real Numbers
Let’s say:
- Amp: 2 channel, 300W RMS @ 4 ohms (bridged)
- Subs: Two 4-ohm, 200W RMS each
Steps:
- Wire subs in parallel: Total load is 2 ohms.
- Bridge amp: Amp delivers about 300W RMS at 4 ohms, maybe 500W at 2 ohms (if allowed).
- Each sub gets equal power.
If your amp does not support 2 ohms bridged, use series wiring. This will reduce power, but protect your amp.
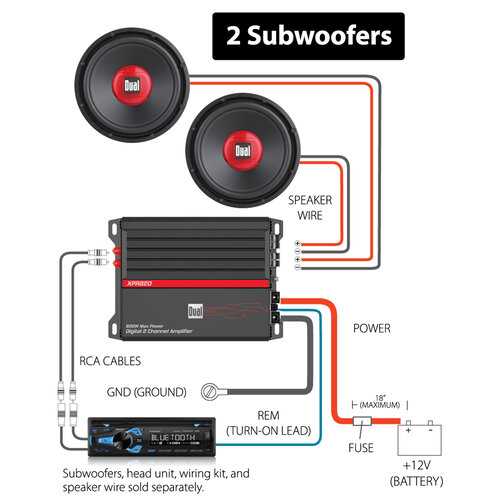
Credit: www.dualav.com
Common Mistakes And How To Avoid Them
Many beginners make these errors:
- Wrong impedance: If you wire two 2-ohm subs in parallel, you get 1 ohm. Most amps can’t handle this and may overheat.
- Overpowering: If the amp delivers more watts than the subs can handle, you risk blowing the subs.
- Reverse wiring: Connecting the wrong terminals can cause phase issues and weak bass.
- Missing fuse: Always use a fuse at the amp’s power input for safety.
Here’s a quick checklist:
- Double-check your amp’s minimum impedance.
- Match sub power ratings to amp output.
- Use thick wires for connections (at least 12 gauge).
- Secure all connections tightly.
How To Maximize Sound Quality
Getting the wiring right is only part of the story. For the best sound:
- Set amp gain correctly: Too high causes distortion; too low, weak bass.
- Use a low-pass filter: Set amp to filter out high frequencies, so subs only play bass.
- Tune box size: Subwoofers work best in the right box (sealed or ported).
- Position subs well: Place them in the trunk or under seats for best bass response.

Credit: www.wikihow.com
Data: Amp And Sub Compatibility
Some amps have different ratings for stereo and bridged modes. Here’s a comparison:
| Amp Mode | RMS Power Output | Impedance Supported |
|---|---|---|
| Stereo | 100W x 2 @ 4 ohms | 4 ohms |
| Bridged | 300W x 1 @ 4 ohms | 4 ohms (sometimes 2 ohms) |
Always check your amp’s real specs, not just what’s on the box.
Non-obvious Insights Most Beginners Miss
- Bridging doesn’t always double power. Some amps are not designed to run safely at low impedance when bridged. You must check the actual RMS output, not just assume “twice as much.”
- Wire gauge affects performance. If your wires are too thin, you lose power and might get distortion. Use at least 12 gauge for subs, and 8 gauge for amp power.
Practical Tips For Safe Installation
- Disconnect your car battery before wiring.
- Route wires away from moving parts and heat sources.
- Use zip ties to keep wiring neat.
- Install a fuse as close as possible to the battery.
- Test everything before closing up panels.
Troubleshooting After Bridging
If you hear distortion or see the amp shutting off:
- Check wiring for loose connections.
- Make sure impedance matches amp’s specs.
- Lower the amp’s gain and re-test.
- If amp overheats, use series wiring or lower volume.
When Not To Bridge
Some situations where bridging is not recommended:
- Your amp’s manual says “not bridgeable.”
- Subs’ impedance is too low for amp in bridged mode.
- You want stereo sound (not just bass).
- The amp gets very hot or cuts out often.
The Role Of Subwoofer Boxes
The right box can double your bass output. Sealed boxes give tight, accurate bass. Ported boxes are louder, but less accurate. Choose based on your music style.
- Hip-hop and EDM: Ported box for louder bass.
- Rock and classical: Sealed box for punchy, clean bass.
How To Upgrade Later
If you want more bass in the future:
- Add a mono amp for more power.
- Upgrade subs to higher wattage.
- Use better wiring and bigger boxes.
Safety Reminders
- Never touch amp terminals with bare hands.
- Always use a fuse.
- Check wires for damage before installation.

Credit: www.crutchfield.com
Where To Find More Information
For more details on wiring and amp specifications, see this Crutchfield Guide.
Frequently Asked Questions
What Happens If I Wire Two Subs In Parallel To A Bridged Amp?
If both subs are 4 ohms, wiring in parallel makes a 2-ohm load. If your amp supports 2 ohms bridged, it will deliver more power. If not, you risk damaging the amp.
Can I Use Different Subwoofers With A Bridged 2 Channel Amp?
You can, but it’s not recommended. Both subs should have the same impedance and power rating. Mixing types can cause uneven sound and possible damage.
How Do I Know If My Amp Can Be Bridged?
Look for a “bridgeable” mark, or check the manual. If there are special terminals labeled for bridging, it’s a good sign. Read the specs for minimum supported impedance.
Is Bridging Safe For My Car Electrical System?
Yes, if you use the correct wiring, fuse, and match impedance. Always disconnect the battery before working. If the amp draws too much power, you may need to upgrade your alternator or battery.
What’s The Best Wire Gauge For Subwoofer And Amp Wiring?
Use at least 12 gauge for subwoofers, and 8 gauge for amp power. Thicker wires prevent power loss and overheating.
Connecting two subs to a 2 channel amp gives you more bass and a better music experience. Bridging is a simple technique, but you must follow the right steps and check your equipment’s specs. When you wire the subs correctly, set your amp properly, and use safe installation practices, you’ll enjoy deep, powerful bass without risking your gear.
Remember, the key is matching impedance and power ratings, using proper wiring, and testing your system before turning up the volume. With these tips, you can easily bridge your amp and run two subs—even as a beginner.