How to Bridge 4 Channel Amp to 1 Sub: Step-by-Step Guide
If you want to add a subwoofer to your car audio setup but only have a 4 channel amplifier, you might wonder: Can I use all four channels to power one sub? The answer is yes, and you can do it safely with the right steps. Many beginners think bridging is complicated, but with simple instructions, you can make your bass much stronger. This guide will show you, step by step, how to bridge a 4 channel amp to 1 sub, what to watch for, and how to avoid common mistakes.
What Does “bridging An Amp” Mean?
Bridging an amplifier means combining two channels into one, making the amp send more power to a single speaker. People do this to get more wattage for subwoofers, which need higher power for strong bass.
- A 4 channel amp usually powers four speakers (left and right, front and back).
- When you bridge the amp, you join the power of two channels into one.
- You can bridge two pairs of channels, using all four amp channels to push one subwoofer.
This method is popular when you want to use an older amp, or you want more “boom” in your car without buying a new mono amplifier.
Is It Safe To Bridge A 4 Channel Amp To 1 Subwoofer?
Yes, it’s safe if you do it right. However, you must follow certain rules:
- The subwoofer impedance (measured in ohms) must match the amp’s requirements.
- The amp must support bridging, which most modern 4 channel models do.
- The subwoofer must be able to handle the total power output from all bridged channels.
If you ignore these, you risk overheating, damaging your amp, or blowing your subwoofer.
Credit: www.diymobileaudio.com
Basic Requirements For Bridging
Before you start, check these:
- Amplifier bridging capability: Read your amp’s manual. Most 4 channel amps support bridging, but check for recommended wiring diagrams.
- Subwoofer impedance: Most 4 channel amps want a load of 4 ohms when bridged. Don’t use a 2 ohm sub unless your amp manual says it’s safe.
- Wattage handling: Your sub must handle the combined power of all amp channels.
- Wiring kit: Use thick enough wire (often 8 or 4 gauge) to handle higher current.
- Speaker wiring knowledge: You must know how to wire the sub’s voice coils for the right final impedance.
How Does A 4 Channel Amp Work?
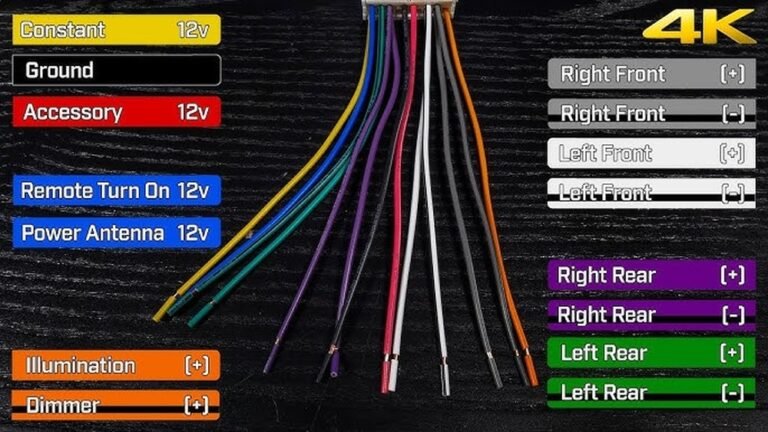
A 4 channel amp has four outputs, usually named:
- Channel 1 (Front Left)
- Channel 2 (Front Right)
- Channel 3 (Rear Left)
- Channel 4 (Rear Right)
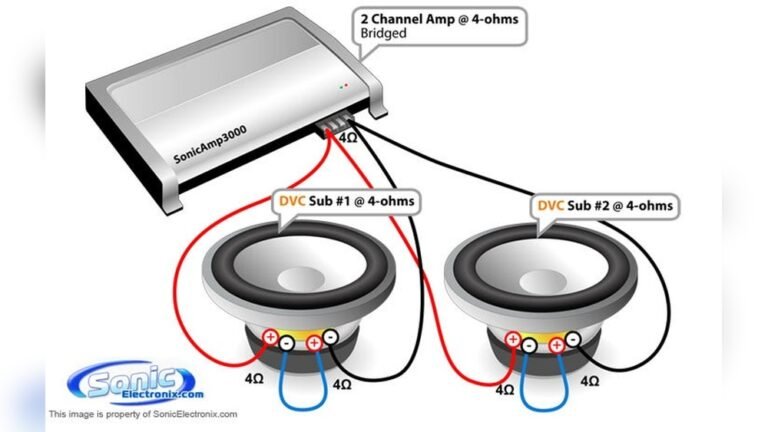
Each channel can power a speaker. When bridging, you combine:
- Channels 1 and 2 (to one sub input)
- Channels 3 and 4 (to the other sub input)
This is called bridged mono, and gives you more power.
Typical Output Power Comparison
Here’s a simple table to help you see the difference:
| Configuration | Output per Channel (Watts) | Total Power (Watts) |
|---|---|---|
| Standard (4 speakers) | 50W x 4 @ 4Ω | 200W |
| Bridged (2 channels) | 150W x 2 @ 4Ω | 300W |
| Bridged (1 subwoofer) | 300W x 1 @ 4Ω | 300W |
Insight: Bridging does not double the total amp output; it just lets you concentrate power into fewer channels.
Credit: www.crutchfield.com
Four Key Steps To Bridge A 4 Channel Amp To 1 Sub
You must follow all four steps to avoid damage and get the best sound. Each step has a dedicated section below.
1. Check Amp And Sub Compatibility
First, check if your amp and sub are a good match.
- Look at your amp’s bridged output power rating (e.g., 150W x 2 @ 4Ω).
- Check your subwoofer’s RMS power rating and impedance (e.g., 300W RMS, 4Ω dual voice coil).
- Make sure the sub can handle the amp’s power, and that the final impedance is what the amp wants.
Example: If your amp can provide 300W bridged at 4Ω and your sub is 4Ω, you’re good.
Beginner Mistake: Using the wrong impedance can make your amp overheat or shut down. Always match the amp and sub’s rated ohms.
2. Plan Your Wiring For Bridging
You need to wire the amp outputs so that pairs of channels work together.
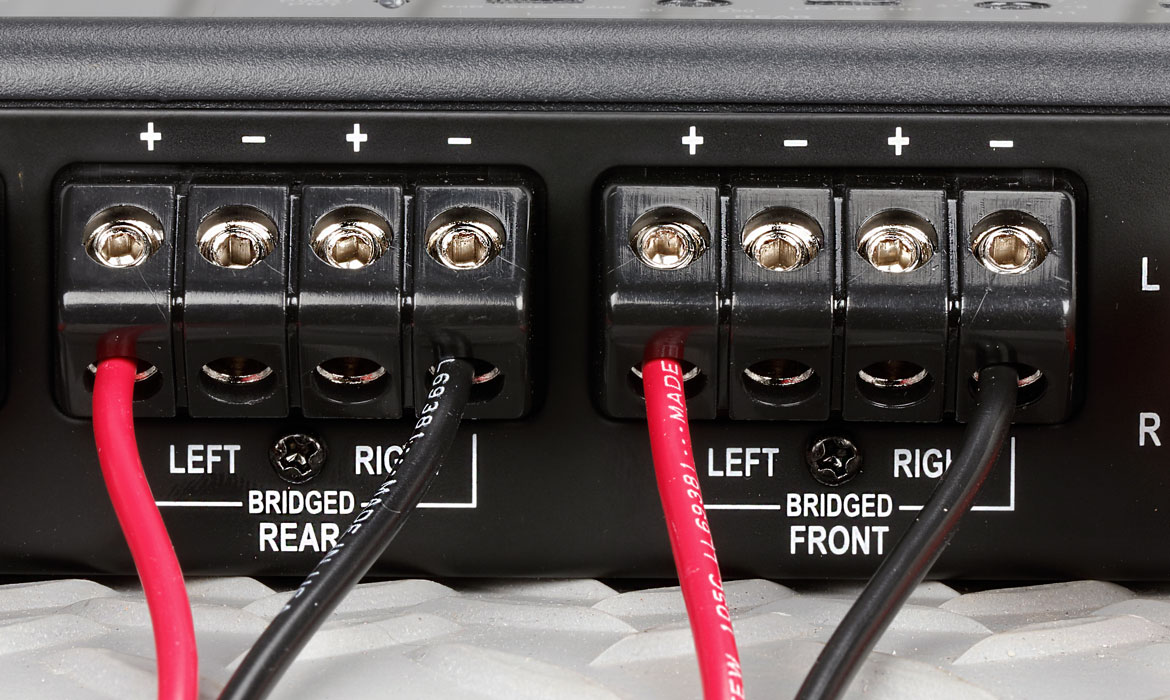
- For a single subwoofer, you will bridge two pairs: Channels 1+2 and Channels 3+4.
- Use the positive terminal from the first channel and the negative terminal from the second channel in each pair.
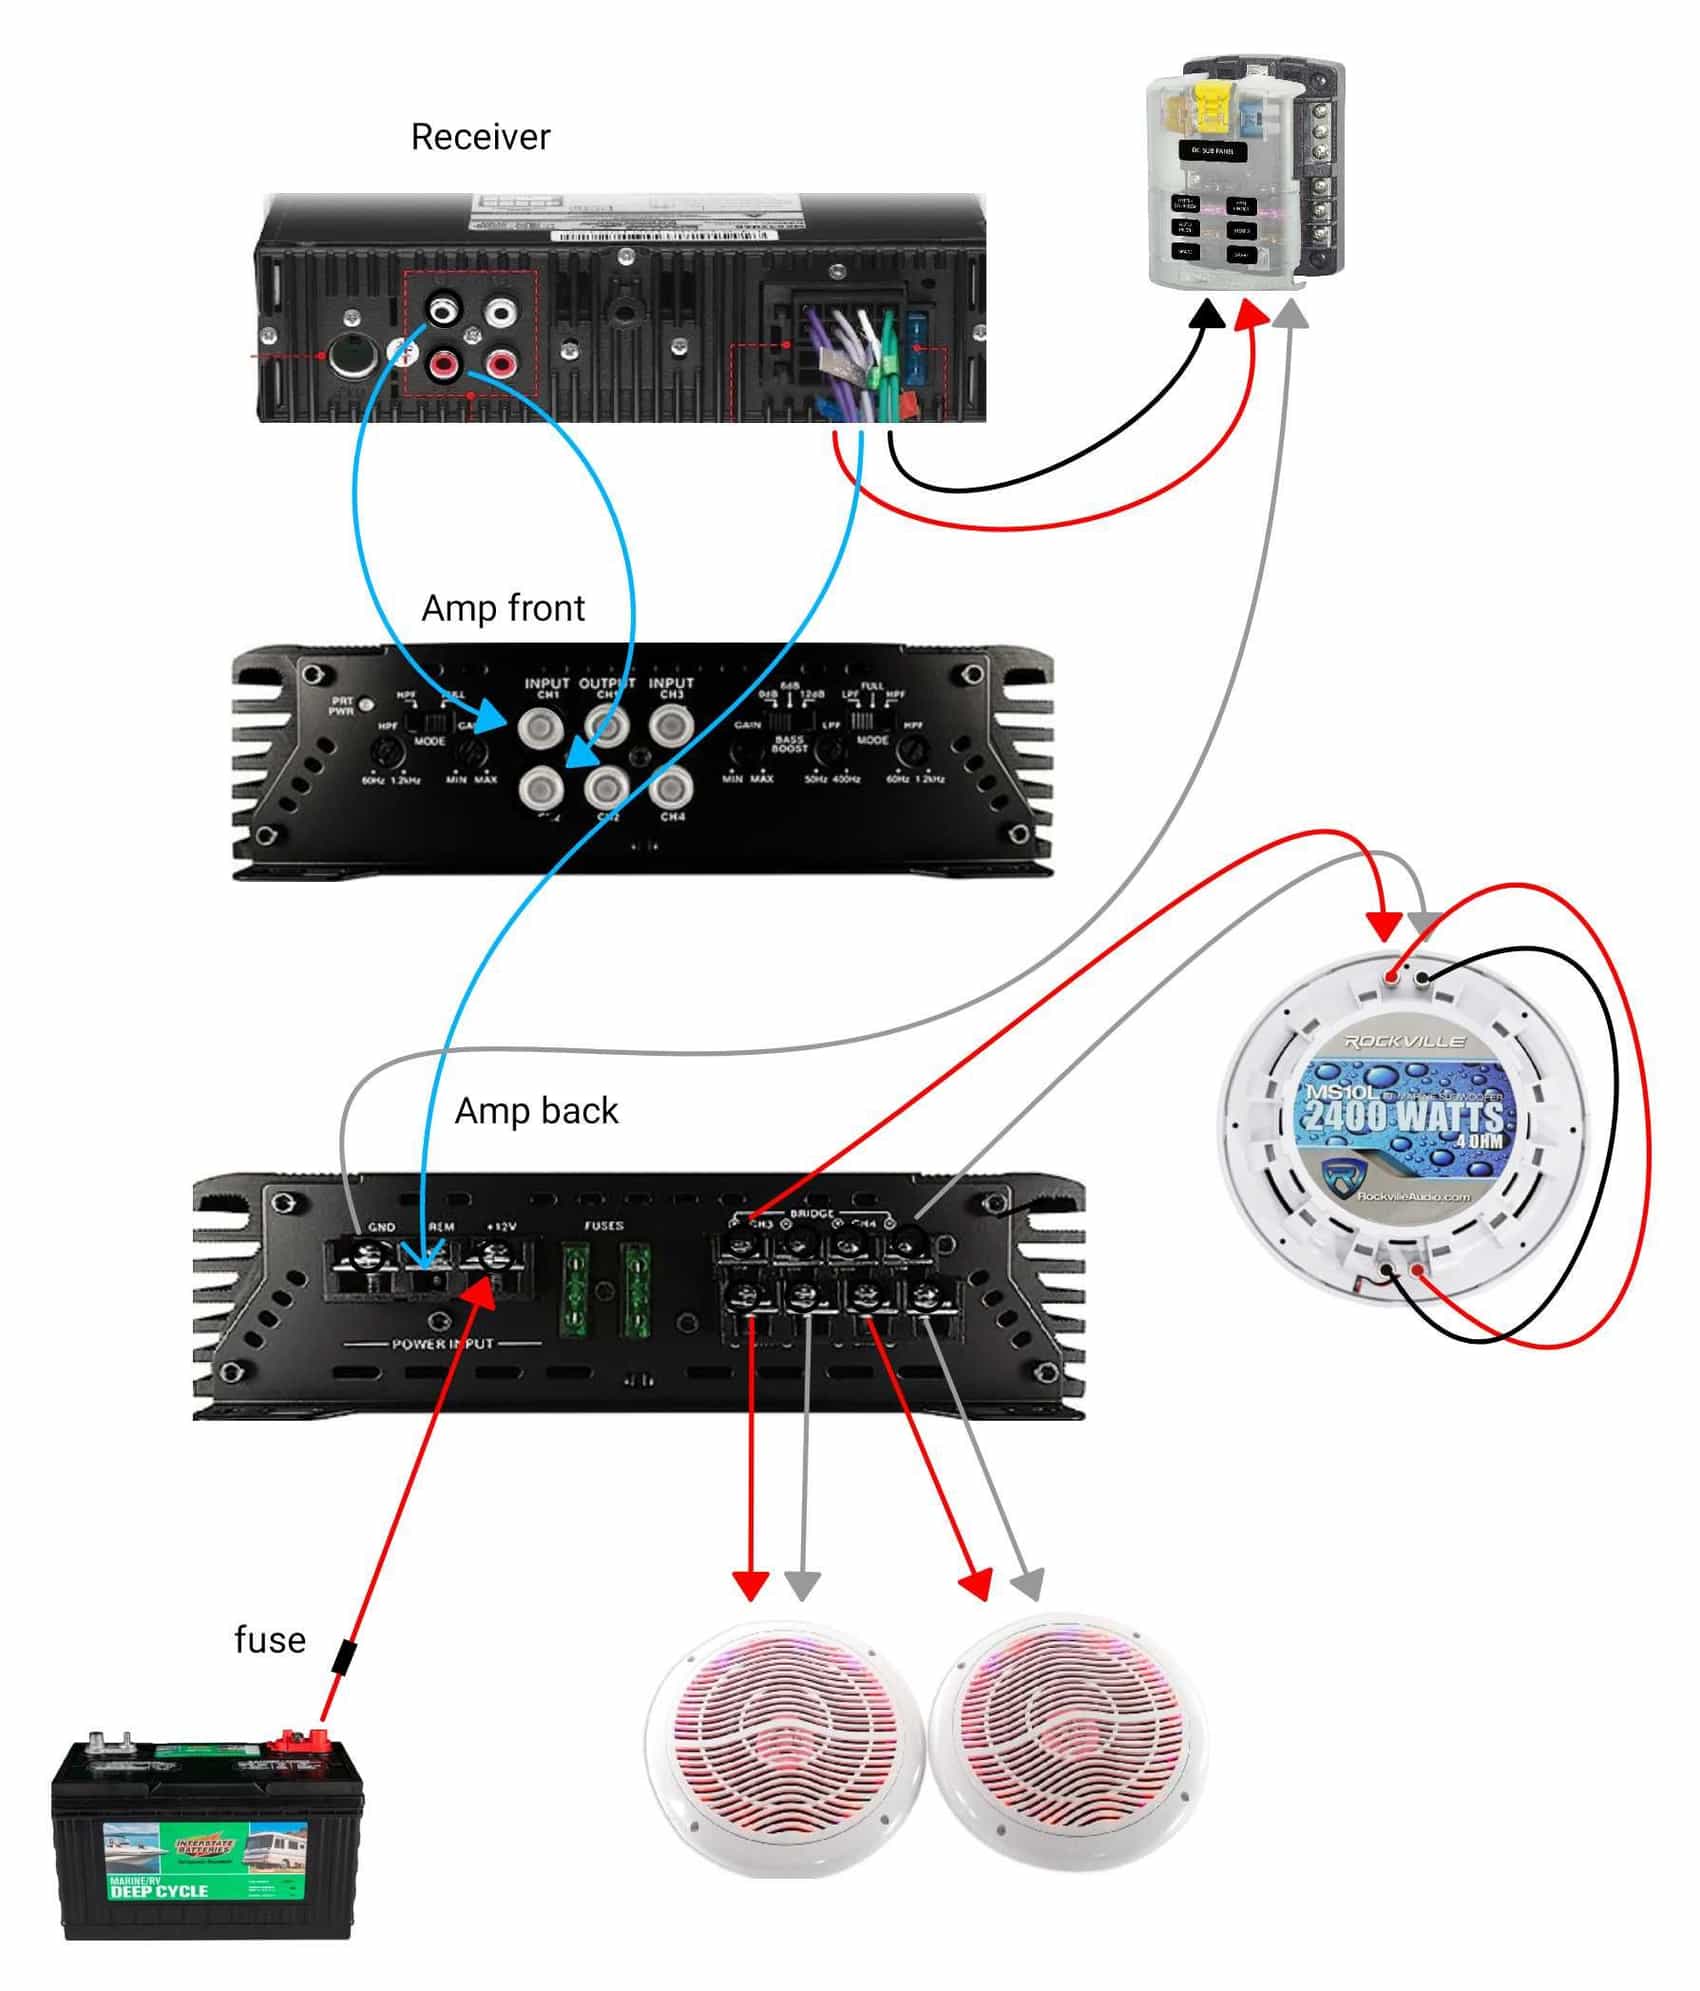
Wiring diagram example:
- Amp Channel 1 (+) and Channel 2 (–) = one sub input
- Amp Channel 3 (+) and Channel 4 (–) = the other sub input
If your subwoofer has dual voice coils, you may need to wire those in series or parallel to reach the target impedance.
Tip: Most amps label the bridging terminals near the speaker connectors. If not, check the manual.
3. Connect The Subwoofer To The Bridged Channels
Now, connect the wires:
- Cut two pieces of speaker wire (same length).
- Connect one wire from Channel 1 (+) to one subwoofer input.
- Connect that wire’s other end from Channel 2 (–) to the same subwoofer input.
- Repeat with Channel 3 (+) and Channel 4 (–) for the other subwoofer input.
For dual voice coil subs: Connect each coil to one bridged pair, or wire the coils together for the correct impedance.
Example Wiring Table
| Amp Channel | Wire Terminal | Subwoofer Terminal |
|---|---|---|
| Channel 1 | + | Input 1 (+) |
| Channel 2 | – | Input 1 (–) |
| Channel 3 | + | Input 2 (+) |
| Channel 4 | – | Input 2 (–) |
Safety reminder: Always disconnect the car battery before wiring to avoid shocks or shorts.
4. Adjust Amp Settings And Test
Once your wiring is done, it’s time to set up your amp.
- Set the amp to “bridge mode” if it has a switch. Most amps detect this automatically when wired as above.
- Set the gain/level knob low to start. Increase slowly after testing.
- Set the low-pass filter to cut off high frequencies. This sends only bass to your sub.
- Use a test track with deep bass to check for clean sound and no distortion.
Non-obvious insight: After bridging, the amp will get warmer than before. Check for overheating in the first 15–30 minutes of play.
Practical Example: Bridging In A Real Car
Let’s say you have:
- Amp: 4 channel, 50W x 4 @ 4Ω, 150W x 2 bridged @ 4Ω
- Subwoofer: Dual 4Ω voice coils, 300W RMS
You would:
- Wire each coil to a bridged channel pair (so each pair “sees” 4Ω).
- Connect as described above.
- Set the amp’s filters and gain.
- Test with music.
Result: You get about 300W to the sub, much more than using only one channel.
Common beginner mistake: Not wiring the sub coils correctly, ending with the wrong impedance.
Credit: www.thehulltruth.com
Key Tips For Success
- Always use thick, quality wire for both power and speaker connections.
- Check all connections for tightness.
- Never bridge to a subwoofer with lower impedance than your amp can handle.
- If you smell burning or the amp shuts off, disconnect everything and check your wiring.
When Shouldn’t You Bridge All 4 Channels?
Bridging a 4 channel amp to one sub is not always the best solution. Here’s why:
- You lose the ability to power front and rear speakers.
- If you want a full-range system, consider using a mono amp for the sub and keep your 4 channel amp for mids/highs.
- Some amps can’t handle low-impedance loads when bridged.
Choosing The Right Subwoofer For Bridging
Not every subwoofer is suitable for this setup. Here’s what to look for:
- Dual voice coil subwoofers are best. You can wire them for 4Ω or 8Ω easily.
- RMS power rating should be close to your amp’s bridged output.
- Avoid subs rated much higher than your amp can provide; you’ll never get their full potential.
Subwoofer Matching Table
| Subwoofer Type | Voice Coils | Best Impedance for Bridged 4ch Amp |
|---|---|---|
| Single voice coil | 1 x 4Ω | 4Ω |
| Dual voice coil | 2 x 4Ω | Wire in series for 8Ω, parallel for 2Ω (use series for safety) |
| Dual voice coil | 2 x 2Ω | Wire in series for 4Ω |
Tip: If you’re not sure, ask the subwoofer seller for a wiring diagram.
Why Not Just Use A Mono Amp?
A mono amp is designed for subwoofers. It’s easier to use and often more efficient. But if you have a 4 channel amp already, bridging is a good way to save money.
- Mono amps often handle lower impedance (like 2Ω) better than bridged 4 channel amps.
- Bridging is best for budget builds or upgrading old equipment.
Common Questions And Beginner Pitfalls
- Overloading: Never wire your sub to a lower impedance than the amp can handle.
- Mismatched power: Don’t use a sub that needs much more power than your amp can supply.
- No protection: If your amp does not have short or thermal protection, bridging increases risk.
Non-obvious insight: Some head units only have two RCA outputs. You might need a Y-splitter to feed all four amp channels.
Recommended Resources
If you need more visual instructions, check your amp’s official manual or visit Crutchfield for wiring guides.
Frequently Asked Questions
Can I Bridge All Four Channels To A Single Subwoofer?
Yes, you can bridge a 4 channel amp to power one subwoofer by pairing channels (1+2 and 3+4). The sub must have the correct impedance, usually 4Ω, to avoid damaging the amp.
What Is The Best Subwoofer Impedance For Bridging A 4 Channel Amp?
Most 4 channel amps are designed to handle a 4Ω load when bridged. Using a lower impedance, like 2Ω, may overheat or damage the amp.
Do I Lose Sound Quality When Bridging?
No, you do not lose sound quality if you match the sub and amp correctly. In fact, you get more power and cleaner bass when the amp is not overloaded.
Can I Bridge A 4 Channel Amp If My Subwoofer Is Single Voice Coil?
Yes, as long as the sub’s impedance matches the amp’s bridged rating (usually 4Ω). Dual voice coil subs give you more wiring options but are not required.
What Happens If I Wire My Subwoofer To The Wrong Terminals?
If you wire the sub to the wrong terminals, you may get weak sound, distortion, or no output. Always check your amp’s manual for the correct bridging terminals.
Bridging a 4 channel amp to one subwoofer is a smart way to boost your bass without buying new gear. Take your time, follow each step, and you’ll enjoy much better sound in your car. If in doubt, consult a professional or reliable online guide.
Happy listening!