How to Add a Second Battery for Car Audio: Step-by-Step Guide
Thinking about adding a second battery for your car audio system? If you want louder music, more bass, or your headlights dim when the bass hits, a second battery can help. Many car owners add one to avoid electrical problems and keep their audio setup strong. This guide explains how to add a second battery for car audio, step by step, with clear advice for beginners. You’ll learn what parts you need, why a second battery is important, and how to do the installation safely.
Why Add A Second Battery For Car Audio?
Upgrading your car audio system often means higher power demand. Big amplifiers and subwoofers can drain your car’s main battery fast. If your headlights flicker, your car struggles to start, or your music gets weaker at high volume, your audio is using more power than your battery or alternator can supply.
A second battery gives your audio system its own power source. Here’s why that matters:
- Prevents dimming lights when the bass hits
- Keeps the main battery safe for starting the engine
- Lets you play music longer with the engine off
- Extends the life of both batteries
Important insight: Many beginners think a bigger main battery is enough. But for powerful audio systems (over 1000 watts RMS), a second battery is much safer and more reliable.
How Car Audio Power Works
Your car’s alternator charges the battery and powers electrical items (lights, radio, etc.) when the engine runs. If your audio system needs more power than the alternator can provide, the battery makes up the difference. But car batteries aren’t meant for deep, repeated discharges—they lose life quickly this way.
Example: A stock alternator gives about 80–120 amps. A high-powered amplifier can draw 60–100 amps by itself. Add headlights, air conditioning, and other items, and you can see how quickly you reach the limit.
Key tip: Upgrading the alternator is sometimes needed for very large systems, but adding a second battery is often the first step.

Credit: www.youtube.com
What You Need For A Second Battery Installation
Before installing, gather these main items:
- Second battery (deep cycle type preferred)
- Battery isolator or relay
- Heavy gauge wire (usually 1/0 or 4 AWG)
- Battery terminals (connectors)
- Battery box (if installed inside car cabin)
- Fuses and holders (for safety)
- Basic tools (wire cutters, wrench, drill)
Deep cycle batteries are best for car audio because they handle frequent discharge and recharge cycles. Popular brands include Optima YellowTop and XS Power.
Battery Types Comparison
Here’s a simple comparison of battery types for car audio:
| Type | Best For | Pros | Cons |
|---|---|---|---|
| Deep Cycle AGM | Audio systems, long play time | Long life, spill-proof | Higher cost |
| Standard Lead-Acid | Starting car | Cheap, common | Not for deep discharge |
| Lithium Ion | High-end systems | Very light, holds charge | Very expensive |
Non-obvious tip: If you install the second battery inside the vehicle, use a sealed AGM or lithium battery. Regular lead-acid batteries produce gases that can be dangerous in closed spaces.
Where To Mount The Second Battery
Choosing the right location is important for safety and performance. Common options:
- Trunk: Most popular, keeps wiring short to amplifiers
- Under rear seat: Good for compact batteries
- Engine bay: Only if there’s enough space
Keep the battery secure and away from metal objects that could cause a short circuit. Use a battery box if inside the cabin or trunk.

Credit: www.youtube.com
Step-by-step Guide: Adding A Second Battery
Ready to install? Here’s a simple process for beginners.
1. Disconnect The Main Battery
Always start by disconnecting the negative terminal of your main battery. This protects you from shocks and electrical shorts.
2. Mount The Second Battery
- Place the battery in your chosen spot (trunk, under seat, etc.)
- Secure it with a battery bracket or box
- Make sure it won’t move during driving
3. Install The Battery Isolator
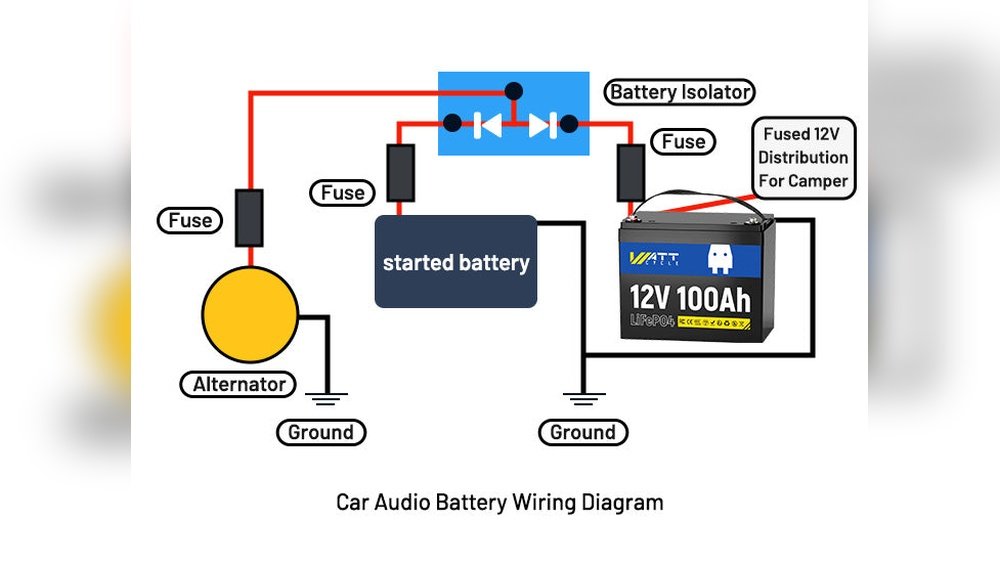
A battery isolator or relay is critical. It connects the two batteries when the car is running but keeps them separate when the engine is off. This way, your main battery won’t get drained by your audio system.
- Mount the isolator near the main battery or firewall
- Connect the input terminal to the main battery’s positive post
4. Run Power Wire To The Second Battery
- Use thick wire (1/0 or 4 AWG) for safety and to handle high current
- Run the wire from the isolator output to the second battery positive terminal
- Route wire under carpet or along the vehicle frame—avoid sharp edges
Practical tip: Always add a fuse within 18 inches of each battery’s positive post. This prevents fires if a wire gets damaged.
5. Connect Grounds
- Connect the second battery’s negative terminal to a solid chassis ground (bare metal)
- Scrape away paint for a clean ground connection
- The main battery also grounds to the chassis—make sure both grounds are solid
6. Connect Your Audio System
- Power your amplifiers from the second battery’s positive and negative posts
- Keep wires as short as possible to reduce voltage drop
7. Double-check And Test
- Confirm all connections are tight and fuses are in place
- Reconnect the main battery’s negative terminal
- Start the car and use a voltmeter to check voltage at both batteries (should be 13.8–14.4 volts with engine running)
- Test your audio system at high volume—no dimming lights or weak sound means success
Wiring Diagram Example
Here’s a basic wiring diagram:
- Main battery positive → fuse → isolator input
- Isolator output → fuse → second battery positive
- Both batteries negative → chassis ground
- Amplifier power wire → second battery positive
- Amplifier ground wire → second battery negative
This setup means your audio gear uses the second battery’s power, but both batteries charge when the engine runs.
:max_bytes(150000):strip_icc()/wiresecondbatteryforperformanceaudio-5b493446c9e77c0037a6d218.jpg)
Credit: www.lifewire.com
Common Mistakes To Avoid
Many first-timers make errors that can damage the car or battery. Avoid these:
- No battery isolator: Drains both batteries when the engine is off. Always use an isolator.
- Too thin wire: Causes voltage drop, heat, and possible fire. Use at least 4 AWG for most setups.
- Bad ground connection: Leads to weak sound or ground noise. Scrape paint for a solid metal connection.
- No fuses: Increases fire risk. Always fuse both ends of the power wire.
- Wrong battery type: Use deep cycle batteries designed for audio, not regular car starter batteries.
Example: A user installed a second battery without an isolator. After playing music with the car off, both batteries died overnight. They could not start the car the next day.
How To Size Your Second Battery
Choosing the right battery size is important. Too small, and you still get dimming and weak sound. Too big, and you waste money and space.
General rule: For every 1000 watts RMS of audio power, add a 50Ah battery.
Example:
- 1500 watt system → 75Ah battery recommended
Check your amplifier’s RMS rating, not the peak power. RMS is a real-world measure of power use.
Second Battery Vs. Capacitor
Some people wonder if they need a capacitor instead of a second battery. Here’s a quick comparison:
| Feature | Capacitor | Second Battery |
|---|---|---|
| Stores energy for quick bursts | Yes | No (longer supply) |
| Helps with dimming lights | Sometimes | Yes |
| Good for long play time with engine off | No | Yes |
| Cost | Low | Higher |
Insight: Capacitors help with short bass hits, but a second battery is much better for real power needs and long play time.
Maintenance And Safety Tips
Once installed, keep both batteries in top shape:
- Check voltage monthly with a voltmeter. Both batteries should read 12.6–12.8 volts when the car is off.
- Clean terminals every few months to avoid corrosion.
- Replace fuses if you notice any power problems.
- Avoid over-discharging. Don’t run the system for hours with the engine off.
Practical advice: If you use your car for long shows or events, consider a battery charger to top up both batteries overnight.
How Much Does It Cost?
Costs depend on your choices:
- Second battery: $100–$350 (deep cycle AGM)
- Isolator/relay: $30–$100
- Wire, fuses, terminals: $50–$120
- Installation (DIY): Free, or $100–$200 at a shop
Total DIY cost: $180–$570 for most systems.
For more on battery isolators and wiring, see Wikipedia.
Is It Worth It?
If you love loud, clean music and don’t want to worry about a dead battery, adding a second battery is a smart move. It protects your car, keeps your sound strong, and means less stress.
Beginner insight: Many people get better sound and fewer problems after this upgrade. It’s easier than you think with the right tools and guide.
Frequently Asked Questions
How Do I Know If I Need A Second Battery For Car Audio?
If your headlights dim when the bass hits, or your car struggles to start after playing music, you probably need a second battery. Systems over 1000 watts RMS almost always require one.
Can I Install A Second Battery Myself?
Yes, most car owners can do this with basic tools and careful steps. Follow safety tips, use the correct wire, and always add fuses and an isolator.
Will A Second Battery Hurt My Alternator?
Not if installed correctly. Both batteries will charge when the engine runs. If your system is very large (over 2000 watts RMS), you may need to upgrade your alternator too.
What Size Wire Do I Need For A Second Battery?
Use at least 4 AWG wire for systems up to 1500 watts. For bigger systems or longer wire runs, use 1/0 AWG. Thicker wire means less power loss.
Is A Battery Isolator Really Necessary?
Yes. Without an isolator, your main battery may drain, leaving you unable to start your car. The isolator keeps the batteries separate when the engine is off.
Adding a second battery for your car audio system can seem complex, but with the right plan, it’s a safe and rewarding upgrade. Enjoy your music at full power, and keep your car running strong!