How Do You Bridge a 2 Channel Amp for Maximum Power Output
Most people who get into car or home audio systems will eventually hear the term “bridging an amp.” If you have a 2 channel amplifier and want more power for a subwoofer or a big speaker, bridging can help. But what does bridging really mean? How do you do it safely? And what should you watch out for? In this guide, you’ll learn step-by-step how to bridge a 2 channel amp, with simple language, practical examples, and clear answers to common questions.
What Does Bridging An Amp Mean?
Bridging an amp means you combine the power of two amplifier channels into one stronger channel. This gives you more power to drive a single speaker, usually a subwoofer. Instead of sending half the amp’s power to each speaker, you send all the power to one.
Think of it like this: If each channel gives 50 watts, bridging can give you up to 200 watts to one speaker (not always double, but much more). The exact power depends on your amp and speaker.
Bridging is common in these cases:
- Powering a subwoofer in a car
- Running a big speaker for home theater
- Upgrading sound systems for more bass
Why Bridge A 2 Channel Amp?
There are a few important reasons to bridge:
- More Power: One speaker gets more watts, so it can play louder and deeper.
- Better Bass: Subwoofers need a lot of power. Bridging gives them what they need.
- Flexible Use: You can use your 2 channel amp to power one speaker or subwoofer instead of two smaller ones.
But bridging isn’t always right. If your speaker can’t handle the extra power, it might get damaged. Always check the ratings before you start.
Credit: soundcertified.com
How A 2 Channel Amp Works
A 2 channel amp has two separate outputs. You can use each one for a speaker, or combine both for one speaker. Here’s a simple breakdown:
- Stereo Mode: Each channel powers one speaker. Good for left and right sound.
- Bridged Mode: Both channels work together to power one speaker. Good for subwoofers.
This table shows the difference:
| Mode | Number of Speakers | Power Output | Best For |
|---|---|---|---|
| Stereo | 2 | 50W x 2 | Left and Right Speakers |
| Bridged | 1 | Up to 200W x 1 | Subwoofer |
When Should You Bridge Your Amp?
You should consider bridging in these cases:
- You have a subwoofer and need more power.
- Your amp’s stereo power isn’t enough for your speaker.
- You want to upgrade your car or home theater bass.
But you should NOT bridge if:
- Your speaker’s RMS (continuous) rating is lower than the amp’s bridged power.
- Your amp isn’t “bridgeable” (not all amps can do this).
- Your speaker’s impedance (ohms) is too low for the amp when bridged.
What Do You Need To Bridge A 2 Channel Amp?
Before you start, gather these items:
- Bridgeable 2 channel amp (check the manual for “bridged” mode)
- Single speaker (usually a subwoofer)
- Speaker wire
- Screwdriver (for connecting wires)
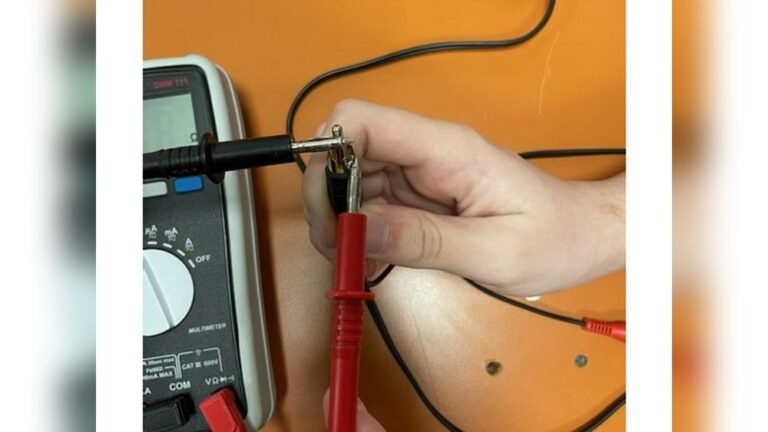
- Multimeter (optional, for checking connections)
Most importantly, you must know the impedance (ohms) of your speaker and amp. This prevents damage.
Understanding Impedance And Power
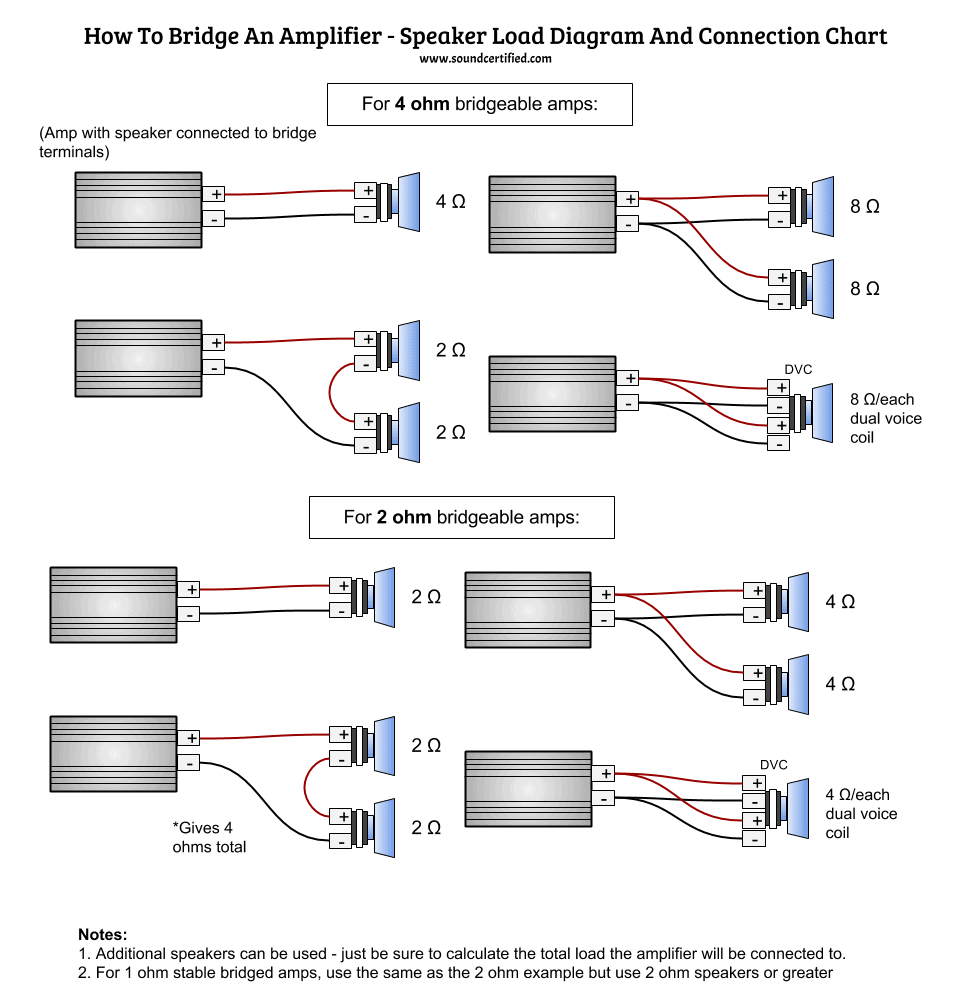
Impedance is the resistance your speaker gives to the amp’s power. Most car subwoofers are 4 ohms or 2 ohms. When you bridge an amp, its minimum safe impedance goes up.
- If your amp can handle 2 ohms per channel, when bridged, it usually handles 4 ohms (not 2).
- If you connect a 2 ohm speaker to a bridged amp rated for 4 ohms, you risk blowing the amp.
Here’s a quick reference:
| Per Channel Rating | Safe Bridged Impedance | Warning |
|---|---|---|
| 2 ohms | 4 ohms | Never bridge into 2 ohms unless the manual says it’s safe |
| 4 ohms | 8 ohms | Lower ohms can burn the amp |
Non-obvious tip: Some amps shut down or go into “protect mode” if you connect a speaker with too low impedance. Always check your amp’s specs!
Step-by-step: How To Bridge A 2 Channel Amp
Here are the practical steps:
1. Turn Everything Off
- Turn off your amp and audio source.
- Disconnect power if possible.
2. Find The Amp’s Speaker Terminals
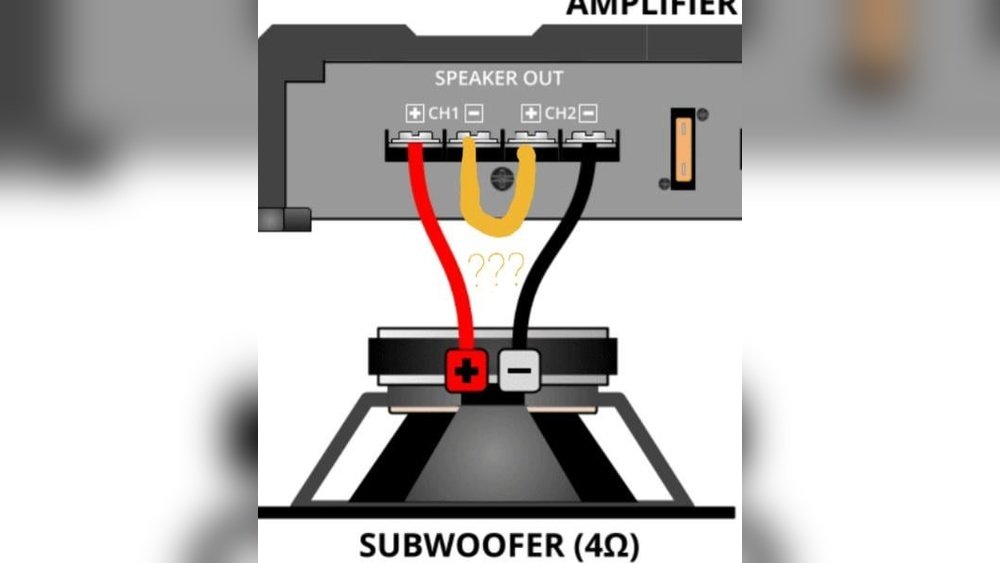
Most 2 channel amps have four terminals:
- Channel 1 positive (+)
- Channel 1 negative (-)
- Channel 2 positive (+)
- Channel 2 negative (-)
Look for markings on the amp or in the manual. Sometimes, “bridged” terminals are labeled.
3. Connect The Speaker Wires
- Take your single speaker wire.
- Connect the positive (+) wire to the Channel 1 positive (+).
- Connect the negative (-) wire to the Channel 2 negative (-).
This is the most common setup, but always check your amp’s diagram. Some amps use Channel 2 positive and Channel 1 negative for bridging.
Non-obvious tip: If your amp has a “bridged” switch, set it to “bridged” before connecting.
4. Double-check Impedance
- Make sure your speaker is the right ohm rating.
- Do NOT use a speaker with lower impedance than the amp’s bridged rating.
5. Secure The Connections
- Tighten the terminals with a screwdriver.
- Make sure there are no loose wires.
6. Power On And Test
- Reconnect power and turn on your amp.
- Play music at low volume first.
- Check for clear sound with no distortion or protection lights.
- Slowly increase the volume.
If you hear distortion, smell burning, or see warning lights, turn everything off and check your wiring and speaker load.
Example: Bridging A 2 Channel Car Amp
Let’s say you have a car amp rated at 50W x 2 at 4 ohms (per channel), or 200W x 1 at 4 ohms (bridged). You bought a 4 ohm subwoofer. Here’s what you do:
- Turn off your amp and disconnect the battery.
- Find the speaker terminals. Use Channel 1 (+) and Channel 2 (-).
- Connect the sub’s positive wire to Channel 1 (+), negative to Channel 2 (-).
- Double-check the sub is 4 ohms.
- Secure wires, reconnect battery, and test at low volume.
If you do this right, your subwoofer will get up to 200 watts, much more than a single channel can give.
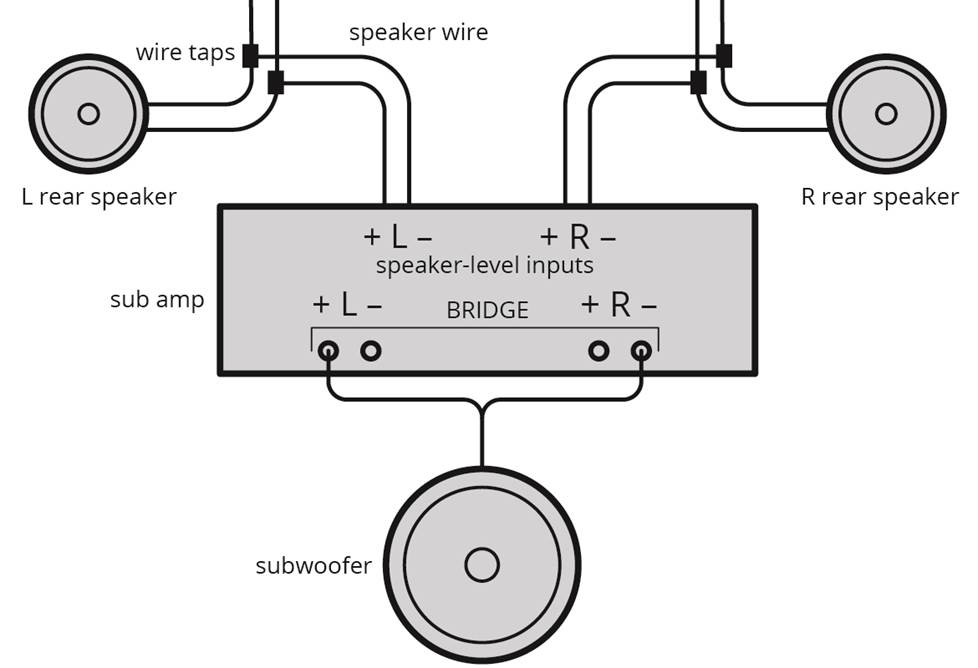
Credit: www.crutchfield.com
Common Mistakes To Avoid
Many beginners make these mistakes:
- Wrong impedance: Using a 2 ohm sub on a 4 ohm min. Amp can blow the amp.
- Loose wires: Poor connections can cause noise or damage.
- Too much gain: Turning the amp’s gain too high can cause distortion.
- Ignoring manual: Not all amps are built to be bridged.
Always check the manual and specs before connecting.
How To Tell If Your Amp Is Bridgeable
Not all amps can be bridged. Look for these signs:
- The amp’s manual mentions “bridged mode.”
- Speaker terminals are labeled for bridging (e.g., “Bridged +” and “Bridged -”).
- Online forums for your amp model confirm it’s bridgeable.
If you see none of these, don’t risk it. Bridging a non-bridgeable amp can cause permanent damage.
What Happens If You Bridge Wrong?
If you connect the wrong way:
- The amp may go into protect mode (shuts off to avoid damage).
- The sound may be weak or distorted.
- The amp or speaker may overheat or burn out.
Always double-check wiring and speaker ratings before turning the amp on.
Bridging Vs. Running Stereo: Which Is Best?
Should you bridge, or run two speakers in stereo? Here’s a quick comparison:
| Feature | Bridged Mode | Stereo Mode |
|---|---|---|
| Number of speakers | 1 | 2 |
| Power per speaker | More (combined power) | Less (individual channel) |
| Best for | Subwoofer, high-power use | Left/Right music |
| Wiring complexity | Medium | Simple |
If you want strong bass or have a subwoofer, bridging is usually better. For general music, stereo mode is best.

Credit: www.wikihow.com
Practical Tips For Safe Bridging
- Always use the right gauge speaker wire (thicker for high power).
- Double-check all connections before turning on the amp.
- Start with the amp gain low, and increase slowly.
- Use a fuse on the power wire for safety.
- Check for overheating during first use.
- Read your amp’s manual carefully.
Upgrading Your System After Bridging
Bridging is just the start. For even better sound:
- Use a dedicated subwoofer amp if you add more subs.
- Upgrade your main speakers or add a crossover.
- Use sound-deadening materials in your car for better bass.
If you ever want to add more speakers, you may need a bigger or multi-channel amp.
Real-world Example: Bridging For Home Theater
Suppose you have a 2 channel home amp (100W x 2 at 8 ohms, 200W x 1 at 8 ohms bridged). You want to power a single 8 ohm subwoofer.
- Connect the sub’s positive to Channel 1 (+), negative to Channel 2 (-).
- Set the amp to “bridged” mode if there’s a switch.
- Keep the volume low at first to test.
This setup can give you much deeper, clearer bass in your home theater.
Expert Insights Beginners Miss
- Speaker Polarity Is Critical: If you reverse the positive and negative, sound can be weak or distorted. Always match the amp’s “+” and “-” to the speaker’s.
- Amp Cooling Matters: Bridged amps work harder and get hotter. Make sure your amp has good airflow, or it might shut down or wear out early.
For even more tips and detailed amp specs, sites like Wikipedia offer technical backgrounds.
Frequently Asked Questions
How Do I Know If My Amp Is Bridgeable?
Check your amp’s manual or look for labels on the speaker terminals. If it says “bridged” or shows a diagram, it’s bridgeable. If there’s no info, search for your amp model online or ask the manufacturer.
Can I Bridge Any 2 Channel Amp?
No. Some amps cannot be safely bridged. Using the wrong amp can cause damage. Always check the manual or the manufacturer’s website before trying.
What Happens If I Use The Wrong Speaker Impedance?
Using a speaker with lower impedance than your amp’s bridged rating can overheat and damage the amp. It may shut off, distort, or even catch fire in extreme cases. Always match or exceed the minimum impedance listed.
Will Bridging Double My Wattage?
Bridging increases power, but not always double. For example, two 50W channels might give 180–200W bridged, not 100W. The actual power depends on the amp’s design and power supply.
Is Bridging Good For All Speakers?
Bridging is best for subwoofers or high-power speakers. For regular music speakers, stereo mode is often better. Only bridge if you need more power for a big speaker and your equipment supports it.
Bridging a 2 channel amp is a powerful way to boost your sound system, but you must do it safely. Always check your amp’s and speaker’s specs, follow wiring diagrams, and start with low volume when testing. With the right setup, you’ll enjoy deeper bass and louder sound, whether in your car or home theater.