How to Bridge 4 Channel Amp: Easy Steps for Maximum Power Boost
If you’re looking to get more power out of your car audio system without buying a new amplifier, bridging your 4 channel amp is a smart move. But how do you do it right?
You might have heard that bridging combines channels to boost output, but the process can seem tricky if you’re not sure where to start. In this guide, you’ll learn exactly how to bridge your 4 channel amp step-by-step, so you can maximize your sound system’s performance safely and effectively.
Keep reading, and by the end, you’ll have the confidence to make your speakers deliver richer, louder audio without any guesswork.
Basics Of A 4 Channel Amplifier
Preparing your 4 channel amplifier for bridging is crucial for a smooth setup. This step ensures safe operation and optimal sound performance. Before connecting wires, take time to prepare carefully. Proper preparation prevents damage to your equipment and helps achieve the best sound quality.
Follow these simple steps to get ready before you start bridging your amplifier.
Check Amplifier Compatibility
Not all 4 channel amps support bridging. Check your amplifier’s manual or label. Look for “bridgeable” or “bridging mode” specifications. Verify the minimum speaker impedance your amp can handle when bridged. Using incompatible amps can cause overheating or damage. Confirm your amp can safely handle the load of bridged speakers.
Gather Necessary Tools And Materials
Prepare all tools before starting. You will need a screwdriver, wire strippers, and a multimeter. Use quality speaker wire that matches your amp’s power rating. Keep electrical tape or heat shrink tubing handy for secure connections. Having everything ready saves time and avoids mistakes during installation.
Preparing For Bridging
Bridging a 4 channel amplifier combines two channels into one. This increases the power output for your speakers or subwoofers. Follow these simple steps to bridge your amp safely and correctly.
Each step is important to avoid damage and get the best sound from your system.
Identify Bridgeable Channels
Check your amplifier’s manual to find which channels can be bridged. Usually, channels 1 and 2 form one bridge, and channels 3 and 4 form the other. Look for labels like “Bridge” or “Bridgable” on the amp terminals. Avoid guessing, as not all channels support bridging. Correct channel choice is key to proper operation.
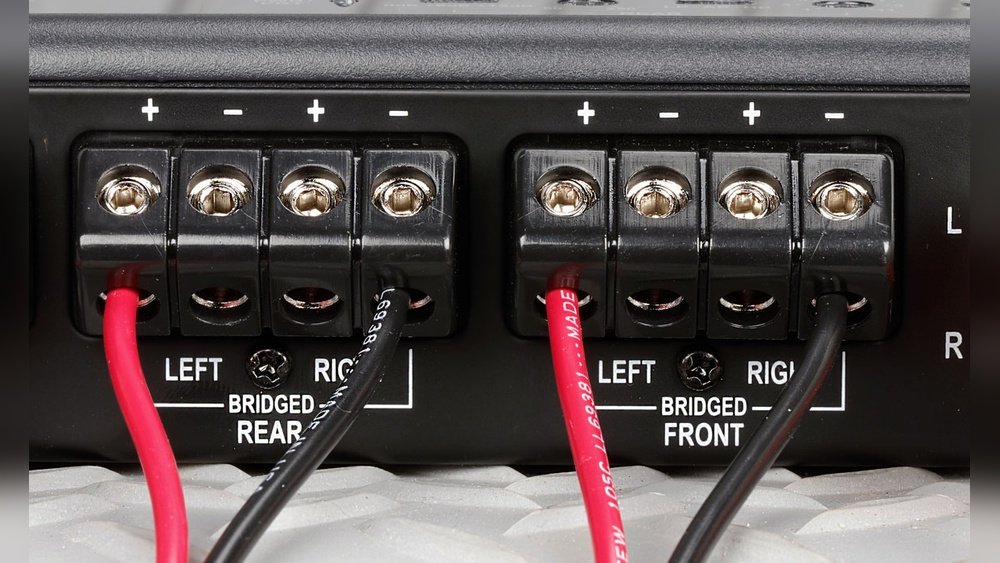
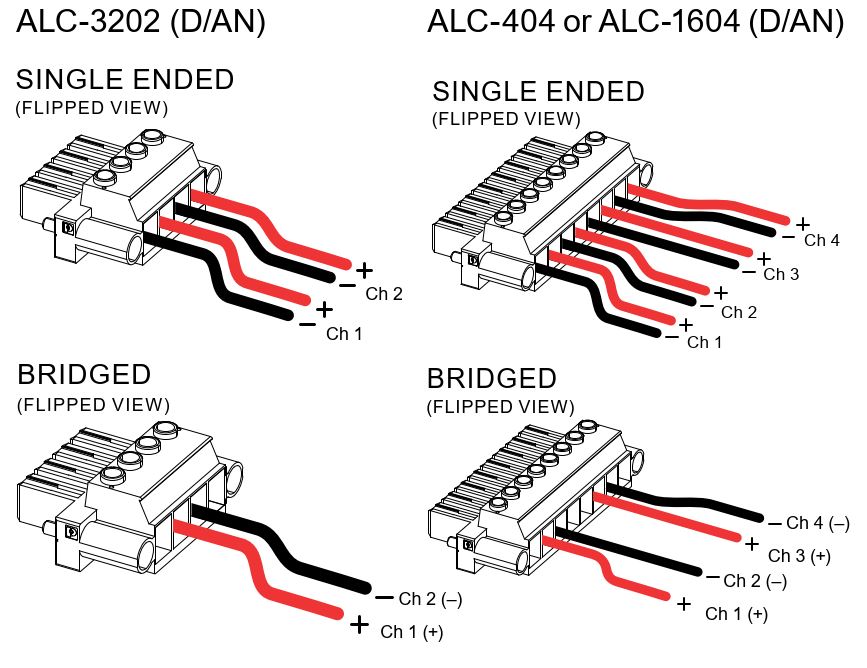
Connect Speaker Wires Correctly
Use speaker wires of good quality and correct gauge. Connect the positive wire to the positive terminal of the first channel. Connect the negative wire to the negative terminal of the second channel in the pair. Do not connect wires to the same channel terminals. Secure all connections tightly to avoid shorts or loss of signal.
Use Proper Terminals For Bridging
Use the designated terminals marked for bridging. These terminals are usually spaced apart from regular speaker outputs. Avoid using terminals meant for single channel output only. Double-check the polarity before powering on. Proper terminal use ensures balanced power and clear sound.
Step-by-step Bridging Process
Maximizing power output is essential when bridging a 4 channel amplifier. Bridging combines two channels to deliver more power to a single speaker. This helps drive subwoofers or high-power speakers effectively. Proper setup ensures the amplifier operates safely and efficiently. Focus on speaker choice, wiring, and testing to get the best results.
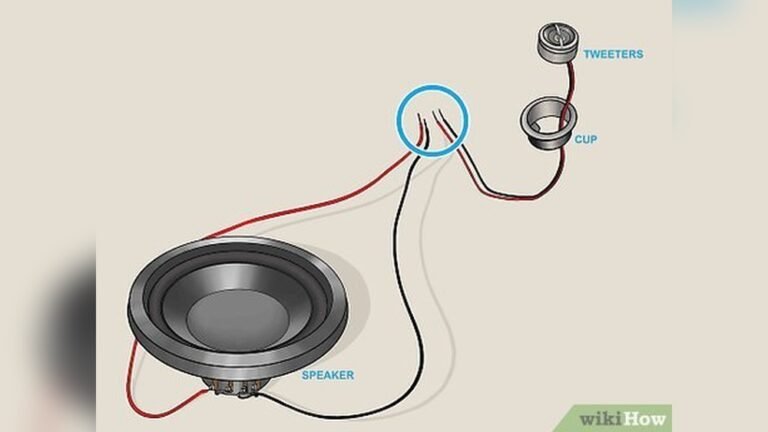
Choosing The Right Speakers
Select speakers that match the amplifier’s power output. Bridging increases wattage, so speakers must handle higher power without damage. Check the speaker’s RMS rating and impedance. Use speakers with an impedance that the amp can support when bridged. Subwoofers often work best with bridged amps due to their power needs. Avoid using speakers that cannot handle the increased load.
Optimizing Wiring For Performance
Use thick, high-quality speaker wire to reduce resistance. Poor wiring can cause power loss and sound distortion. Connect the positive terminal of one channel and the negative terminal of the other channel to the speaker. Ensure all connections are tight and secure to prevent shorts. Keep wire runs short to maintain signal strength. Proper wiring improves power delivery and sound clarity.
Testing Power And Sound Quality
Test the amplifier after bridging to confirm power output and sound quality. Start with low volume to avoid damage. Listen for distortion or clipping, which indicate overload. Use a multimeter to check speaker voltage and amplifier output. Adjust gain controls to balance volume and clarity. Regular testing helps maintain optimal performance and protects audio equipment.

Credit: audiocontrol.com
Adjusting Amplifier Settings
Bridging a 4 channel amp can boost your audio system’s power. Many people make simple errors that cause poor sound or damage. Avoiding these common mistakes helps protect your gear and get better sound quality. Pay close attention to wiring, impedance, and gain settings. These details matter a lot.
Incorrect Wiring Connections
Wrong wiring is the top cause of issues when bridging amps. Each channel has positive and negative terminals. Mixing these up can cause no sound or damage to the amp. Always connect the speaker wires to the correct terminals. Double-check the manual for the exact wiring diagram. Use good quality speaker wire and secure all connections tightly.
Ignoring Impedance Limits
Impedance is how much resistance the speaker gives to the amp’s signal. Bridging channels lowers the impedance the amp sees. If it drops below the amp’s limit, it can overheat or fail. Check your amp’s manual for the minimum impedance allowed when bridged. Use speakers that match or exceed that rating. Never connect too many speakers to one bridged channel.
Setting Gains Too High
Gain controls the amp’s input sensitivity. Setting it too high causes distortion and speaker damage. Start with the gain low and increase it slowly while playing music. Listen for clear sound without buzzing or clipping. Proper gain settings protect your speakers and improve sound clarity. Avoid maxing out the gain just to get louder sound.
Maximizing Power Output
Advanced users often seek ways to enhance their audio setup beyond basic bridging. These tips help maximize performance and sound quality. They focus on smart wiring and component integration. Follow these ideas to get the most from your 4 channel amp.
Using Y-adapters For Rca Inputs
Y-adapters split one RCA output into two inputs. This lets you feed the same signal to multiple amp channels. Use quality adapters to avoid signal loss. Keep cable lengths short to reduce noise. Y-adapters simplify wiring when bridging channels for subwoofers or speakers.
Maintaining Stereo Sound While Bridging
Bridging often merges two channels into one, risking stereo separation loss. Preserve stereo by bridging only two channels for a subwoofer. Use the remaining channels for left and right speakers. Adjust gain levels carefully to balance sound. This method keeps stereo clarity and adds power where needed.
Integrating With Other Audio Components
Linking your bridged amp with other devices needs planning. Match impedance and power ratings to avoid damage. Use line-level converters if signals differ between components. Secure connections prevent hum and interference. Proper integration ensures clean sound and system reliability.
Credit: www.dualav.com
Common Mistakes To Avoid
Troubleshooting bridging issues with a 4 channel amp helps ensure clear sound and system safety. Bridging combines two channels to increase power output. This process can cause problems if not done correctly. Common issues include no sound, distortion, overheating, and risk of speaker damage. Knowing how to address these problems is crucial.
No Sound Or Distortion
No sound or distortion often means wiring errors. Check speaker connections for correct polarity and tightness. Confirm the amp’s bridged terminals are used, not regular ones. Verify the amp settings match your speaker’s impedance. Distortion can happen if the amplifier is overloaded. Lower the gain or volume to reduce distortion. Inspect all cables for damage or loose connections.
Overheating Amplifier
An overheating amp risks permanent damage. Ensure the amp has proper ventilation and is not enclosed. Bridging doubles the power demand, which raises heat levels. Avoid pushing the amp to maximum volume for long periods. Check the impedance load; too low a load causes overheating. Use a cooling fan if needed. Turn off the system to cool the amp if it feels hot.
Speaker Damage Prevention
Protect speakers by matching amp power and speaker rating. Bridging increases power, which can blow speakers if mismatched. Use speakers with the correct impedance for bridged mode. Avoid playing music at full volume for extended times. Inspect speakers regularly for signs of damage. Replace damaged speakers to prevent further issues. Proper setup extends both amp and speaker life.
Credit: support.biamp.com
Frequently Asked Questions
Can A 4 Channel Amp Be Bridged?
Yes, a 4-channel amp can be bridged by combining channels to increase power output. This suits subwoofers or high-power speakers. Always check the amp’s manual for proper wiring and impedance requirements to avoid damage.
How To Bridge 4 Channel Amp To One Sub?
To bridge a 4-channel amp to one sub, connect the sub to the amp’s bridged channels. Use channels 1+2 or 3+4. Check the amp’s manual for correct wiring and impedance. Adjust gain settings to match the subwoofer for optimal performance and avoid damage.
Can I Bridge A 4 Channel Amp At 2 Ohms?
Yes, you can bridge a 4-channel amp at 2 ohms if the amp supports it. Check the manual for safe impedance ratings. Bridging combines two channels to increase power output, so ensure your speakers can handle the increased wattage to avoid damage.
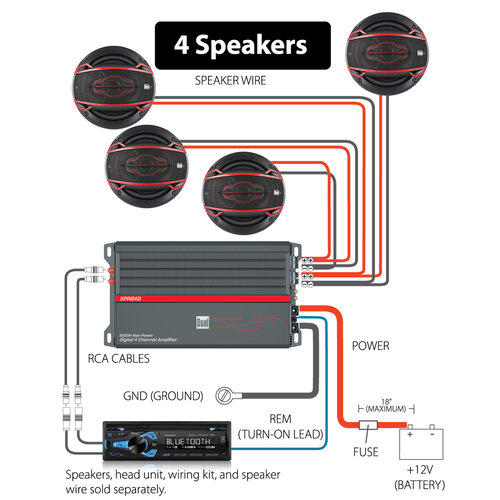
Can I Run 4 Speakers Off A 4 Channel Amp?
Yes, you can run 4 speakers off a 4-channel amp by connecting one speaker per channel. Ensure speaker impedance matches amp specifications. Avoid wiring multiple speakers per channel unless the amp supports it. Proper wiring maintains sound quality and prevents damage.
Conclusion
Bridging a 4 channel amp can boost your audio power effectively. Always check your amp’s manual for proper wiring steps. Use the right speaker impedance to avoid damage. Take your time connecting wires carefully and securely. This simple change can improve sound quality and loudness.
Enjoy a stronger and clearer audio experience in your vehicle.