How Do You Bridge a 4 Channel Amp: Step-by-Step Guide
Bridging a 4 channel amp is a smart way to boost the power you send to your speakers. Many people want louder, clearer sound in their cars or home audio systems. But the process can seem confusing, especially if you’re new to audio equipment.
This guide will help you understand what bridging means, why you’d do it, and how to bridge a 4 channel amp step by step. You’ll also learn about the risks, common mistakes, and how to get the best results. By the end, you’ll know exactly what bridging a 4 channel amp involves and if it’s right for your setup.
What Does Bridging A 4 Channel Amp Mean?
When you bridge an amp, you combine two channels into one. This lets you send more power to a speaker or subwoofer. In a 4 channel amp, you can bridge two pairs of channels. Each pair gives you one powerful output.
- Bridging is done by wiring speakers to the positive terminal of one channel and the negative terminal of another.
- It increases the output wattage, usually doubling the power.
- The amp’s manual will show how to bridge safely.
Bridging is often used for powering bigger speakers or subwoofers that need more energy. It’s especially popular in car audio systems, where space is limited and you want strong bass.
Why Bridge A 4 Channel Amp?
There are several reasons to bridge a 4 channel amp. Here are the main ones:
- Increase power output: Bridging lets you send more watts to your speakers.
- Drive bigger speakers: Large speakers and subwoofers often need more power than a single channel can provide.
- Flexible setup: You can use a 4 channel amp to power two strong speakers instead of four smaller ones.
- Cost effective: You don’t need to buy another amp for higher power.
Bridging is best when you want to power two high-performance speakers or a subwoofer with your existing amp.
The Four Key Steps To Bridge A 4 Channel Amp
Bridging isn’t just about connecting wires randomly. There are four important steps you must follow. Each step is vital for safety and performance. Let’s look at them one by one.
1. Check Your Amp’s Bridgeability
Not all 4 channel amps can be bridged. Before you start, check the manual or manufacturer’s website. Look for:
- Bridgeable channels: Some amps only allow certain channels to be bridged.
- Minimum speaker impedance: Most amps require a speaker of at least 4 ohms when bridged.
- Wiring diagram: Find the recommended bridging diagram.
Manufacturers like Alpine, Pioneer, and Kenwood include this info in their manuals. If you can’t find it, search online or contact customer support.
Example
If you have a Pioneer GM-D9704 amp, the manual shows you can bridge channels 1+2 and 3+4. Each bridged channel will deliver up to 200 watts RMS at 4 ohms.
Practical Data
- Minimum safe impedance when bridged: 4 ohms
- Typical power increase: 2x per bridged channel
2. Prepare Your Speakers And Wiring
Before bridging, make sure your speakers can handle the extra power. If you send too much wattage to a speaker, it can blow or distort.
- Check speaker ratings: Use speakers rated for at least the amp’s bridged output.
- Wire gauge: Use thicker wire (16 AWG or lower) for higher wattage.
- Secure connections: Loose wires can cause shorts and damage.
Example
If your amp gives 200 watts RMS when bridged, use speakers rated for 200 watts RMS or more. For wiring, a 14 AWG wire is safer than a thin 18 AWG wire.
Common Mistakes
- Using speakers with low power ratings (they can burn out)
- Using thin wire that overheats
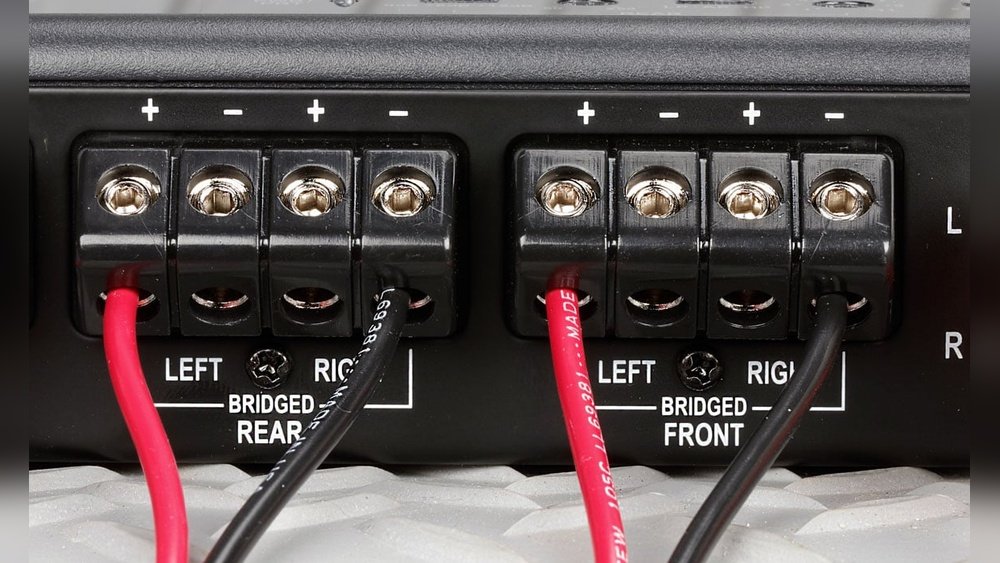
3. Wire The Amp For Bridging
This is the most technical step. Follow the wiring diagram in your amp’s manual. The process usually goes like this:
- Find the positive terminal of channel 1 (or 3).
- Find the negative terminal of channel 2 (or 4).
- Connect your speaker’s positive wire to the amp’s positive terminal on channel 1.
- Connect the speaker’s negative wire to the amp’s negative terminal on channel 2.
Repeat for channels 3+4 if you want to bridge both pairs.
Practical Example
Suppose you have a 4 channel amp with the following terminals:
- Channel 1: + / –
- Channel 2: + / –
- Channel 3: + / –
- Channel 4: + / –
To bridge channels 1+2:
- Speaker positive → Channel 1 +
- Speaker negative → Channel 2 –
To bridge channels 3+4:
- Speaker positive → Channel 3 +
- Speaker negative → Channel 4 –
Data Table
Here’s a sample wiring comparison for bridging vs. normal setup:
| Setup Type | Channel Used | Speaker Connection | Power Output |
|---|---|---|---|
| Normal | 1, 2, 3, 4 | Each channel to one speaker | 50W RMS per channel |
| Bridged | 1+2, 3+4 | Each bridged pair to one speaker | 200W RMS per bridged channel |
4. Adjust Settings And Test
Once you’ve wired everything, set your amp’s gain, filters, and crossovers. Bridging changes the power output, so you may need to adjust settings for best sound.
- Set gain lower to avoid distortion.
- Use high-pass or low-pass filters for your speakers or subwoofer.
- Test with low volume first, then increase slowly.
If you hear distortion or the amp gets hot, check your wiring and settings.
Practical Data
- Start with amp gain at 25% and increase slowly.
- Bridged amps can get hotter; make sure there’s airflow.
When Should You Not Bridge A 4 Channel Amp?
Bridging is powerful, but it’s not always the best choice. Here are times to avoid bridging:
- Speaker impedance too low: Bridged amps need at least 4 ohms. Using 2 ohms can damage your amp.
- Speakers can’t handle the power: They may blow or distort.
- You need four channels: If you want to power four speakers (like front and rear), don’t bridge.
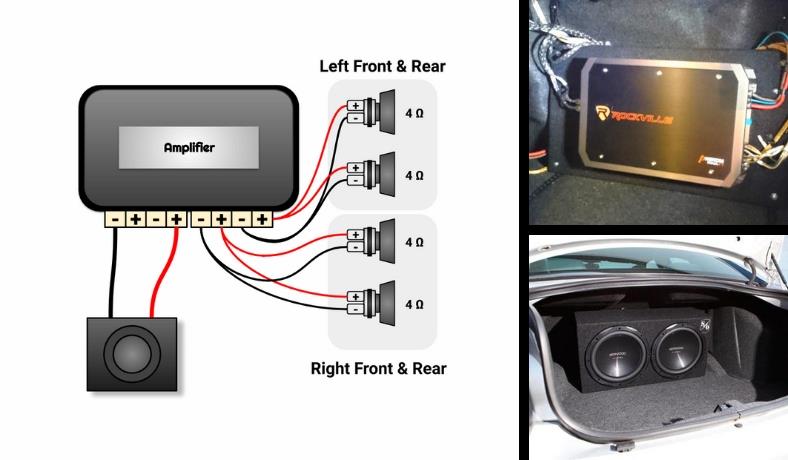
If you bridge an amp to power a subwoofer, you lose the ability to run four separate speakers.

Credit: audiocontrol.com
Real-life Example: Bridging A 4 Channel Amp In A Car
Let’s say you have a Kenwood KAC-M3004 amp in your car. You want to power two 6×9 inch speakers in the rear for strong bass.
- The amp gives 50W RMS per channel normally.
- Bridged, it gives 150W RMS per channel.
You follow the manual, connect the speakers to channels 1+2 and 3+4, use 14 AWG wire, and set the gain low. The result? Your rear speakers play louder and clearer, with strong bass.
Comparison Table: Bridged Vs. Non-bridged Setups
Here’s a comparison of typical setups:
| Feature | Non-Bridged | Bridged |
|---|---|---|
| Number of Speakers | 4 | 2 |
| Power per Speaker | 50W RMS | 150–200W RMS |
| Best for | Full range sound | Bass/subwoofer setup |
| Risk of Damage | Low | Higher if wrong wiring |
Common Mistakes Beginners Make
Many beginners make mistakes when bridging a 4 channel amp. Here are the most frequent ones:
- Wrong speaker impedance: Using 2 ohm speakers can fry your amp.
- Incorrect wiring: Connecting both wires to the same channel won’t work.
- Forgetting to adjust gain: High gain can cause distortion and damage.
- Not checking manual: Every amp is different. Always check before wiring.
Avoid these mistakes for safe, clear sound.
How Bridging Affects Sound Quality And Amp Life
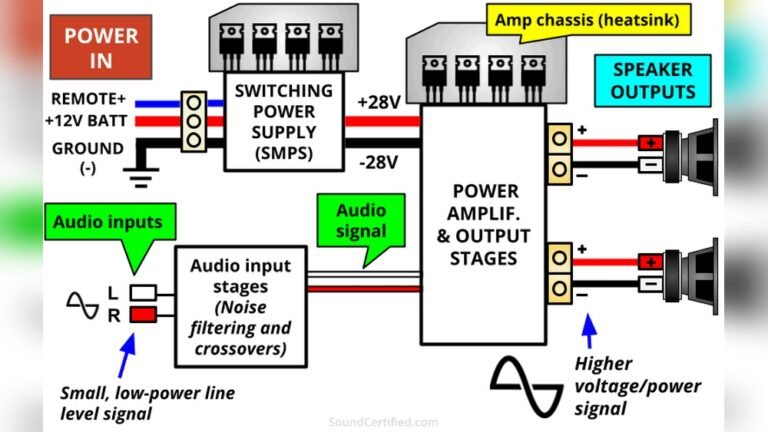
Bridging can boost power, but it also changes how your amp works.
- More power means louder sound but also more heat.
- Bridged amps run hotter and may wear out faster if not cooled.
- Distortion risk increases if gain is set too high.
Make sure your amp is well ventilated and your speakers are rated for the higher wattage. If you notice distortion, turn down the gain or check your wiring.
Credit: soundcertified.com
Non-obvious Tips For Successful Bridging
Here are two tips many beginners miss:
- Check your amp’s fuse rating. If your amp’s fuse is too small for bridged power, upgrade it to avoid blowouts.
- Test with a multimeter. Measure speaker impedance before wiring. This prevents using low-impedance speakers that could damage your amp.
These steps can save you from expensive repairs.
Bridging A 4 Channel Amp For Subwoofer Use
Many people bridge their amp to power a subwoofer. Here’s how:
- Use one bridged channel for the subwoofer.
- Make sure the subwoofer is rated for the amp’s power output.
- Set a low-pass filter (usually under 100 Hz) for the subwoofer channel.
This setup delivers strong bass and makes your music feel deeper.
Data Table: Example Bridged Power Outputs
Here’s a table showing typical power ratings for popular 4 channel amps:
| Brand | Model | Normal Output (per channel) | Bridged Output (per channel) |
|---|---|---|---|
| Kenwood | KAC-M3004 | 50W RMS | 150W RMS |
| Pioneer | GM-D9704 | 60W RMS | 200W RMS |
| Alpine | MRV-F300 | 50W RMS | 150W RMS |
Summary: Bridging A 4 Channel Amp Made Simple
Bridging a 4 channel amp is a practical way to get more power for your speakers or subwoofer. Follow these steps:
- Check if your amp is bridgeable.
- Prepare your speakers and wiring.
- Wire the amp carefully using the manual.
- Adjust gain and settings, then test.
Always use speakers with the correct impedance and power rating. Don’t forget to check your amp’s manual and test your setup before playing music at high volume. With the right approach, you’ll enjoy louder, clearer sound without damaging your equipment.
For further technical details, you can visit the Bridge Amplifier Wikipedia page.

Credit: www.reddit.com
Frequently Asked Questions
How Do I Know If My Amp Can Be Bridged?
Check your amp’s manual or manufacturer’s website. Look for bridgeable channels and the minimum speaker impedance. If your amp says “bridgeable” and has a wiring diagram, you can bridge it.
What Happens If I Bridge An Amp With 2 Ohm Speakers?
Most amps can’t handle 2 ohm speakers when bridged. This can cause overheating, distortion, or damage. Always use 4 ohm speakers or higher for bridged channels.
Can I Bridge All Four Channels To A Single Speaker?
No. You can only bridge two pairs (1+2 and 3+4). Bridging all four to one speaker doesn’t work and can destroy your amp.
Will Bridging My Amp Make It Louder?
Yes, bridging increases the power to your speakers. This makes them louder and can improve bass. But only if your speakers can handle the extra power.
Is Bridging Safe For My Amp And Speakers?
Bridging is safe if you follow the manual, use the right speakers, and set the gain correctly. If you ignore these steps, you risk blowing your speakers or damaging your amp. Always double-check your setup.