How to Bridge a 4 Channel Amplifier for Maximum Power Output
When you want more power from your car audio system, bridging a 4 channel amplifier can be a smart solution. Many beginners hear the term “bridging” but don’t know what it really means or how to do it safely. In this article, you’ll learn exactly how to bridge a 4 channel amplifier, why you might want to do it, and what mistakes to avoid.
Short sentences, clear steps, and practical examples will help you understand everything—even if English is not your first language.
What Does Bridging A 4 Channel Amplifier Mean?
Bridging is a way to combine two amplifier channels into one. This makes the amp send more power to a single speaker or subwoofer. In a 4 channel amplifier, you can bridge pairs of channels. For example, you can bridge channels 1 and 2, and also bridge channels 3 and 4.
This will give you two powerful channels instead of four weaker ones.
This technique is popular for car audio systems. Bridging helps you drive bigger speakers or subwoofers that need more power. But you must do it correctly to avoid damaging your amp or speakers.
Why Bridge A 4 Channel Amp? Key Benefits
People bridge their amplifiers for several reasons:
- More Power: Bridging doubles the output power for each bridged channel. You can run larger speakers or subwoofers.
- Flexible Setup: You can use your amp to power fewer but bigger speakers.
- Better Sound: Higher power often means louder and clearer music.
For example, a 4 channel amp rated at 50 watts per channel (at 4 ohms) can deliver around 100 watts per bridged channel. This is enough for most subwoofers.
The Four Main Ways To Bridge A 4 Channel Amplifier
There are four common ways to bridge a 4 channel amp. Each method is used for a different purpose and speaker setup. You must choose the right one for your needs.
1. Bridging For Two Subwoofers
This is the most popular method. If you have two subwoofers, you bridge channels 1 & 2 for one sub, and 3 & 4 for the other.
Steps:
- Check your amp’s manual. Make sure it allows bridging.
- Identify the positive and negative terminals for each channel pair.
- Connect the subwoofer’s positive wire to channel 1’s positive terminal.
- Connect the subwoofer’s negative wire to channel 2’s negative terminal.
- Repeat for channels 3 and 4 with the second subwoofer.
Example: If you have two 4-ohm subwoofers and a 4 channel amp rated at 50 watts per channel, bridging will give each sub around 100 watts.
Tip: Make sure the subwoofers’ impedance matches the amp’s bridged output. Most amps are stable at 4 ohms bridged.
2. Bridging For One Subwoofer
Some people want extra bass with only one subwoofer. You bridge two channels for the sub and use the other two for regular speakers.
Steps:
- Bridge channels 3 & 4 for the subwoofer.
- Connect the subwoofer’s positive wire to channel 3 positive, negative wire to channel 4 negative.
- Use channels 1 & 2 for front speakers.
Example: Many car owners use this setup to get deep bass while still powering front speakers.
Tip: Always check the amp’s minimum impedance for bridged mode. Using too low an impedance can damage the amplifier.
3. Bridging For Two Large Speakers
If you have two powerful speakers instead of subwoofers, bridging works the same way. This is common in home audio or custom car audio setups.
Steps:
- Bridge channels 1 & 2 for one speaker, 3 & 4 for the other.
- Connect each speaker to the bridged terminals as described above.
Example: Bridged output will give each speaker about twice the power, perfect for bigger speakers.
Tip: Use speakers that can handle the increased power to avoid blowing them.
4. Bridging For Mixed Use (subwoofer + Speaker)
Some advanced users want a subwoofer and a powerful speaker. You bridge channels for each and connect them accordingly.
Steps:
- Bridge channels 1 & 2 for the speaker.
- Bridge channels 3 & 4 for the subwoofer.
- Connect each device to the bridged terminals.
Example: This is useful in custom setups where you want strong bass and high volume from one main speaker.
Tip: Always use the correct wiring. Mixing up positive and negative terminals can cause phase problems.
Key Technical Data: Understanding Power And Impedance
Bridging changes the amplifier’s output. You must know how much power you get and the right speaker impedance.
| Mode | Channels Used | Power Output | Speaker Impedance |
|---|---|---|---|
| Stereo (Unbridged) | 4 | 50W x 4 | 4 Ohms |
| Bridged | 2 | 100W x 2 | 4 Ohms (min.) |
Non-obvious insight: Many beginners think bridging always doubles power. In reality, power output depends on amp design and speaker impedance. Always check your amp’s manual.
Credit: soundcertified.com
Step-by-step Guide: How To Bridge A 4 Channel Amp
Bridging sounds complex, but it’s easy if you follow these steps:
- Read the Manual: Find the wiring diagram for bridging. Each amp is different.
- Turn Off Power: Always disconnect the car battery before wiring.
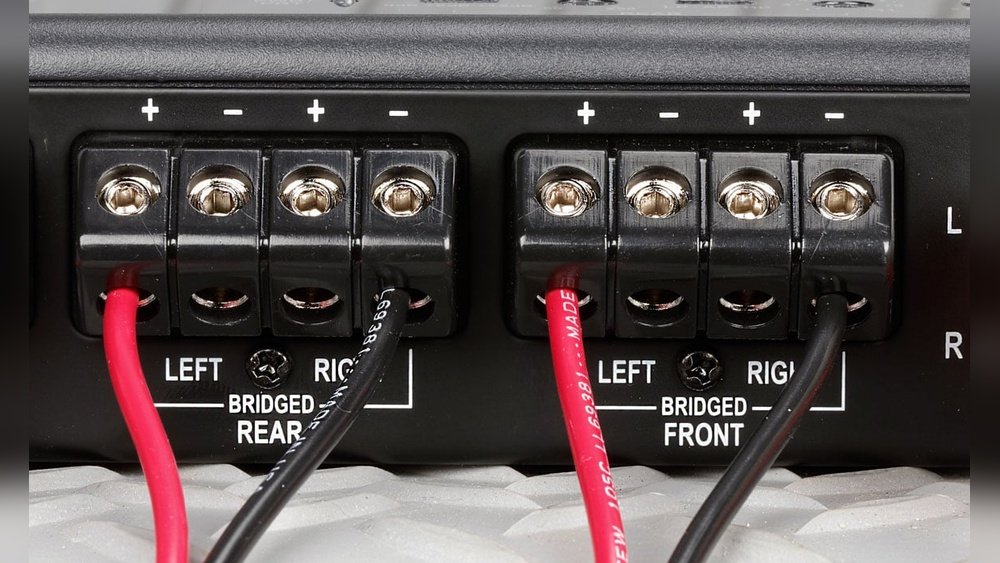
- Identify Terminals: Find which terminals are used for bridging. Usually, you use the positive of one channel and the negative of another.
- Wire Speakers/Subwoofers: Connect the speaker’s positive wire to the positive terminal of the first channel, negative wire to the negative terminal of the second channel in the pair.
- Check Connections: Double-check for loose wires or mistakes.
- Reconnect Battery: Turn on the power and test the system.
Example: On a typical amp, bridging channels 1 & 2 means using channel 1 positive and channel 2 negative.
Practical Example: Bridging A Pioneer 4 Channel Amp
Let’s say you have a Pioneer GM-A6704 amp.
- It’s rated at 50W x 4 at 4 ohms, or 150W x 2 at 4 ohms bridged.
- To bridge, use the positive terminal of channel 1 and the negative terminal of channel 2 for the first speaker/subwoofer.
- Repeat for channels 3 & 4.
Why this matters: Some amps have different bridging options. If you use the wrong terminals, you may get no sound or damage your gear.
Common Mistakes Beginners Make
Bridging is not hard, but many make errors:
- Wrong Impedance: Using speakers below the amp’s minimum impedance can overheat and destroy the amp.
- Wrong Terminals: Mixing up positive and negative wires will cause phase issues and weak sound.
- No Manual Check: Not reading the manual leads to wiring mistakes.
- Loose Connections: Poor wiring causes distortion or no sound.
- Overloading Speakers: Bridged power may be too much for small speakers.
Non-obvious insight: If your amp has “bridgeable” written on it, always check if it’s for all channels or only pairs. Some amps can only bridge certain channels.
Data Table: Example Speaker And Amp Pairings
You can bridge your amp for many setups. Here’s a quick guide:
| Speaker Type | Impedance | Recommended Bridged Power | Typical Use |
|---|---|---|---|
| Subwoofer | 4 Ohms | 100–150W | Bass |
| Large Speaker | 4 Ohms | 80–120W | Main music |
| Small Speaker | 6 Ohms | 60–80W | Rear fill |
How To Choose The Right Speakers For Bridging
When bridging, you must select speakers with the right specs:
- Impedance: 4 ohms is best for most amps.
- Power Handling: Speakers must handle the amp’s bridged power.
- Quality: Use trusted brands for clear sound.
- Type: Subwoofers or large speakers work best.
Example: If your amp gives 100W bridged, use speakers rated for at least 100W RMS.
Tip: Avoid pairing small, low-power speakers with a bridged amp. This can lead to distortion and damage.
Wiring Diagram Comparison
Different amps have different bridging diagrams. Here’s a comparison:
| Brand | Bridged Terminal Pair | Max Power (Bridged) |
|---|---|---|
| Pioneer | Ch1 +, Ch2 – | 150W x 2 |
| Kenwood | Ch1 +, Ch2 – | 120W x 2 |
| Alpine | Ch1 +, Ch2 – | 100W x 2 |
Tip: Always check your amp’s manual for the correct bridging method.

Credit: audiocontrol.com
Safety Tips For Bridging
Bridging increases power, but safety is important:
- Turn off power: Disconnect your car battery before wiring.
- Use thick wires: High power needs thick speaker wires.
- Check for shorts: Double-check connections before turning on.
- Don’t overload: Never connect too many speakers to bridged channels.
- Test slowly: Start at low volume and check for problems.
Non-obvious insight: If you hear distortion or the amp gets hot, stop and check your wiring and speaker match.
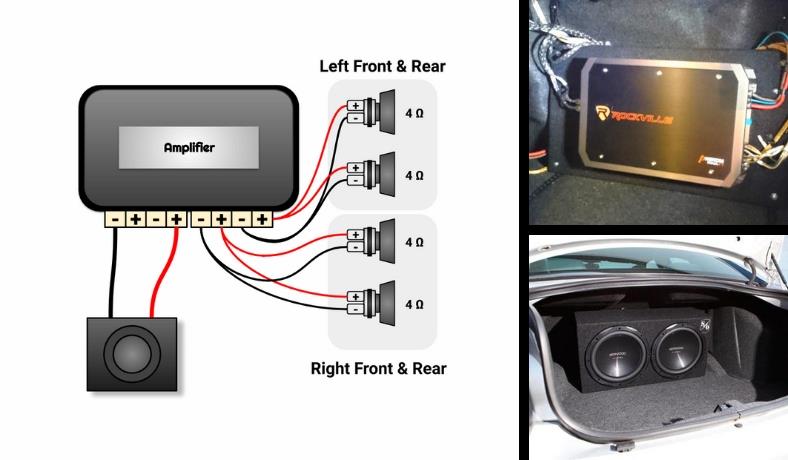
Real-world Application: Car Audio Upgrade
Many car owners bridge amps to upgrade their sound:
- You can use a 4 channel amp to power one subwoofer and two front speakers.
- Bridging gives strong bass without buying a separate mono amp.
- It’s cost-effective and uses less space.
Example: A single 4 channel amp, bridged, can give a small car big sound.
Expert Advice: When Not To Bridge
Bridging is great, but not always needed:
- If your speakers are small or need little power, use normal (unbridged) mode.
- If your amp isn’t bridgeable, don’t try to force bridging.
- If you need more than two powerful channels, consider a bigger amp.
Tip: Check amp specs online at Crutchfield for compatibility.
Frequently Asked Questions
How Do I Know If My Amp Can Be Bridged?
Most amps have “bridgeable” written in the manual or on the amp itself. You can also look for wiring diagrams showing bridged connections. If unsure, ask the manufacturer.
What Happens If I Use The Wrong Speaker Impedance?
Using too low an impedance can make your amp overheat and shut down. Always use 4 ohm speakers for bridging unless your amp supports lower.
Can I Bridge All Four Channels At Once?
No, you can only bridge pairs of channels. You can bridge channels 1 & 2, and channels 3 & 4, making two powerful channels.
Will Bridging Improve Sound Quality?
Bridging improves volume and power. Sound quality depends on your speakers and setup. If everything matches, you’ll get louder, clearer music.
Is Bridging Safe For Beginners?
Yes, if you follow steps and check your manual. Never rush. Always double-check your wiring and speaker specs.
Bridging a 4 channel amplifier gives your audio system more power and flexibility. With clear steps, practical examples, and careful wiring, even beginners can upgrade their car or home audio with confidence. Always check your amp’s manual, use the right speakers, and avoid common mistakes.
This way, you’ll enjoy powerful sound without risking your equipment.

Credit: www.reddit.com