Can You Replace a Car Radio Antenna? Step-by-Step Guide
Can You Replace A Car Radio Antenna?
A car radio antenna might seem like a small part, but it plays a huge role in your listening experience. If your music sounds fuzzy, or you hear a lot of static, your car antenna could be the problem. Many people wonder if they can replace their antenna themselves. The answer is yes. With the right tools, some patience, and a little guidance, most car owners can replace their antenna at home. This article will walk you through everything you need to know, from signs of a bad antenna to step-by-step instructions. Whether your antenna is broken, rusted, or just not working well, you’ll learn how to fix it without spending a lot at a repair shop.
Understanding The Car Radio Antenna
A car radio antenna is a metal rod or wire that catches radio signals from the air. It sends these signals to your radio system. Most cars have either an external antenna (the metal rod you see outside) or an internal antenna (hidden in the windshield or roof). The antenna’s job is simple: pick up as much signal as possible, so you get clear sound.
Types Of Car Antennas
There are several types of antennas. Here’s a quick comparison:
| Type | Where It’s Found | Pros | Cons |
|---|---|---|---|
| External Mast | Fender or roof | Best signal strength, easy to replace | Can break easily, visible |
| Internal (Embedded) | Windshield, rear window | Hidden, hard to damage | Weaker signal, harder to replace |
| Shark Fin | Roof | Modern look, includes GPS/Satellite | More expensive, may need pro installation |
Most beginners find external mast antennas the easiest to replace. Internal and shark fin antennas can be tricky and sometimes need special tools.
Signs Your Car Antenna Needs Replacement
How do you know if your antenna is the problem? Here are clear signs:
- Static or weak signal: If your favorite station fades or sounds fuzzy.
- Only local stations work: Distant stations are gone.
- Antenna is visibly broken: Bent, rusted, or missing parts.
- Radio cuts out when driving: Especially if it works fine when parked.
Not every radio problem is caused by the antenna. Sometimes, the radio unit or wiring is the issue. But if you see physical damage or notice a sudden drop in performance, the antenna is a likely suspect.
Can You Replace A Car Radio Antenna Yourself?
Yes, you can. Many car antennas are designed for easy removal and replacement. Here’s what makes it possible for beginners:
- Simple tools: Most use basic wrenches or screwdrivers.
- Plug-and-play: Many new antennas screw or plug right in.
- No need for advanced skills: If you can change a lightbulb, you can usually change an external antenna.
However, some antennas (like shark fin or embedded types) may need more effort. For these, check your car’s manual or ask a professional if you’re unsure.
Tools And Materials Needed
Before you start, gather these items:
- Replacement antenna (must fit your car’s make, model, and year)
- Wrench or pliers
- Screwdriver (flat or Phillips, depending on your antenna)
- Cleaning cloth
- Anti-rust spray (optional but helpful)
- Owner’s manual (for reference)
- Electrical tape (for internal antennas)
Buying the right antenna is important. Check your car’s manual or look up your car online to find the exact type. Most auto parts stores or websites let you search by your car’s details.
Step-by-step Guide: How To Replace A Car Radio Antenna
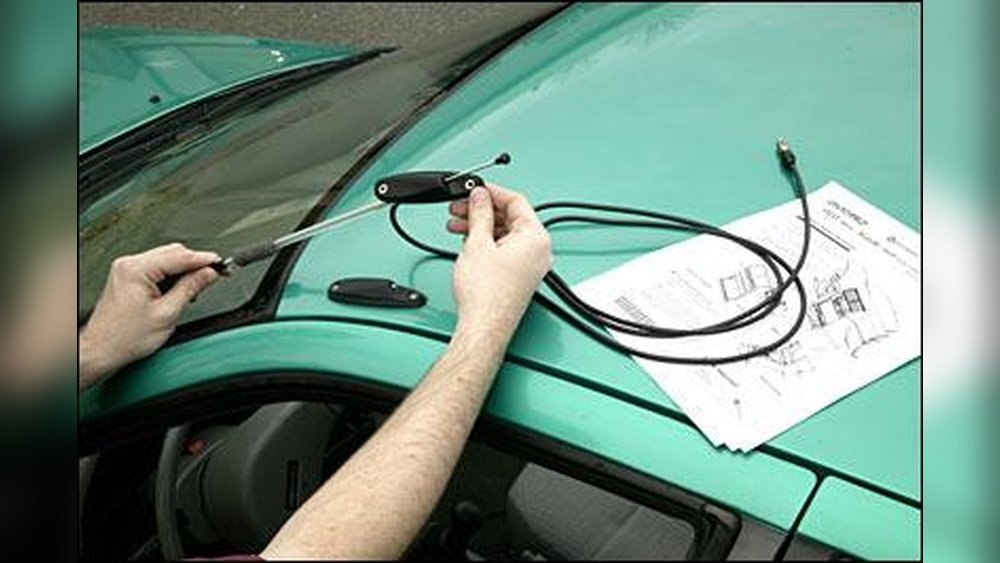
Let’s walk through the process for an external mast antenna, the most common type for beginners.
1. Remove The Old Antenna
- Turn off your car and radio.
- Locate the antenna base (usually on the fender or roof).
- Use your hand to unscrew the antenna mast. If it’s stuck, use pliers gently.
- For antennas with a nut, use a wrench to loosen and remove it.
- If you see rust or dirt, clean the area with a cloth and spray.
2. Disconnect The Antenna Cable
- Open your car’s hood or trunk to find where the antenna wire enters.
- Carefully pull the cable out from the radio unit (usually plugs in the back).
- For some cars, you may need to remove a plastic panel or cover.
3. Install The New Antenna
- Attach the new antenna mast by screwing it in or securing with a nut.
- Plug the new antenna cable into the radio unit.
- Tuck any extra cable back, and reattach any covers you removed.
4. Test The Radio
- Turn on your radio.
- Try different stations, especially weak ones, to check the signal.
- If the sound is clear, your job is done.
Extra Tips
- If the antenna is corroded, spray the base with anti-rust spray before installing the new one.
- For internal or shark fin antennas, look up video guides for your car model.
Costs Involved
Replacing a car antenna is usually affordable. Here’s a quick look:
| Type of Antenna | DIY Replacement Cost | Professional Replacement Cost |
|---|---|---|
| External Mast | $10–$40 | $50–$120 |
| Internal/Embedded | $30–$60 | $100–$200 |
| Shark Fin | $20–$100 | $120–$300 |
Most people choose to replace external antennas themselves and save money. Internal or shark fin types may need extra labor, which increases the cost.

Credit: www.amazon.com
Common Mistakes To Avoid
Many beginners make simple mistakes. Here’s how to avoid them:
- Forgetting to check compatibility: Always match the new antenna to your car’s make and model. Wrong threads or connectors won’t fit.
- Over-tightening: Tightening the antenna too much can strip the threads or crack the base.
- Ignoring rust or dirt: Not cleaning the base can lead to poor contact and weak signals.
- Skipping the radio test: Always test before finishing to catch issues early.
- Damaging the cable: Pull cables gently to avoid breaking internal wires.
If you make a mistake, don’t panic. Most problems can be fixed by retracing your steps.
When Should You Call A Professional?
While DIY is possible, some situations need expert help:
- Embedded antennas: Located in the glass or bodywork.
- Electrical problems: If new antennas don’t fix the signal.
- Complex dashboards: Cars with lots of trim or electronic systems.
- Satellite/GPS antennas: Involves more wiring.
Professional installers have tools and experience. If you’re not comfortable, it’s better to pay for their help than risk damaging your car.

Credit: www.familyhandyman.com
Upgrading Vs. Replacing: What’s The Difference?
Replacing means swapping out a broken antenna for the same kind. Upgrading means installing a better antenna, sometimes with extra features like GPS, satellite radio, or improved AM/FM range.
Upgrading can give you:
- Stronger signal: Especially if you drive in rural or mountainous areas.
- Modern look: Shark fin antennas look new and sporty.
- Extra features: Some antennas combine radio, GPS, and Wi-Fi.
However, upgrades can cost more and may need professional installation.
Comparing Diy Vs. Professional Replacement
Still unsure if you should do it yourself? Here’s a comparison:
| Factor | DIY | Professional |
|---|---|---|
| Cost | Low | High |
| Time Needed | 30–60 min | 1–2 hours (with appointment) |
| Tools Required | Basic | Advanced |
| Risk of Damage | Medium (if careful) | Low |
| Warranty | No | Yes (usually) |
If you’re comfortable with basic car repairs, DIY is a good choice. If your car is expensive or under warranty, consider a professional.

Credit: www.amazon.com
Non-obvious Insights For Beginners
Many first-timers overlook these points:
- Antenna adapters: Some new antennas need a small adapter to fit your car’s cable. Check the package or ask at the store.
- Radio reset: After changing the antenna, some radios need a reset. This is usually a simple button press. Check your manual.
- Weather impact: If you replace the antenna in rainy weather, seal the base carefully to prevent leaks inside the car.
These small steps can save time and prevent problems later.
Practical Example: Replacing A Honda Civic Antenna
Let’s look at a real example. The Honda Civic (2012 model) uses an external mast antenna. Here’s how a typical replacement goes:
- Remove the old mast by unscrewing it.
- Use a 10mm wrench to remove the nut at the base.
- Pull out the antenna cable from the trunk area.
- Plug in the new cable and secure the mast.
- Tighten the nut, but not too much.
- Turn on the radio to test.
This process takes about 30 minutes and costs $15–$25 for the part. It’s a simple job for most beginners.
Frequently Asked Questions
What If My New Antenna Doesn’t Fit?
Check if you bought the right antenna for your car’s make, model, and year. Sometimes, you need an adapter for the cable or thread. Most auto parts stores will help you find the correct part.
Can I Install A Shark Fin Antenna If My Car Has A Mast Antenna?
Yes, but it may require extra work. Shark fin antennas often need wiring changes and sealing. It’s possible for skilled DIYers, but many people choose a professional for this upgrade.
Will Replacing The Antenna Fix All Radio Problems?
Not always. If the radio still sounds bad after changing the antenna, the problem might be inside the radio unit, the wiring, or even with the local radio stations. Check other devices, and if needed, visit a technician.
How Long Does A Car Radio Antenna Last?
Most antennas last 5–10 years or more. Weather, car washes, and accidents can shorten their life. If you live near the ocean, salt air can cause rust faster.
Is It Legal To Use Aftermarket Antennas?
Yes, in most countries, you can use aftermarket antennas. Just make sure they don’t block your view or break local regulations. For more details, you can check Wikipedia’s entry on vehicle antennas.
Replacing a car radio antenna is a practical DIY project for most car owners. With a little planning and the right tools, you can restore your radio’s sound and enjoy your favorite stations again. If in doubt, ask for help or consult your car’s manual.
This small repair can make a big difference in your daily drive.