How to Wire Door Speakers to Amp: A Step-by-Step Guide
Wiring door speakers to an amp is one of the best ways to improve your car’s sound quality. Many factory stereos do not provide enough power for clear, strong audio. An external amplifier gives your speakers the energy they need, resulting in louder, cleaner sound—even at high volume. If you’re new to car audio, this process can seem overwhelming. But with the right steps and a bit of patience, you can get professional results at home.
This guide explains each part of the process in simple terms. You’ll learn what tools and wires you need, how to route cables, and how to avoid common mistakes. By the end, you’ll understand not just the “how,” but also the “why” behind each step.
Understanding The Basics
Before starting, it’s important to know why wiring door speakers to an amp is different from connecting them to your head unit.
- Head units (car stereos) usually offer 15–25 watts RMS per channel.
- External amps can provide 40–100+ watts RMS per channel.
- More power means better sound clarity and less distortion.
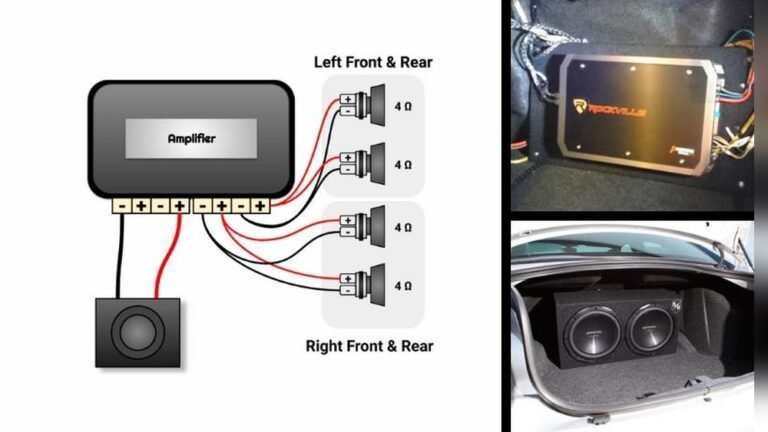
Most cars have 4 door speakers. When you wire them to an amp:
- Each speaker gets its own channel.
- You’ll need to run new speaker wire from the amp to each door.
Pro tip: The amp should match your speakers’ power handling (RMS) and impedance (ohms).
What You Need: Tools And Materials
Gather these items before starting. Quality parts make installation smoother and safer.
- Amplifier (4-channel is standard for 4 door speakers)
- Amplifier wiring kit (includes power, ground, RCA, remote turn-on wire, and fuses)
- Speaker wire (16 or 14 gauge, copper recommended)
- Wire cutters/strippers
- Crimp connectors or soldering kit
- Electrical tape/heat shrink
- Panel removal tool
- Drill with rubber grommets (for running wire into doors)
- Multimeter (for testing voltage and connections)
- Zip ties
Extra items that help:
- Distribution block (if powering more than one amp)
- Speaker adapters (for some vehicles)
- Sound deadening material (optional, reduces vibrations)
Planning Your Wiring Route
Efficient wire routing is key for both performance and safety. Rushed or messy routes can cause noise problems or even electrical shorts.
Typical wire paths:
- Power wire: From battery, through the firewall, under carpet, to amp location.
- RCA and remote wire: From stereo, along opposite side of car from power wire, to amp.
- Speaker wires: From amp, under carpet or trim, through door boot, to each speaker.
Avoid:
- Running power and RCA wires together (prevents noise).
- Pinching wires under seat bolts or sharp metal.
Example: If the amp is in your trunk, most wires will run from the dash area to the rear of the car, splitting left/right for each side.
Removing Door Panels And Old Wiring
Getting to your door speakers means removing the interior panels. Here’s a simple process:
- Unscrew all visible screws (often near handles and armrests).
- Pry off the panel gently with a plastic tool to avoid damage.
- Disconnect any wires for power windows/locks.
- Remove old speakers by unscrewing them and unplugging the connectors.
Keep screws and clips organized. Some cars use delicate plastic fasteners—be gentle to avoid breaking them.
Non-obvious tip: Take a photo of each door before removing anything. It helps you remember how to reassemble.
Running New Speaker Wire To Each Door
This is the most time-consuming step, but it’s critical for good sound.
Step-by-step Guide
- Measure the distance from your amp to each door. Add a bit extra for slack.
- Cut speaker wire for each door (two wires per speaker: Positive and negative).
- Route wire through the car’s interior.
- Tuck under carpet or trim.
- Keep wires away from moving parts.
- Pass wire into the door.
- Use the factory rubber boot if possible (protects wire from weather).
- If there’s no space, drill a small hole and use a rubber grommet.
- Pull wire up to the speaker location.
Common mistake: Not labeling wires. Use colored tape or tags to mark left/right and positive/negative.
Wiring The Speakers
With new wire in place, you’re ready to connect your door speakers.
- Connect the positive wire from the amp to the positive terminal on the speaker.
- Connect the negative wire from the amp to the negative terminal.
- Use crimp connectors, solder, or speaker terminals for strong connections.
- Wrap connections with electrical tape or heat shrink.
If your car uses factory speaker harnesses, you can buy adapters instead of cutting wires.
Practical data: Most aftermarket speakers use 0.205” (positive) and 0.110” (negative) terminals.
Credit: www.youtube.com
Connecting The Amp To Power And Signal
Now, connect the amplifier to the car’s electrical system and audio signal.
Power Connections
- Power wire: Run from the car battery (use an in-line fuse close to the battery) to the amp.
- Ground wire: Short wire (less than 18 inches) from the amp to bare metal on the car’s chassis.
- Remote turn-on: Thin wire from stereo to amp, tells amp to power on with the stereo.
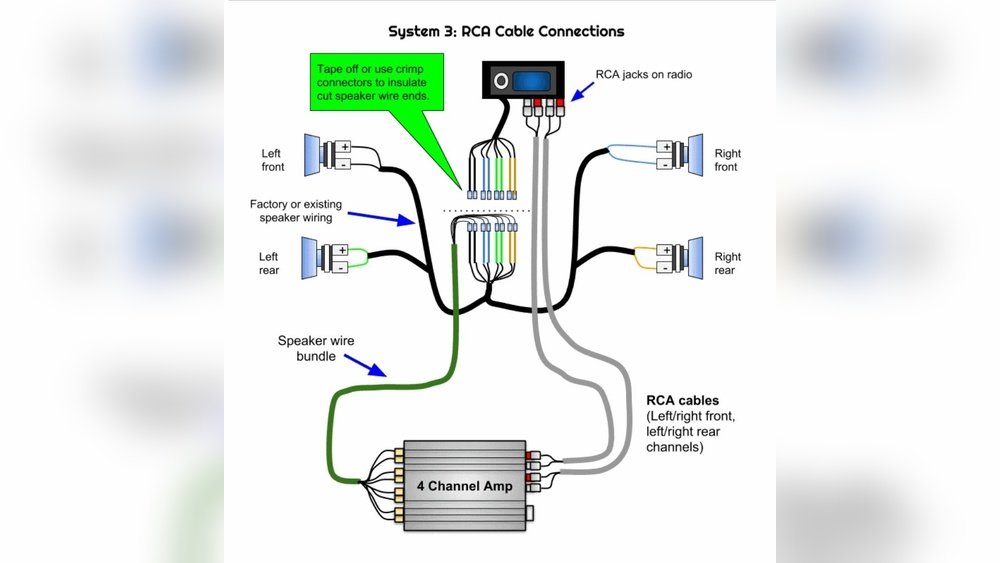
Signal Connections
- RCA cables: Carry audio from the head unit to the amp.
- High-level inputs: If your stereo has no RCA out, use speaker-level inputs on the amp.
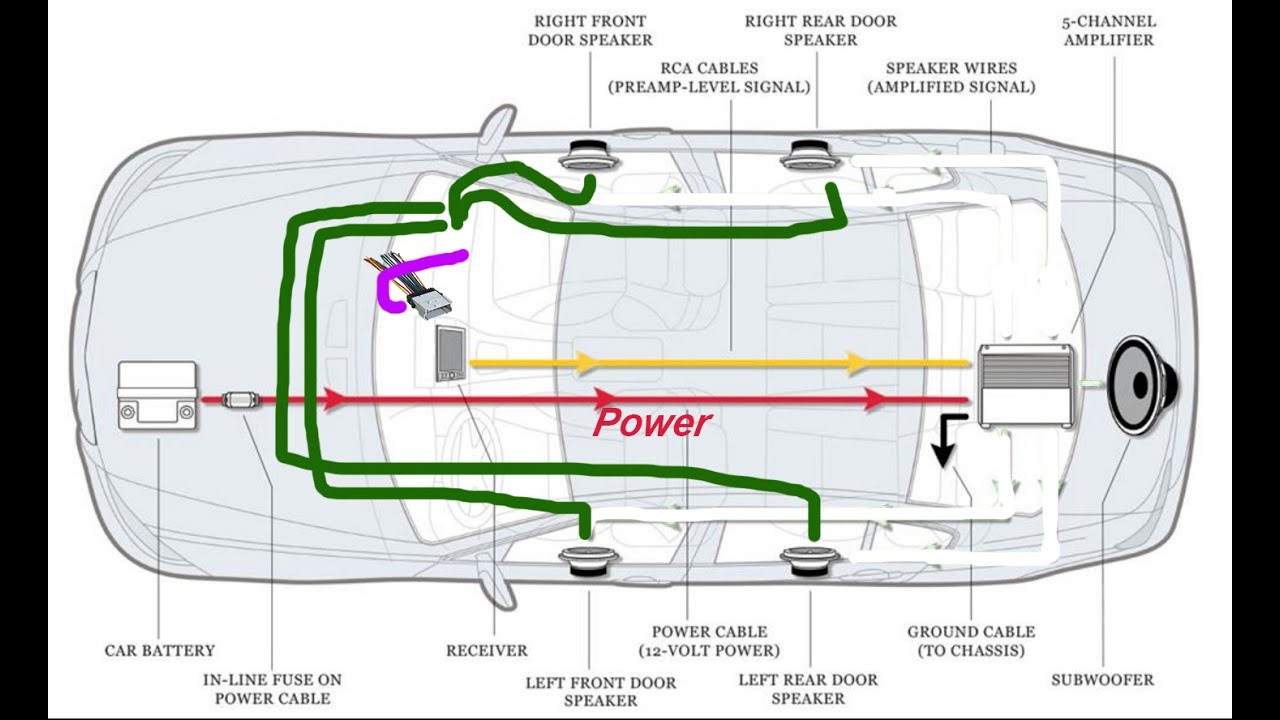
Typical Wiring Layout
Here’s a quick summary of how all connections fit together:
| Wire Type | From | To |
|---|---|---|
| Power (+12V) | Battery | Amp |
| Ground | Car chassis | Amp |
| Remote turn-on | Stereo | Amp |
| RCA (audio) | Stereo | Amp |
| Speaker wire | Amp | Speakers (doors) |
Non-obvious insight: Always disconnect the car battery before starting any wiring. This prevents accidental shorts and protects electronics.
Setting Up And Testing The System
After wiring everything, it’s time to check your work.
- Reconnect the car battery.
- Turn on the stereo. The amp’s power light should come on.
- Play music at low volume.
- Listen to each door speaker—check for clean sound and balanced volume.
- If you hear noise or distortion, double-check all connections.
Tuning Your Amp
Most amps have simple adjustments:
- Gain: Controls input sensitivity. Set it low, then adjust up until the sound is clean and loud.
- High-pass filter: Blocks bass below a set frequency (usually set at 80 Hz for door speakers).
- Bass boost: Use sparingly to avoid distortion.
Example: If your speakers are rated for 50W RMS, set the amp gain so you don’t exceed this power level.
Helpful tip: Use a test tone (like 1 kHz sine wave) to set gain for best results.
Credit: www.crutchfield.com
Troubleshooting Common Problems
Wiring mistakes are common for beginners. Here’s how to fix the most frequent issues.
No Sound From One Speaker
- Check for loose or reversed wires.
- Test with a multimeter for voltage at the speaker.
Engine Noise (whine)
- Re-route RCA cables away from power wires.
- Check for a solid ground connection.
Amp Does Not Turn On
- Verify power and remote wires with a multimeter.
- Make sure the fuse is not blown.
Sound Cuts Out At High Volume
- Check for loose speaker wires.
- Make sure the amp isn’t overheating or going into protect mode.
Pro insight: Don’t ignore small problems. A buzzing speaker or hot amp can signal bigger issues.
Example: 4-door Sedan Speaker Wiring
Let’s see a practical example for a typical mid-size sedan:
- Amp location: Trunk
- Speakers: 4 door speakers (front left, front right, rear left, rear right)
- Wire runs: Each speaker wire averages 15 feet from amp to door.
Total wire needed: 4 speakers x 2 wires x 15 feet = 120 feet (always buy extra)
Typical wiring kit size: 8 gauge power wire, 16 gauge speaker wire
Time required: 4–6 hours for first-time installers
Cost range: $120–$300 for amp, wire kit, and connectors (not including speakers)
Door Speaker And Amp Matching Table
Matching your speakers and amp is important for both safety and performance. Here’s a quick reference:
| Speaker Rating (RMS) | Amp Channel RMS (per channel) | Ohm Rating | Safe Setup? |
|---|---|---|---|
| 30W | 20–40W | 4Ω | Yes |
| 50W | 40–60W | 4Ω | Yes |
| 75W | 60–90W | 4Ω | Yes |
| 50W | 100+W | 4Ω | No (Overpower) |
Non-obvious tip: Never connect speakers rated for less power than your amp can output. This can damage the speakers.
Mistakes Beginners Often Make
- Using too thin speaker wire: Thicker (lower gauge) wire reduces power loss and improves sound.
- Skipping the fuse: Always protect the power wire with a fuse near the battery.
- Not grounding properly: Poor ground causes noise and amp shutdowns.
- Crossing RCA and power wires: This introduces noise into your system.
- Reversing polarity: If speakers are “out of phase,” bass will sound weak or hollow.
Pro tip: Double-check every connection before powering on the amp.

Credit: soundcertified.com
Extra Tips For A Clean Install
- Use zip ties to bundle wires neatly.
- Add sound deadening to doors for better bass.
- Test each speaker before reassembling door panels.
- Record your wire layout for future upgrades.
A little extra care during installation pays off with fewer problems and better sound.
Frequently Asked Questions
How Do I Know Which Wire Is Positive Or Negative For My Door Speakers?
Most speaker wire uses color coding: solid color is positive, striped or black is negative. When in doubt, use a multimeter or check the amp and speaker manuals.
Can I Use Factory Speaker Wire With An Aftermarket Amp?
You can, but it’s not recommended. Factory wire is usually thin and may not handle more power. Running new, thicker wire gives the best sound and reliability.
What Gauge Speaker Wire Should I Use?
For most car door speakers, 16 gauge is good for runs up to 50 feet. Use 14 gauge for longer runs or more powerful systems.
Do I Need To Disconnect The Car Battery When Wiring Speakers To An Amp?
Yes. Always disconnect the negative battery terminal before starting. This prevents electrical shorts and protects you and your car’s electronics.
Where Can I Find A Detailed Wiring Diagram For My Car?
Check your vehicle’s service manual or a trusted site like Crutchfield for detailed diagrams.
Wiring your door speakers to an amp is a project that takes some time and attention to detail, but the results are worth it. With the right tools and careful planning, even beginners can enjoy a big upgrade in audio quality. Take your time, follow each step, and you’ll enjoy powerful, clear sound on every drive.