How to Bridge 4 Channel Amp: Unlock Maximum Audio Power
Bridging a 4 channel amplifier is one of the most effective ways to boost your car audio system’s power. It’s a popular upgrade for anyone who wants stronger bass or clearer sound from their speakers or subwoofers. Many beginners feel nervous about bridging because it involves wiring changes, but with some basic knowledge and careful steps, you can do it safely and correctly.
This article explains everything you need to know about how to bridge a 4 channel amp. You’ll learn what bridging means, why it’s useful, and exactly how to do it. There are also practical tables, detailed examples, and answers to the most common questions. Whether you want to power a subwoofer or just get more from your car speakers, you’ll find all the information you need here.
What Does Bridging An Amp Mean?
Bridging an amplifier means combining two channels into one. This process doubles the power output sent to a single speaker or subwoofer. Bridging is possible because most amps use a design that allows two channels to share their output voltage.
Key points to understand:
- One speaker gets more power by using two channels together.
- Bridging does not double the total power of the amplifier, but it increases the power for one output.
- Common for subwoofers or when you want to run two powerful speakers.
Example:
If your amp provides 50 watts per channel (x4 channels), bridging two channels can give around 150 watts to one speaker (the exact number depends on your amp’s design).
Why Bridge A 4 Channel Amp?
There are several reasons car audio enthusiasts bridge amps:
- More power for subwoofers: Subwoofers need more power than regular speakers.
- Better sound quality: More power means less distortion and cleaner sound.
- Flexible setup: You can run two speakers with high power instead of four with lower power.
- Cost-effective: You get more out of your existing amplifier without buying a new one.
Some people bridge their amp to run one or two subwoofers, while others do it to power high-end speakers. Always check your amp’s manual before bridging—some amps are not bridgeable.
The Basics: How A 4 Channel Amp Works
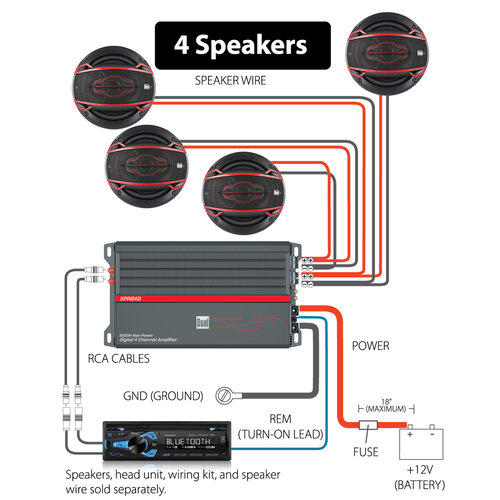
A 4 channel amplifier has four separate outputs. Normally, you would connect four speakers—one to each channel.
Standard wiring setup:
- Front Left
- Front Right
- Rear Left
- Rear Right
Bridging lets you combine these channels, so you use two channels for one speaker. You can bridge a 4 channel amp in two main ways:
- Bridge two channels: Power one subwoofer with two channels, and use the other two channels for regular speakers.
- Bridge all four channels: Power two subwoofers or two powerful speakers (each with two channels).
Common 4 Channel Amp Bridging Configurations
There are four main ways people bridge a 4 channel amplifier. Each setup has its pros, cons, and best use cases.
1. Bridging One Subwoofer (2 Channels Bridged)
This is the most popular beginner setup. You use two channels (for example, channels 3 and 4) bridged together to power a single subwoofer. The other two channels power your front speakers.
How it works:
- Channels 1 & 2: Regular speakers (left and right)
- Channels 3 & 4 (bridged): One subwoofer
Wiring steps:
- Identify which channels you will bridge (check amp manual).
- Connect the positive wire of the subwoofer to the positive terminal of channel 3.
- Connect the negative wire of the subwoofer to the negative terminal of channel 4.
- Leave the unused positive and negative terminals empty.
Practical example:
If each channel gives 60W RMS at 4 ohms, bridging channels 3 & 4 can give 180W RMS at 4 ohms to your subwoofer.
Benefits:
- Great for boosting bass
- Keeps front speakers powered
- Simple wiring
Caution:
Never connect a speaker with a lower impedance than your amp supports when bridged. Most amps can handle 4 ohms bridged, but not 2 ohms.
2. Bridging Two Subwoofers (all 4 Channels Bridged)
This setup is for those who want serious bass with two subwoofers.
How it works:
- Channels 1 & 2 (bridged): First subwoofer
- Channels 3 & 4 (bridged): Second subwoofer
Wiring steps:
- Bridge channels 1 & 2 for subwoofer 1.
- Bridge channels 3 & 4 for subwoofer 2.
- Connect each subwoofer as in the first example.
Practical example:
If your amp gives 75W per channel at 4 ohms, bridging gives about 220W per subwoofer.
Benefits:
- Maximum bass output
- Good for big car audio setups
Limitations:
- No power for regular speakers (unless you have a separate amp)
- Requires careful speaker matching
3. Bridging Two High-power Speakers (front Or Rear)
Some users bridge their amp to power two high-quality main speakers instead of subwoofers. This is common if you want loud, clear sound in the front or rear of your car.
How it works:
- Channels 1 & 2 (bridged): High-power left speaker
- Channels 3 & 4 (bridged): High-power right speaker
Wiring steps:
- Same as above, but connect full-range speakers instead of subwoofers.
Example:
Bridged output is ideal for component speakers that handle high wattage.
Benefits:
- Superior sound quality for two main speakers
- Best for people who want music clarity, not just bass
Downside:
You lose the ability to run four separate speakers from this amp.
4. Mixed Bridging: One Subwoofer And Two Speakers
This advanced setup uses three channels: two bridged for a subwoofer, and the other two for separate speakers.
How it works:
- Channels 3 & 4 (bridged): Subwoofer
- Channels 1 & 2: Front left and right speakers
Wiring steps:
- Bridge channels 3 & 4 for the subwoofer.
- Connect speakers to channels 1 and 2 as normal.
Benefits:
- Balanced sound (powerful bass + front clarity)
- Popular in many car audio upgrades
Limitation:
Rear speakers are not powered in this setup (unless you use a second amp).
Step-by-step Guide: How To Bridge A 4 Channel Amp
Bridging is easy with the right information. Here’s a practical, beginner-friendly process.
- Read Your Amp Manual
- Not all amps support bridging. The manual tells you if yours does.
- Look for diagrams or “bridged mode” instructions.
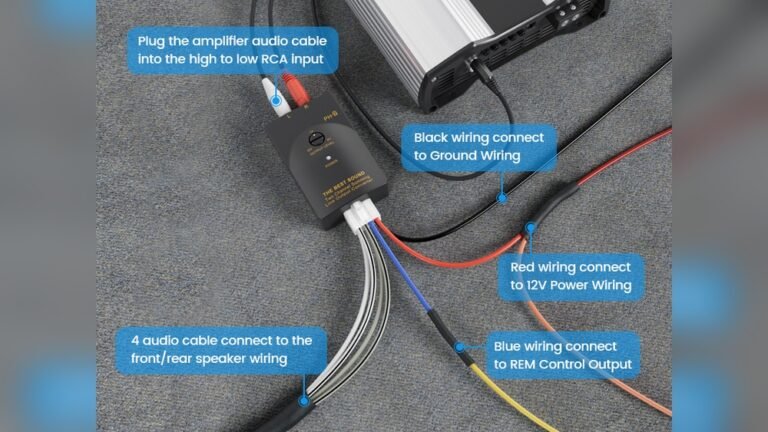
- Gather Tools
- Screwdriver
- Quality speaker wire
- Wire strippers
- Electrical tape
- Turn Off Power
- Disconnect the car’s battery to prevent shocks.
- Identify the Right Terminals
- Bridged mode uses one positive from one channel, one negative from another.
- Example: Use the positive from channel 1 and negative from channel 2.
- Connect Speaker Wires
- For a subwoofer: Connect positive wire to bridged positive terminal, negative wire to bridged negative terminal.
- Check Impedance
- Most 4 channel amps handle 4 ohms in bridged mode.
- Do not use 2 ohm speakers unless your amp clearly supports it.
- Secure Connections
- Tighten all screws and ensure no bare wires touch metal parts.
- Test the Setup
- Reconnect battery, turn on amp, and play music at low volume.
- Listen for distortion, rattling, or abnormal heat.
- Adjust Gain and Settings
- Set the amp gain to match your system. Too high can cause damage.
Tip: If your amp gets hot or shuts off, you may have a wiring or impedance problem.
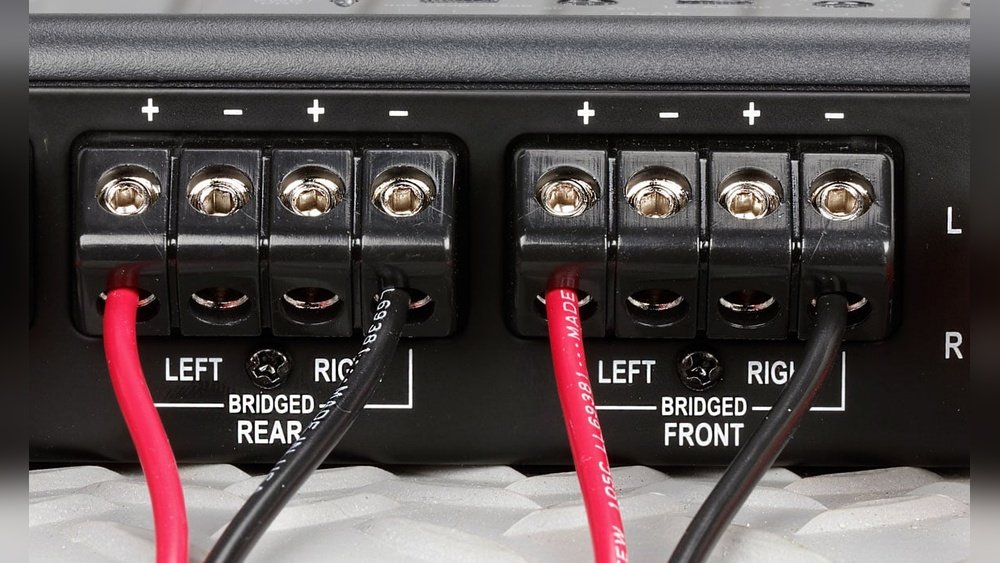
Example Wiring Diagram
Here’s a simple example for bridging channels 3 and 4 for a subwoofer:
- Subwoofer positive wire: Connect to channel 3 positive terminal
- Subwoofer negative wire: Connect to channel 4 negative terminal
- Leave the other terminals empty
Double-check your amp’s manual for exact terminal locations—some brands use different layouts.
Comparison: Bridged Vs. Standard Wiring
To help you see the difference, here’s a quick comparison.
| Setup Type | Number of Speakers | Power per Speaker | Best For |
|---|---|---|---|
| Standard (Unbridged) | 4 | 40-75W RMS (typical) | Full car sound |
| Bridged (2 channels) | 1 subwoofer + 2 speakers | 160-300W RMS (subwoofer) | Strong bass + front sound |
| Bridged (4 channels) | 2 subwoofers | 160-300W RMS (each) | Maximum bass |
Key Factors To Check Before Bridging
Before you start, check these important points to avoid damaging your amp or speakers:
- Amp Compatibility: Not all amps can be bridged. Confirm with the manual.
- Speaker Impedance: Most amps require 4 ohm speakers when bridged.
- Wattage Handling: Your speakers or subwoofers must handle the increased power.
- Proper Wiring: Use high-quality wires, and keep connections tight and safe.
Common mistake: Using a speaker that’s too low in impedance (like 2 ohms) can overheat and damage your amp.

Credit: audiocontrol.com
Data Table: Example Wattage Output
Here’s an example of how power output changes when bridging.
| Mode | Per Channel Power (4Ω) | Bridged Power (4Ω) | Total Power Output |
|---|---|---|---|
| Standard | 60W RMS x4 | — | 240W RMS |
| Bridged | — | 180W RMS x2 | 360W RMS |
Insight: While the per-channel power increases, the total output may not double. This is because amps have a maximum total wattage.
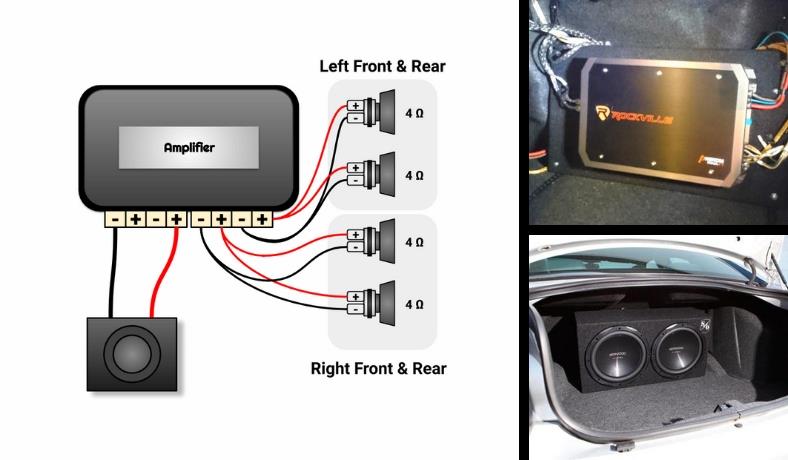
Real-world Example: Bridging For Better Bass
Let’s say you have a basic 4 channel amp (50W x 4 @ 4 ohms). You want to add a subwoofer.
- Bridge channels 3 & 4 for the subwoofer.
- Connect your front left/right speakers to channels 1 & 2.
- Now, your subwoofer gets around 150W RMS instead of just 50W RMS. The bass becomes much louder and cleaner.
This is why many car audio fans choose bridging for subwoofers.
Credit: soundcertified.com
Two Insights Most Beginners Miss
1. Bridging Reduces Available Channels
Many people think they can run four speakers and a bridged subwoofer from a 4 channel amp. In reality, bridging uses up two channels for each speaker or subwoofer. Plan your system so you don’t lose sound in other areas.
2. Not All Amps Are Bridgeable
Some cheaper or older amps do not allow bridging. Always check your amp’s manual and look for “bridgeable” or a bridging diagram before rewiring.
Practical Tips For Safe Bridging
- Use thick, quality speaker wire (at least 16 gauge).
- Double-check polarity—incorrect wiring can cause phase issues.
- Start at low volume after wiring to test for issues.
- Avoid bridging if your amp or speakers are not rated for it.
Mistakes To Avoid
- Using 2 ohm speakers in bridged mode (unless amp supports it)
- Forgetting to disconnect the battery during wiring
- Setting gain too high after bridging
- Not tightening connections (can cause rattling or short circuits)
When Not To Bridge
- If you need four separate speakers for full car sound.
- If your amp gets too hot in bridged mode.
- If your speakers cannot handle the extra power.
In these cases, consider upgrading your amp or adding a second amplifier.
Credit: www.dualav.com
Extra Resource
For more technical details about amplifier bridging, visit the Wikipedia Bridge Tied Load page.
Frequently Asked Questions
How Do I Know If My Amp Can Be Bridged?
Check your amp’s manual or look for “bridgeable” markings near the speaker terminals. Most modern 4 channel amps are bridgeable, but some are not.
Can I Bridge All Four Channels To One Subwoofer?
No. Bridging combines two channels for one output. You cannot safely combine all four channels into one unless your amp is specifically designed for that (very rare).
What Happens If I Bridge To A 2 Ohm Speaker?
Most 4 channel amps are not stable at 2 ohms in bridged mode. This can cause overheating, distortion, or even permanent damage to your amp.
Why Does My Amp Shut Off After Bridging?
Possible reasons include incorrect wiring, speaker impedance too low, or amp overheating. Double-check your setup, and make sure your speakers match your amp’s requirements.
Is Bridging Better Than Buying A More Powerful Amp?
Bridging is a cost-effective way to increase power, but if you need to power many speakers or want extreme volume, a bigger amp or extra amp is often better.
Bridging a 4 channel amp can transform your car audio experience, giving you more power and better sound from your system. With the right information and careful setup, you can enjoy louder, cleaner music or deep bass without spending a fortune.
Just remember to check your amp’s compatibility, use quality wiring, and always match your speakers’ impedance. With these tips and the step-by-step guide above, you’re ready to bridge your amp and enjoy your upgraded sound system.