How to Wire Dvc 4 Ohm Sub for Maximum Bass Performance
Wiring a DVC 4 Ohm subwoofer can seem confusing, especially for beginners. But with the right steps, clear instructions, and practical examples, you can achieve the best sound for your car or home audio system. This guide explains how to wire a Dual Voice Coil (DVC) 4 Ohm subwoofer in four common ways. You’ll learn the basics, see real data, and avoid common mistakes. Whether you want deeper bass, louder sound, or safer operation, you’ll find everything you need in easy-to-understand language.
Understanding Dvc 4 Ohm Subwoofers
A DVC (Dual Voice Coil) subwoofer has two separate voice coils. Each coil has its own terminals. A 4 Ohm DVC sub means each coil has a resistance of 4 Ohms.
Why Does This Matter?
- You can wire the coils in different ways to get different impedance.
- This affects how much power your amp delivers and how your sub sounds.
- Choosing the right wiring protects your equipment and gives better sound.
Most car audio setups use DVC subs because they offer more flexibility. For beginners, it’s important to understand that wiring changes the load (Ohms) seen by your amplifier. If you wire incorrectly, you can damage your amp or subwoofer.
Four Common Wiring Methods For Dvc 4 Ohm Subs
There are four main ways to wire a DVC 4 Ohm subwoofer. Each method changes the final impedance and works best in certain situations. Below, we cover each method step-by-step, with practical data and examples.
1. Series Wiring
Series wiring connects the two voice coils in a chain. The positive terminal of coil one connects to the amplifier. The negative terminal of coil one connects to the positive terminal of coil two. The negative terminal of coil two connects back to the amplifier.
How Does It Work?
- Final impedance = 4 Ohms + 4 Ohms = 8 Ohms
- Good for: Matching high-impedance amps, safer operation
Steps:
- Connect amp’s positive wire to coil 1’s positive terminal.
- Connect coil 1’s negative terminal to coil 2’s positive terminal.
- Connect coil 2’s negative terminal to amp’s negative wire.
Example:
If your amp is rated for 8 Ohms, this is the best method. You get less power, but it’s safer and reduces distortion.
Data:
Most amps deliver about half the power at 8 Ohms compared to 4 Ohms. For example, a 400W amp at 4 Ohms may give 200W at 8 Ohms.
Common mistake:
Don’t mix up the terminals. Double-check before powering on.
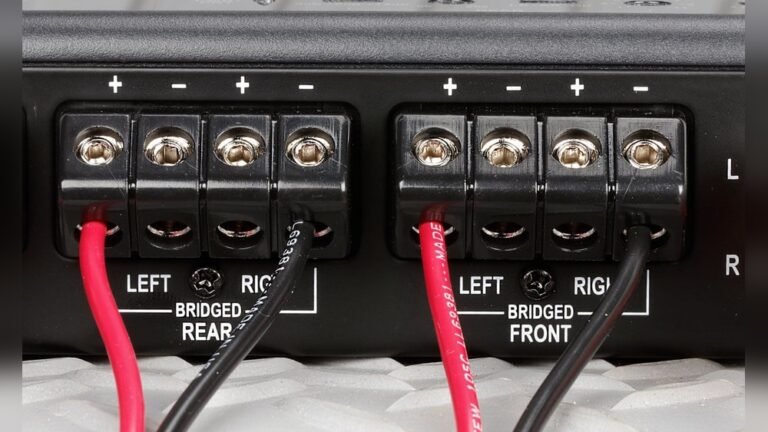
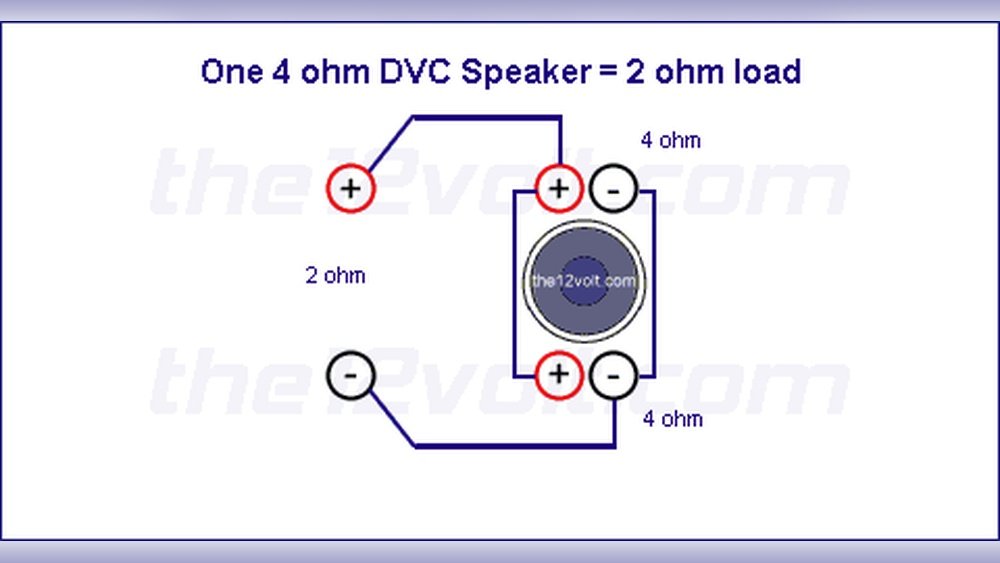
2. Parallel Wiring
Parallel wiring combines both coils so the amp sees a lower impedance. Both positive terminals go to the amp’s positive wire. Both negative terminals go to the amp’s negative wire.
How Does It Work?
- Final impedance = (4 Ohms x 4 Ohms) / (4 Ohms + 4 Ohms) = 2 Ohms
- Good for: Getting more power from amps rated for low impedance
Steps:
- Connect both coil positives to amp’s positive wire.
- Connect both coil negatives to amp’s negative wire.
Example:
If your amp is stable at 2 Ohms, this setup gives more bass and volume.
Data:
A 400W amp at 4 Ohms may deliver 700–800W at 2 Ohms (check amp specs).
Common mistake:
Never use parallel wiring with amps not rated for 2 Ohms. This can overheat or damage the amp.
3. Independent Wiring
Independent wiring sends each coil to its own channel on a multi-channel amplifier. Each coil stays at 4 Ohms, and the amp channels work separately.
How Does It Work?
- Final impedance per channel = 4 Ohms
- Good for: Using two channels of a stereo amp, or matching amp specs
Steps:
- Connect coil 1’s terminals to amp channel 1 (positive to positive, negative to negative).
- Connect coil 2’s terminals to amp channel 2 (positive to positive, negative to negative).
Example:
If you have a 2-channel amp, wire each coil to its own channel. This is rare but sometimes useful for custom setups.
Data:
Each channel sends power independently. If your amp gives 200W per channel, each coil gets 200W.
Common mistake:
Don’t bridge the amp unless it’s designed for it. Always check amp manual for safe wiring.
4. Series-parallel Wiring (for Multiple Subs)
When you wire multiple DVC 4 Ohm subs, you can use series-parallel wiring to balance impedance and power. This method is popular for two or more subs.
How Does It Work?
- Each sub’s coils are wired in series (8 Ohms per sub).
- Then, wire all subs in parallel to the amp.
- Final impedance depends on the number of subs.
Steps (for two subs):
- Wire each sub’s coils in series (see Series Wiring above).
- Connect both subs’ positive terminals to amp’s positive wire.
- Connect both subs’ negative terminals to amp’s negative wire.
Example:
Two DVC 4 Ohm subs wired this way give a final impedance of 4 Ohms.
Data:
Here’s a practical comparison for two subs:
| Wiring Method | Number of Subs | Final Impedance | Recommended Amp |
|---|---|---|---|
| Series-Parallel | 2 | 4 Ohms | 4 Ohm Stable |
| Series | 2 | 16 Ohms | High Impedance |
| Parallel | 2 | 1 Ohm | 1 Ohm Stable |
Common mistake:
Don’t wire multiple subs without checking amp specs. Too low impedance can burn your amp.

Credit: www.reddit.com
Practical Tips For Safe Wiring
Wiring subs is not just about connecting wires. Small mistakes can cause big problems.
- Check amp specs: Always make sure your amp can handle the final impedance.
- Use thick wires: For subwoofers, 12–16 gauge wire is best.
- Secure connections: Loose wires cause poor sound or damage.
- Label terminals: Mark positives and negatives to avoid confusion.
Example:
If your amp can’t handle 2 Ohms, use series wiring for 8 Ohms. If you want louder bass and your amp is 2 Ohm stable, use parallel wiring.
Wiring Dvc 4 Ohm Sub: Visual Comparison
To help you choose, here’s a simple comparison of the four methods:
| Method | Final Impedance | Power Output | Best Use |
|---|---|---|---|
| Series | 8 Ohms | Lower | Safe, older amps |
| Parallel | 2 Ohms | Higher | Modern, high-power amps |
| Independent | 4 Ohms per coil | Balanced | Multi-channel amps |
| Series-Parallel | Depends on subs | Balanced | Multiple subs |
Non-obvious insight:
Many beginners think more subs always mean louder sound. But wiring wrong can actually make your system quieter or damage your amp. Always check the final impedance.
Real-world Example: Wiring One Dvc 4 Ohm Sub
Let’s say you have a single DVC 4 Ohm sub and a mono amp rated for 2 Ohms.
- Use parallel wiring.
- Connect both positive terminals to amp’s positive.
- Connect both negative terminals to amp’s negative.
- Final load: 2 Ohms.
- The amp delivers maximum safe power.
If your amp is not stable at 2 Ohms, use series wiring.
Pro tip:
Take a picture of your wiring before closing the box. This helps if you need to troubleshoot later.
Why Impedance Matters
Impedance controls how much power the subwoofer receives. Too low, and the amp overheats. Too high, and the sub is quiet.
- Most car amps are 2 Ohm stable. Home amps are often 4 or 8 Ohm stable.
- If unsure, choose higher impedance for safety.
- Always check your amp’s manual.
Choosing The Right Wiring For Your Needs
Ask yourself:
- What is my amp’s lowest safe impedance?
- Do I want louder bass or safer operation?
- Am I wiring one sub or many?
Beginner mistake:
Beginners often ignore amp specs. This can cause expensive damage. Always match wiring to your amp.
Example:
If your amp says “Minimum impedance: 2 Ohms”, don’t wire below 2 Ohms. If you have two subs and want the amp to see 4 Ohms, use series-parallel wiring.
Wiring Multiple Dvc 4 Ohm Subs
If you have two DVC 4 Ohm subs, you can wire them in several ways:
- Series: Each sub in series (8 Ohms), both subs in series (16 Ohms total).
- Parallel: Each sub in parallel (2 Ohms), both subs in parallel (1 Ohm total).
- Series-parallel: Each sub in series (8 Ohms), both subs in parallel (4 Ohms total).
Data comparison:
| Subs | Coil Wiring | Final Impedance | Amp Type |
|---|---|---|---|
| 2 | Series-parallel | 4 Ohms | 4 Ohm Stable |
| 2 | Parallel | 1 Ohm | 1 Ohm Stable |
| 2 | Series | 16 Ohms | High Impedance |
Non-obvious insight:
Wiring to 1 Ohm is risky. Only use this if your amp is specifically rated for 1 Ohm loads.
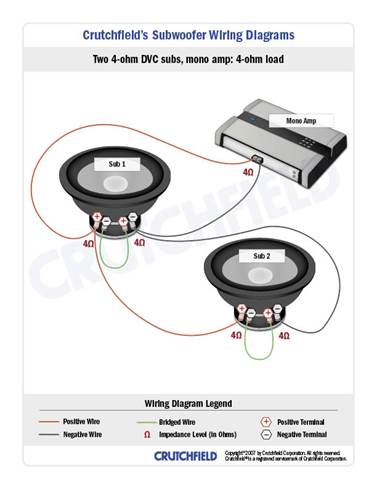
Credit: www.crutchfield.com
Troubleshooting Common Problems
If you get poor bass, distortion, or your amp shuts down, check:
- Are all wires tight and clean?
- Did you mix up positives and negatives?
- Is your amp rated for your final impedance?
- Did you use the correct wire gauge?
Example:
If you hear buzzing, check for loose wires. If the amp overheats, check if you wired below its rated impedance.
Safety Tips
- Always disconnect power before wiring.
- Use insulated tools.
- Test wiring with a multimeter before powering on.
- Don’t guess—always follow diagrams.
For safe, clear diagrams and extra tips, check Crutchfield.

Credit: soundcertified.com
Frequently Asked Questions
What Is A Dvc 4 Ohm Subwoofer?
A DVC 4 Ohm subwoofer has two voice coils, each with 4 Ohms resistance. This allows flexible wiring for different amps and setups.
Which Wiring Method Gives The Most Bass?
Parallel wiring gives the lowest impedance (2 Ohms), sending more power to the sub. But your amp must be stable at 2 Ohms.
Can I Wire A Dvc 4 Ohm Sub To A 4 Ohm Amp?
Yes. Use series-parallel wiring if you have two subs, or independent wiring if your amp has two channels.
What Happens If I Wire Incorrectly?
Wrong wiring can cause poor sound, distortion, or even damage your amp and subwoofer. Always check your final impedance.
Is Wiring Multiple Dvc Subs Safe?
It’s safe if you match the final impedance to your amp’s rating. For two subs, series-parallel wiring is usually best.
Wiring a DVC 4 Ohm subwoofer is easy with clear steps and the right knowledge. Always check your amp’s specs, use proper wire, and double-check connections. With the four wiring methods explained here, you can build a powerful, safe audio system that matches your needs.
Avoid shortcuts, and your sound will be loud, clear, and reliable.